
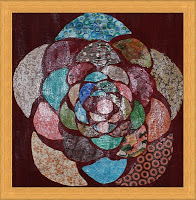
Here is a coiled magazine page heart dish with lid, since you all loved the dish with lid I showed you here. It is less time consuming than the first dish, but if you don’t have your strips folded and ready to go, I wouldn’t count on this being ready by Christmas!
Here is where I showed you how to fold the strips. Since that time, I have made my strips slightly differently. I start with 1/4 of a magazine page (using my paper cutter, I cut a stack of pages into quaters lengthwise) and dip them in 2 parts elmers glue, 1 part water, clipping them on a line to dry for a day or 2. Then when I am ready to use them in a project, I spritz them with a little water. This makes thinner strips that don’t rip and lend to beautiful, neat final projects.
To begin:
 Continue in this manner, gluing every inch or so, abutting new strips to the end of the previous one to keep going when your come to the end of a strip. Eventually this heart shape will form.


When the base of the heart is the size you want (mine is about 3.25 inches at its widest) you are ready to start building up and out for the sides of the dish. To do so, glue the next strip so that its bottom half is adhered to the top half of the strip you are attaching it to. Go all the way around, and when you get back to the where you started, cut the end of the current strip so that it lines up with the beginning of the first strip on this level. Continue in that manner until the dish is as tall as you want.

 To construct the lid, you do pretty much the same thing. When the lid is just smaller than the base, use strips twice the width of the onces you have been using (i.e. folded one less time) to go around the perimeter of the lid. This creates the lip you see, to hold the lid in place on the base. Go around with your regular strips once or twice after this to complete the lid.

To ensure durability of the project you have spent so much time creating, coat 3 times with finish of your choice. I used mod podge matte finish. That is it!! Enjoy.


I made some bowls using this technique a long time ago. I love this heart dish. Thank you for sharing xo
that is so awesome, love the idea of recycling, very creative!!!!
And yet… you’ve done it again! This is so amazing!!!
I’m definitely going to have to try this! I have more than enough things to put in it already.
Thanks so much for sharing.
Waooo..simply Superb! Love it 🙂
I LOVE these – so pretty! I totally want to try out your Elmer’s and clothesline plan so that I can make magazine bowls and dishes that look as nice and pretty as yours! Gorgeous – thanks for sharing! : )
-Mel the Crafty Scientist
congratulations! it is really beautyful I would like link to your site if you want :).
Seriously cool. This looks fun and easy. I’m gonna earn some major points with the girlfriend with this one, or maybe make a date of it and make them together 🙂
GREAT creative idea.
very cute! I don’t think I have the patience. 🙂
gail
Fantastic idea! I’ve got a ton of magazines laying around too!
Hi, this is a beautiful project which I’m looking forward to trying! Just wondering, roughly how many strips do you need to make one box?
Thanks!
[…] it lovely? Check out how it’s assembled at Saved By Love Creations. Chapter: DIY + tutorials ✼ Comments (0) […]
[…] Photo by Johnnie from Saved By Love Creations […]
[…] Photo by Johnnie from Saved By Love Creations […]
[…] https://savedbylovecreations.com/2011/12/heart-dish-from-magazine-pages.html […]