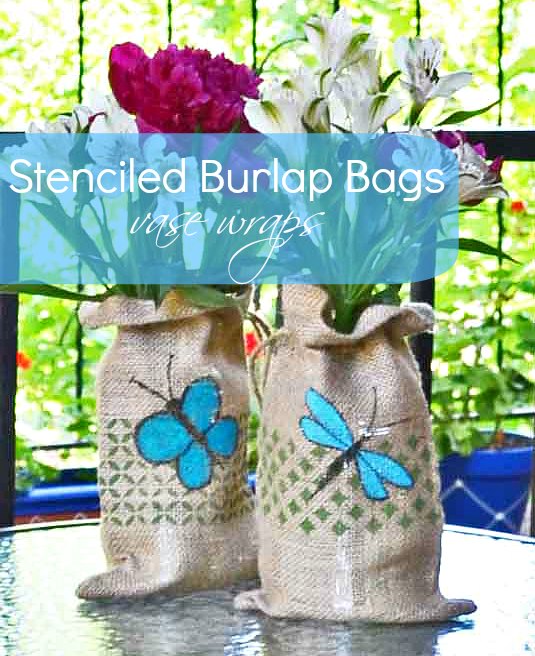
Stenciled Burlap Bags Vase Wraps

[pinit]Stenciled-Burlap-Bags-DIY @savedbyloves[pinit]

Hello! It’s Colleen and I’m back with a fun paint craft today. Are you a fan of burlap like I am? I saw these little burlap bags in that store that starts with Wal and ends with Mart and couldn’t resist them. A set of 3 for under $3? Oh yeah. I would’ve bought more but I had no idea what I was going to do with them.

They’re not quite large enough for wine bottles so that was out. They’d make cute party favors but I’m not throwing any parties. And I simply couldn’t wait for the holidays – although I did buy another set so I’d have them for Christmas presents.

They are the perfect size for canning jars. But who wants to cover up Mason jars, even with burlap? I just grabbed some regular ol’ jars, filled them with water, slipped them inside the burlap bags and made a cute burlap vase!

However the only thing cuter than burlap is painted burlap so let’s paint!
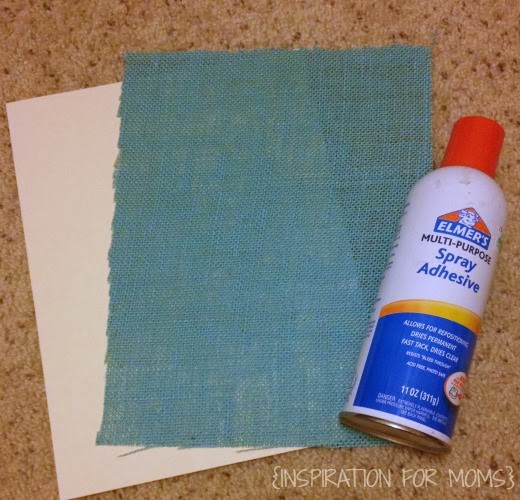
Stenciled-Burlap-Bags

Supplies:

  • Burlap Bags (available at Walmart and craft stores)
  • Mod Podge peel ‘n stick stencils
  • Sharpie marker
  • Stencil Pouncer or foam brush
  • #8 paint brush
  • piece of cardboard to fit inside the bag
  • painter’s tape (optional)
  • wax paper (optional)

Paint:

  • Folk Art Calypso Sky (for the dragonfly)
  • Folk Art Fresh Cut Grass
  • Folk Art Aqua (for the butterfly)

Stenciled-Burlap-Bags

We’re going to start with stenciling the bags. Usually stenciling burlap is tricky because of the weave and the nubbiness. But Mod Podge just came out with a line of stencils that are self-adhesive that I just love.

Stenciled-Burlap-Bags

These stencils adhere pretty well to the burlap but I found if you lay a piece of wax paper underneath the bag, when you lay the stencil over it, the edges will grab the wax paper and anchor the stencil so it won’t move. I also put some painter’s tape on both sides but that was to protect the burlap from over-stenciling.

Stenciled-Burlap-Bags

After your stencil is placed, load your pouncer or foam brush with the green paint. Then tap it a few times on a paper towel or on your palette plate to ‘off-load’ some of the excess paint. This helps to prevent bleed-thru under the stencil.

Stenciled-Burlap-Bags

Pounce in an up and down motion, making sure you have full coverage with the paint. Rather than pressing hard, tap lightly and repeat the application as needed. I found the coverage to be really good and only had to touch up a couple of areas with one application.

Stenciled-Burlap-Bags

While the paint is still wet, carefully lift the stencil off, place it on the wax paper and wipe the paint off of both sides with a damp paper towel. Even though these stencils are self-adhesive, you can reuse them over and over again. Once the stencil is clean, place it back onto the mylar strip it comes with.

Stenciled-Burlap-Bags

If you’re stenciling more than one bag, toss your foam pouncer (or brush) into a plastic baggy to keep it moist while you’re cleaning the stencil. If you put the foam into water, even with wringing it out thoroughly, you’ll still get an excess of air bubbles in the paint.

Stenciled Burlap Bags

Let the paint dry thoroughly and keep the cardboard inside the bag.

Now we’re going to draw a little dragonfly. If you don’t trust your freehand skills, you can grab a dragonfly pattern here that I drew. There is a butterfly pattern in there too. Since I draw a lot, I make quite a few patterns for my readers. But you can always find clip art on Google too or practice drawing your own. Yes! You can only get better, the more you practice!

draw dragonfly

Okay, to draw a simple dragonfly, start with a dot and a long oblong shape. That would be his head and his body.

Then draw two more elongated ovals, and then under those two more that are a little shorter.

Add a couple of antennae and you’ve just drawn a dragonfly!

Stenciled-Burlap-Bags

Fill in the wings with Calypso Sky using the #8 brush, or any other brush you have on hand.

Allow the paint to dry and then go back over the outline with the Sharpie.

Stenciled-Burlap-Bags

Next, go grab one of your clean jars and fill it with water.

Stenciled-Burlap-Bags

Now I’m gonna share a top secret florist trick! Just kidding. I was a florist but I used floral tape, not scotch tape. (works about the same though, ha!) Criss cross some tape over the mouth of the jar, creating a gridwork. Then gather your flowers in one hand and when you have them arranged how you want, wrap a twisty-tie around the stems. Place the stems thru the centermost opening in the tape grid.

Ta da! You can arrange flowers now!

Stenciled-Burlap-Bags

Then slip the jar with the flowers into your stenciled burlap bag.

Stenciled-Burlap-Bags

Isn’t this a cute way to use some plain ol’ jars? They’d make a pretty gift too!

What else would you use these bags for? I’d love to hear your ideas too!

Thanks so much for hanging out with me today! I hope you’ll come visit me at Just Paint It too. You can also find me on Facebook, Google+, Pinterest and Instagram. And of course, I’d love for you to drop by my Etsy and Zazzle stores.

I’ll see you next month!

signature

Make a Burlap Spring Wreath

Hi everyone! It’s Laura again from Inspiration for Moms.
Today is a beautiful day in Colorado.
The sun is out, the windows are open and the birds are chirping.
Spring is in the air!
So I though it would be the perfect time to make a Spring wreath for my front door.

[pinit]

DIY Spring Wreath with Burlap @savedbyloves

[pinit]

First you will need your choice of burlap and a floral wire wreath.
I was going to pick a green color but my son suggested the teal blue.
I think he has a good eye! 🙂
DIY Spring Wreath - Supplies
If you are intimated by those fancy looking burlap wreaths, don’t be!
I’m hear to tell you there as easy as a simple tuck and fluff!
The first step is to tie your burlap around a middle cross wire.
Then it’s time for step two, gently tuck the burlap
from behind the wreath and push it through the wire spacing to make a loop shape.
Work your way through all three rows.
DIY Spring Wreath - Step-by-Step
Now it’s time for step number three, fluff those loops.
Sounds really technical right?! 🙂
Once you have fluffed, continue on until you get to the next middle wire.
I try to pack as many loops in between the middle dividers
to make the burlap really secure which is step number four.
Continue your way around the wreath until completely covered.
Now it’s time to make the Spring banner.
I already had six burlap triangles but these can be found at most craft stores.
I wanted to add some chalkboard triangles for a little contrast.
I took some chalkboard tags from a previous craft project and cut them into triangles.
DIY Spring Wreath - Chalkboard Tags
I then hot glued my chalkboard cut outs onto the burlap triangles.
I added some white stickers to spell “Spring” and then hot glued
the banner together on some twine.
I had a burlap flower leftover from a previous project and thought
it would be a perfect accessory for this wreath.
You can never have too much burlap! 🙂
Now that my door is ready for Spring maybe the weather will cooperate too.
Hey there is only 9 more days until it’s officially Spring. Then it has to get warmer, right?!
Thanks for hanging out with me today and I can’t wait to see you again next month!
  Until then we can stay in touch by visiting Inspiration for Moms,

Want more?  Check out 50+ Burlap Crafts and Decor Ideas!

Burlap DIY Decor

How to Print on Burlap with Free Spring Printable and DIY

[pinit]DIY how to print on Burlap with free Printable wall art @savedbyloves[pinit]

Hi there everyone!
I’m so happy to be back chattin’ with you!
Do you love the look of burlap prints?
If you do, this is your lucky day because I’m going to teach you how
to make your very own right in the comfort of your home!
Honestly, this whole project took me less than 15 minutes to make
and I absolutely adore it!

SUPPLIES:

-burlap
-card stock
-scissors
-home printer
-spray adhesive

TUTORIAL:

DIY Burlap Printable-Supplies Needed

You first step is to cut your burlap to the same size as your card stock.
Spray the card stock with your adhesive and then apply your burlap on top.
 Press down and make sure that there are no lose ends.
How to print on burlap
Now it’s time to insert the burlap into the printer.
You want to make sure the burlap in on the side that will be printed on.
For my printer, I placed it in upside down.
(Please ignore the dust on my printer. Dusting is not my favorite activity!)
if I had a flower

If you would like to print my quote, 
just right click on the image below and save to your computer.
Printing on burlap at home
Then it’s time to print your design or quote.
 I chose this quote because I thought it was beautiful
and I knew I had the perfect burlap accessory to go along with it. 🙂
Now sit back and watch your fabulous art appear.
Burlap home decor
Once it’s done printing some tutorials may tell you to remove the card stock.
But I won’t. Nope.
I am going to use the card stock to give my burlap some support for when I frame it.
I didn’t want my printable behind glass because I wanted to accessorize
with some pretty burlap flowers.
So I placed the burlap print in the frame first and placed the glass behind.
To add my flowers, I simply used my glue gun.
And that was it.
Can you believe how easy that is?
I know right. I better go stock up on ink because I am going to be
a burlap printing fool!  🙂
 Are you addicted to burlap like I am?

I hope you enjoyed this easy burlap craft. 
If you would like to see more of my projects or keep up with my latest updates,
follow me on FacebookPinterestTwitterGoogle+ or Instagram.


Want more?  Check out 50+ Burlap Crafts and Decor Ideas!

Burlap DIY Decor

Privacy Policy