The 50 Best DIY Mirror Projects Ever Made

[pinit]

50 Best DIY Mirros Upcycled Recycled and Eco Friendly Decor with Mirrors @savedbyloves[pinit]

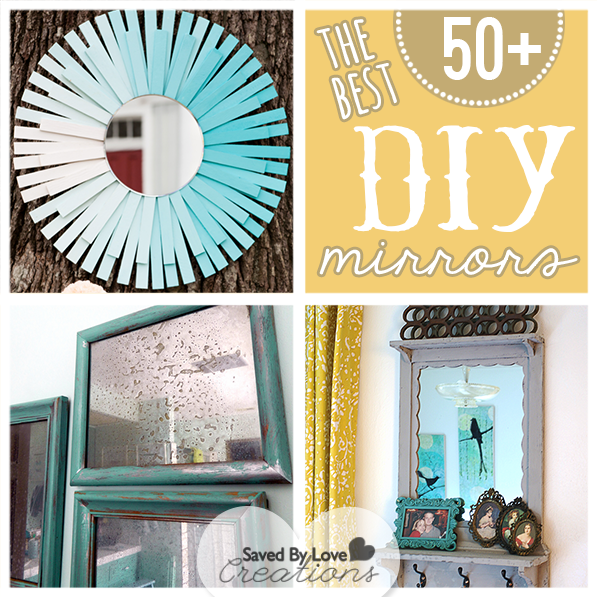
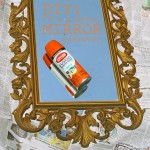
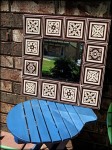
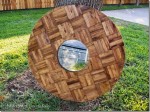
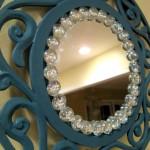
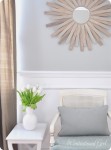
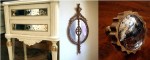
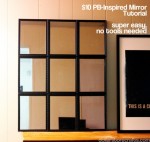
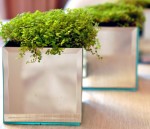
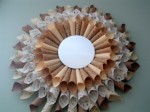
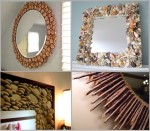
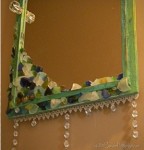
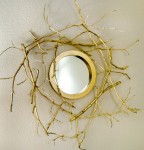
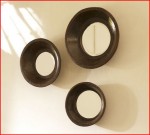
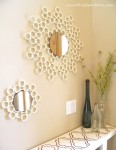
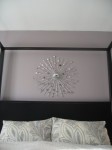
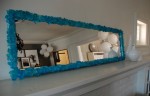
Have you ever been to a house with no mirrors? Yep, we all use them. Today I am sharing my favorite DIY mirrors, upcycles, hacks and revamps from the most creative people gracing the blog world.  You will be amazed.  It helps you look good, so help it do the same.  If breaking it brings bad luck, maybe beautifying it will land you that winning lottery ticket!  If not, you are left with a cool mirror that you made.  Everyone wins.  Enjoy!


Flea Market Vintage Table and Chairs Revamp

[pinit]Flea Market Vintage Table Makeover[pinit]

There’s not much better than a good flea market find revamping, which is what I am sharing with you today.  This fantastic formica topped, chrome legged vintage table cost a whopping $19 at a local flea market.  Why such a steal?  There was some work to be done to reveal the beauty you see before you!

Removing rust from metal table legs

This was the state of the legs to start.  I had never tried to remove rust from chrome.  Off to the hardware store I went.

How to Remove Rust from Chrome

I found this Rust Stain Remover by Whink.  It worked like a charm, and was just a few bucks.  I just wiped the legs to get rid of any loose dirt with a damp cloth.  I squirted a small amount of the Whink on the yellow side of the sponge, which I had dampened with water.  Wipe it on the legs and scrub with green scouring side.  Watch the rust vanish!

How to Get Rust off of Table Legs

I cleaned the top of the table with countertop cleaner and the table was good to go.  Now I needed seating.

Remove Seat Pads

I found these junky gold-ish metal chairs with perfect aqua, sparkly seat pads that would accent my red/aqua kitchen color scheme.  I decided to spray paint them to match the chrome table legs.  First step was removing the seat pads, which was simple with a pair of pliers.  Phew!

Rustoleum Metallic Spray Paint and Metal Primer

Now time to prime and paint.  I went with Clean Metal Primer and Metallic Silver Rustoleum Sprays.

Primer for Metal Chairs

I wiped the chairs down with a damp cloth and sprayed with primer.

How to Revamp Flea Market Chairs

After primer dried (about 15 minutes) I sprayed with the metallic silver, 3 light coats.  When that dried, I replaced the pads to finish.

Formica and Chrome Vintage Table Restoration

I am a little smitten on my flea market mix n’ match dinette set.  It is perfect in my new kitchen, with all of its vintage charm.  All off this cost about $60, spray paint included!  Never bypass a good deal because of rust, or the wrong color.  Use your imagination, and you can make it exactly what you want.

How to Distress Furniture With Vasoline

[pinit]Distressed Painted Table
[pinit]

Did you know that Vasoline petroleum jelly is a fantastic ingredient for distressing furniture?  It is true.  The technique is simple and fast.  Today I am sharing how I took this chevron painted table I shared with you in a previous tutorial, and used Vasoline to create a chippy, funky distressed piece to go with my new living room.

Distressed Furniture Tutorials

I needed a coffee table to go with my urban-modern-distressed-vintage-eclectic decor style in progress.  You will be seeing reveals as I decorate in my new home.  I am into yellow, gray, orange poppy, turqouise, emerald green, navy blue and vintage white these days.  My living room kinda has a little of all of these, with yellow, gray and turquoise dominating the stage.

Paint a Chevron Coffee Table with @DecoArt_Inc @savedbyloves

I revamped this roadside find last week, thinking it would be the perfect coffee table for the living room.  Well, it wasn’t.

Pantone Emerald Green Valspar

I decided to apply Vasoline to the areas of the table I wanted to look “chippy”, then paint with homemade chalk finish paint (see how to make chalk paint yourself in my barnwood frame tutorial).  Valspar’s Pantone Emerald was the perfect color!  I picked it up at Lowe’s.

Distressing Furniture Tutorial

Once the paint dried, I just took my scraper to the areas where I had applied the Vasoline and the it peeled right off, revealing the colors in the chevron stripes.  I love the effect!  It looks so cool with the random colors.

Martha Stewart Decoupage copyOnce I was happy with the amount of scraping, I sealed the piece with Martha Stewart’s Antique Finish Decoupage Medium.  It was my first time using the stuff and it gives a subtle warm antique feel to the piece.

Distressing a Table

Stay tuned for more DIY home decor as I settle into my new place!

New Americana Multi-Surface Satins & Stencils

[pinit]
Paint a Chevron Coffee Table with @DecoArt_Inc @savedbyloves

[pinit]

Have you seen the new Americana Multi-Surface Satins and Mixed Media Stencils yet?  I had a chance to try them out, so I used the opportunity to work some magic on a curbside find.  You are going to love not only the colors and stencil designs in this line, but the paint quality is outstanding to boot.  Today I am sharing how I created this modern chevron painted coffee table with my box of goodies!

DecoArt Americana Multi-Surface Satins and Mixed Media Stencils

SUPPLIES:

Americana Multi-Surface Satins

Americana Black Chalkboard Paint

Americana Mixed Media Stencils

Sponge Brushes

Painters Tape

Medium Grit Sand Paper

Coffee Table

DecoArt Americana Multi-Surface Satins and Mixed Media Stencils

TUTORIAL:

Table Makeover

Here is the curbside rescued table before any revamping.

Sanding a Table

I sanded with medium grit paper to give the paint surface something to grab.

Applying paint with a roller

I primered the table top rolled on Multi-Surface Satin color Dolphin.

How to Refinish a Table

I cut the segment of the stencil I wanted to use off of the main 12×12 inch sheet and taped it into place.

How to Stencil a Table

How to Paint Chevron on a Table

I worked my way down the table, using the sponge pouncer to apply the paint.  Coverage is fantastic.  I decided I wanted thicker chevron strips, so I taped off around the strips and filled in the space between them.

Sand Distress a Table

I continued on like this, using various colors of this fabulous paint.  I sand distressed lightly when I was finished.

Glue on Casters

The legs were cut off when I found the table and looked unfinished, so I glued on these caster cups I found at Lowe’s for $1-ish.

Painted Chevron Pattern

DecoArtStenciledTable

I painted the legs and lower part of table (including caster cups) with Americana chalkboard paint and a soft 1 inch paint brush.

DecoArt Multi-Surface Satin Paint Rebate

Americana Multi-Surface Satins are available for purchase at Michaels, A.C. Moore, Hobby Lobby, and other fine craft retailers.  Go get them now!

Find out more about them at DecoArt!

DISCLAIMER:  The paint and stencils mentioned in this post were provided to me by DecoArt.  All opinions are still 100% my own!

Spray Paint Lamp Makeover

[pinit]Spray Paint Lamp Makeover @savedbyloves[pinit]

One of the easiest, most inexpensive and foolproof ways to revamp a good thrift store find is with a little spray paint.  It has been awhile since I took advantage of this fact.  If you are like me, always getting tired of your decor and wanting to change things up without breaking the bank, a few bucks on a can of color is the way to go.

SUPPLIES:

Lamp that you are sick of

Krylon Dual (Paint and Primer in one) Spray Paint in choice of color – Gray

Painter’s Tape

TUTORIAL:

You can see in this Lamp Makeover Tutorial, that this is not the first go around for this particular lamp.

This was the original lamp I found for $1

How to Redo a Lamp with Spray Paint

Here she is now after a simple, quick coat of Krylon Dual.  That simple!

Coffee Table Revamp with CeCe Caldwell Paint & Recycled Gift Cards

[pinit]

Makeover a table with CeCe Caldwell Chalk and Clay Paint @savedbyloves http://wp.me/p1BUxN-2Qm[pinit]

I have been dying to share this project with you for-like-ever!  I had this table I wanted to paint with fabulous paint.  So, I contacted my good friend Debi from Debi’s Design Diary and ordered CeCe Caldwell Paints.  Nothing else was going to do for this table.  The stuff is wonderful.

One of the big things that sets CeCe Caldwell paint apart from other brands is that is is non-toxic, containing no VOC and all ingredients are listed on the label.  Many low volatile organic compound paint brands don’t list their ingredients because they are not required to do so.  Many low voc brands still contain lots of harsh chemicals.  You aren’t washing anything harmful down the drain and you don’t have to worry about paint fumes or using gloves when waxing.  That is a plus!

Remember when I revamped this little junky table?  It was the first time I had used CeCe’s product, and it was love at first brush stroke.  You can read all about it by clicking the image or link, but basically I had zero experience and getting the look I wanted was super simple.

Back to today’s project:


I found this thing roadside, brought it home and painted it with a quatrefoil design on top:

You can click the image or go to Martha Stewart Coffee Table Revamp to read about that project.

How to custom Cut a Table to fit a space

Not only did I want to paint the table, but I wanted it to fit in a spot that it turns out was about 5 inches to small for it.   See how it sticks over to the carpeted area where the arrow is pointing?  No good. That is when John and I decided to cut the table in half, remove 5 inches, and put it back together using the Kreg Jig.  Whaaaat?  I know.

How to Revamp a Coffee Table

We took the top off the table then marked a 2.5 inches on either side of the center.

How to Use a Circular Saw

Making a Custom Coffee Table

I used a circular saw and cut along the lines to remove the 5 inch segment.

How to Clamp Wood

I drilled pocket holes with my Kreg Jig (love you, Kreg Jig) and attached the two shortened table halves together with Kreg screws.

Using Kreg Jig to Join Wood

Here is the top of the table joined with pocket holes and screws.  You can see the segment I removed in this photo.

How to cut a table in half and rejoin

I used the Kreg mini, clamping it onto the sides of the table on the inside to make pocket holes to attach the top of the table.

Distress Sanding a table

You can see the seam, just a little.  O.k., a lot.  I sanded the table with my Ryobi sander next.  You totally don’t need to sand or prime when using CeCe Caldwell paint.  I did this to try and even out the seam area.  For the first project linked above, I didn’t prep much at all.  That is my kind of paint!!

Ryobi sander for table distressing

Kissimmee Orange CeCe Caldwell Paint

After I sanded and wiped away the debris, it was time to get painting.  I am all about orange, and this Kissimmee Orange is beeeaauuutiful!

CeCe Caldwell distressed table

It goes on smoothly, with great coverage.

How to Join wood using Kreg Jig

This photo shows the seam at the blue arrow, which still needs some work.  It also shows wet paint vs. dry.  In the sunlight, the paint dries enough to do the top coat in 30 minutes.

How to use wood Putty

Before doing the next coat, I filled in the seam with wood putty.  When that dried, I sanded it down with the Ryobi sander.

Recycled Gift Card Craft

I did one more coat of the Kissimmee Orange to cover the wood putty and seam, then one coat of the Vintage White.  When that dried, I added tiles that I created from recycled gift cards and painted with Tim Holtz Distress Paint.  I showed you how I made and adhered the tiles in this Mosaic Frame from Recycled Gift Cards Tutorial.

How to Sand Distress a Table

Once the tiles were all in place, I used the sander to distress and bring out the orange under coat.

How to Distress Furniture

I went at it pretty aggressively.  You can sand a little or a lot for the look you want.

Clear Wax CeCe Caldwell

Applying Finishing Wax to Table

I applied the clear wax with the wax brush.  It is easy.  Just a light, even layer does the trick.

CeCe Caldwell Dark Wax

I applied CeCe Caldwell aging cream over the clear wax  to grunge it up a bit.  It is a subtle, nice antiquing effect.  I buffed with a soft cloth after an hour or so.  That makes a shiny, more durable finish.

How to Distress a Table

This is the final piece. I adore it.  I am off to order more paint!  I can’t get enough.

To find a CeCe Caldwell distributor near you, visit this Map of Retailers page.

For loads of inspiration on the amazing things you can do with this paint, visit Debi’s Design Diary the blog, Debi’s awesome YouTube channel, Facebook page and Pinterest!

Easy Mini Pallet Patriotic Canvas Art


[pinit]
Easy diy patriotic wall art #washitapecrafts #washitape #fourthofjuly @savedbyloves

 [pinit]

While we are on a roll with patriotic decor around here, I thought to keep the momentum going with a quick and easy washi tape stars n’ stripes canvas.  See how to use craft sticks for a mini pallet on canvas that you can dress up to fit any occasion!

Easy diy patriotic wall art #washitapecrafts #washitape #fourthofjuly @savedbyloves

SUPPLIES:

How to make washi tape art diy

Jumbo Craft Sticks

Fabri-Tac craft glue

An old canvas (can be used; grab one for cheap at a garage sale or thrift store)

Star Template printed to size, and scissors

String, letter stickers, other embellishments

White Gesso

Sponge brush

Acrylic paint in choice of colors

Washi tape in coordinating colors and prints

Scrap white card stock or cardboard

Foam mounting squares or other adhesive

TUTORIAL:

For this project, I updated the Easter Faux Mini Pallet Art I showed you before.  Head to that tutorial for how to make the canvas.

Recycle old art with spray paint

I took the bunny silhouette piece and spray painted with blue Krylon I had on hand.

free star template

 Right click this star image and print to size for your project.

how to make patriotic decor #fourthofjuly

Apply strips of washi tape to scrap white cardboard or card stock.  I used the cover flap for a scrapbook paper pad.  Cut out your star template and tape on top of washi tape stripes where you want your cut out to be.  Cut along template edge to get a washi tape striped star.

How to make easy diy wall art

Adhere to mini pallet canvas with foam mounting stickers.  Embellish with stickers for words, baker’s twine, buttons and more!

For more patriotic project ideas to get you inspired, visit our 50+ DIY Patriotic Crafts, Jewelry and Decor Roundup:

Make Metallic Mason Jars With Spray Paint

Spray Paint mason jars for a great vase!

Photo by It All Started With Paint

Mason jar decor is a huge favorite in this house.  Working on a paper bouquet for my grandmother for Mother’s Day, I have been trying to land on the perfect vase.  Recycled wine bottles, tin cans and mason jars always top my list of bouquet containers.  While searching for inspiration, I came across the pictured metallic mason jars by It All Started With Paint.  I am all about metallic spray paint, and really am kinda shocked I haven’t already done this!  You can order your own at the link above, or if you are a DIY kinda person, Lovely Little DIY’s gold mason jar tutorial will get you on your way!

DIY mason Jar Crafts

Photo by Lovely Little DIY

This is not the project I ended up going with for my grandmother’s vase.  That is for another post.  This did make my to do list and if you are looking for a quick vase for Mother’s Day, you still have time to make metallic mason jars that she will love!

For more mason jar crafts, visit our frequently updated collection of the the world’s greatest Mason Jar ideas!

Painted Burlap Tag DIY From Fox Hollow Cottage

Hello Saved By Love Readers I’m Shannon.

While Johnnie is off at SNAP! I am here to share a quicky craft with you from Fox Hollow Cottage.

I recently completed a Linen Closet Makeover and made some fun burlap label/tags for the baskets that I used to help contain the clutter! I thought you might like to make some for you home too so I am sharing a simple tutorial. They are really easy to personalize so you could use then in a bathroom, kids room, a pantry… or like I did here, to for citrus in the kitchen.

Maison Blanche La Craie Colette Burlap Craft DIY foxhollowcottage 500X

How To Make a Painted Burlap Label/Tag

To make label/tags like mine, you will need;
-burlap
-felt (for backing)
-paint color(s) of choice
-paint pen
-paint brush; med and small/fine size
-twine
-glue gun
-Elmer’s craft bond spray adhesive
Step One
Cut your burlap to desired size. Next, cut your felt a pinch smaller then your burlap so it fits nicely behind it. You will back the burlap with a pc. of felt.
Step Two
Lightly spray your felt with the Elmer’s craft bond and place the felt and burlap together.
Press firmly and smooth.
(Tip; I sprayed my felt piece right over my trash can to avoid worrying about over spray messiness.)
Step Three
Place your paint color of choice on the burlap surface and paint away! I used the new Maison Blanche Paint La Craie shade in “Colette” because it’s aqua. If you have ever read Fox Hollow Cottage, or follow me on facebook, you’ll know I am a total aquaholic so this was a given for me!
(If not… Hello, my name is Shannon and I am a total aquaholic!)
(tip; You can get nice straight lines if you follow the texture of the burlap weave as you cut. The Lines are sort of built-in.)
Step Four
Place your text of choice on the burlap with a Elmer’s paint pen. The paint pen offers more control then a paint brush, and I find it easier to use my regular hand writing to put the text on the burlap this way.
Step Five (optional)
If you like, you can go over the paint pen text with a fine brush and black craft paint to bulk it up a bit and fill in.
Step Six
Tie your twine in a knot, then knot again. Snip ends to desired length. Affix with glue gun to corners or the desired location on your project.
Note: You can also attach a small piece of twine
as a hanger (shown below) to the back of the label/tag
or you can glue/affix it directly on your basket or surface of choice, like this…
These are the tags I made for the baskets I used when I organized my linen closet.
The makeover needed a little oomph and they sure did the trick!
Don’t you love it when the little things just make a space really come together? I do!
And I love them lots more when they don’t take a lot of skill or time to achieve.
That’s It.
Cute. Cheap. Easy.
Have fun if you make some!!
Thanks for having me today Johnnie! Hope you are having a BLAST at SNAP!


Repurpose Fan Blades to Dragonflies

#DIY #Repurpose fan blades to Dragonflies @savedbyloves

Since the first time I saw Lucy’s fan blade/table leg dragonflies, I have been dying to make my own.  Today, I will show you how I used ceiling fan blades and spindles for this fun, cheap, and easy to create upcycled decor project.

[pinit]

Make #upcycled dragonflies from fan blades #tutorial @savedbyloves

[pinit]

SUPPLIES:

Dragonflies8

Fan blades (I found some at Goodwill and Habitat Restore for just a few dollars)

Table leg or spindles for body (I found a box of these at Habitat Restore and snatched them up, knowing I would find a use for them)

Sandpaper

Lint free cloth

2 hinges per dragonfly

Hardware for eyes and antennae

Paint in colors desired for wings and body

DIY #upcycledDecor

  TUTORIAL:

How to repurpose fan blades

Lightly sand your fan blades and body (table leg, spindles or whatever you find).  Use a permanent marker to draw the shape you want on your wings.


Scroll Saw DIY project

Cut along line with scroll saw or jig saw.  Clamp 2 or more fan blades together to cut more than one wing at a time if you want them all exactly the same.


#Recycledcrafts, upcycle project idea

Wipe the debris and dust away from blades with damp cloth.  Let dry and apply coat of gesso or primer.


Martha Stewart Craft Paint project

After gesso dried, I painted Martha Stewart Craft Paint satin finish, color Carrot.

I painted haphazardly to let the gesso show through on purpose.  This dragonfly was going for a distressed look.


Color Box pigment ink

Using Color Box pigment ink, color sweet melon, I stamped over The Crafter’s Workshop Cosmic Bubbles template to create the design on the wings.

I went around the wing edges with the sweet melon ink pad and blended the stamped design into the edges with my finger.

I used my heat tool to dry the pigment ink, then sealed the wings with Mod Podge Clear acrylic sealer.


DIY upcycle crafts

I used Liquitex heavy body acrylic paint in raw umber for the base
coat on one body, dry brushing lime green acrylic paint and aqua acrylic paint randomly for  a distressed feel.   The other body was sprayed with Rustoleum in metallic silver.


Make #upcycled dragonflies from fan blades #tutorial @savedbyloves2

I used a hinge to join the wings to each other, and to the body.


Dragonflies4

Make #upcycled dragonflies from fan blades #tutorial @savedbyloves


 The eyes are drawer pulls on the orange dragonfly, and washers with screws on the blue one.  Leftover antenna strap from my hubby’s stash and craft wire were used for the antennae.


DIY #outdoordecor repurposed dragonflies


 Hang them inside or outside!

#Upcycle #repurpose

What do you think?  Do you have any fan blade repurpose ideas?

Privacy Policy