50 Plus Awesome Ribbon Crafts

50 Best DIY Ribbon Crafts @savedbyloves
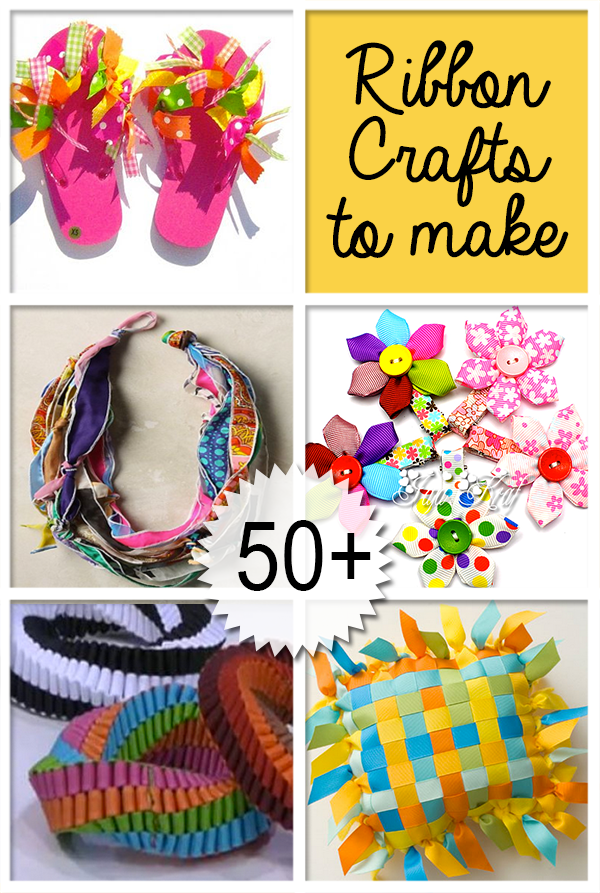
If you are obsessed with ribbons like me, you will love today’s round-up. Read on for over 50 ribbon crafts, including holiday projects, DIY home decor, kids crafts and more! If you want your ribbon project included, leave a link to your tutorial in the comments.


DIY Dollar Store Eraser Valentine Earrings

Valentines Day Jewelry Tutorial

I heart creating with dollar store supplies. For one, it is cheap, and it challenges me creatively. When I saw these cute Valentine’s Day erasers over the weekend, I immediately thought they need some resin and ear wires! Follow along to see how I made earrings from dollar store erasers!

Dollar Store Craft Idea

At first I imagined making a pendant, but then I realized the erasers came in pairs, just perfect for earrings. This project is super cheap and easy to do. Don’t be intimidated by resin if you’ve never used it.

ICE Resin Jewelry Tutorial

Especially now that ICE resin has made mixing the two parts so simple.

Dollar Store Resin Craft Idea

When working with 2 part resin, it is crucial to mix equal parts A and B. If you are off even just a little, the resin may no cure properly. ICE resin comes in a plunger that extrudes equal parts automatically.

How to Use Resin

Use a craft stick and mix the 2 parts by stirring for at least 1 minute.

TIP:  After mixing, let resin sit for 5 minutes before applying it. This lets the mixture settle and decreases air bubbles.

How to apply resin

Apply a little bit of resin at a time, starting in the center using the craft stick. It can take awhile to get use to how much resin to use. Just don’t go overboard. You can always add more to create a dome effect after the first layer has dried, but you are in for a mess if you use to much and it spills over the edge.

Let resin cure for 12 hours.

Upcycled Jewelry

I picked up these screw eyes at Walmart for $0.97.

How to Make Earrings

 Upcycling

Just screw the hardware into the top center of your resin eraser.

Jewelry Making Tutorial

Add ear wire and you are set!

Valentines Day Craft

Do you love them as much as I do? You can make 6 pairs with the pack of $1 erasers!

Make Adorable Valentine's Day Earrings Dollar Store Craft @savedbyloves

Find over 50 ways to decorate for Valentine’s Day:

50+Valentine’s Gifts to Make:

Valentine’s Day Washi Tape Charms

DIY Washi Tape Resin Charms for Valentines Day

Today’s project is a washi tape and resin craft that makes the perfect Valentine’s Day gift! Follow along as we die cut washi tape and apply ICE resin for a quick and easy charm that you can customize to fit your needs.

Valentines Day Washi Tape Craft

I was inspired on a recent trip to the craft store by these Valentine’s Day prints on washi tape by Hampton Arts.

Valentines Day Washi Tape Craft 3

I covered white card stock with strips of the tape as shown.

Valentines Day Washi Tape Craft 4

I folded the excess tape over the back of the paper. If you want your charms two sided, you could cover the entire back in tape as well, or use printed scrap book paper instead of white card stock.

Valentines Day Washi Tape Craft 5

I cut the tape covered paper with these heart dies by Spellbinder’s Media Mixage.

Valentines Day Washi Tape Craft 6

Here is what they look like after die cutting the shapes.

Valentines Day Washi Tape Craft 7

I sealed the front and back of the hearts with Iced Enamels Medium. If you don’t seal the paper tape, the resin will darken it and look funny. Let dry.

ICE Resin

I used ICE Resin on my charms. You could use any jewelry grade resin, or Mod Podge Dimensional Magic.

Valentines Day Washi Tape Craft 8

Following the directions on the resin package, I mixed the two parts in a plastic dixie cup with a clean craft stick.

Valentines Day Washi Tape Craft 9TIP: Place the paper hearts on top of sticky contact paper to keep them flat while resin dries.

Use the toothpick to drip the resin onto the hearts.

DIY Washi Tape Valentine's Day Jewelry Idea

Hole punch the hearts once dry. The resin instructions say 6-12 hours. I let mine sit overnight and used a jewelry hole punch to place holes for jump rings.

Washi Tape Crafts

Add keychain fobs and other charms. I went for keychains with the larger hearts. I will be using the smaller hearts for earrings!

Upcycled Sweater Christmas Ornaments

I am so happy to be here today sharing a tutorial for these Cozy Christmas Ornaments made from old sweaters. That ugly Christmas sweater you have? I bet it would make beautiful ornaments! This is an easy ornament to DIY, and you can make quite a few ornaments from one sweater, so let’s get started.

Upcycled Sweater Ornaments DIY from @savedbyloves @craftsncoffee

Fair-Isle-Sweater-Orn

You are going to need 3” balls of STYROFOAM™ Brand Foam (you could go larger or smaller, too); an old sweater or two; scissors; a sharp pencil; needle & thread; thick, white craft glue; and ribbon for hanging the ornaments.

Sweater-Ornament-Supplies

To start, mark the center top and bottom of your foam ball with a pencil. Then insert your pencil at each point to make a 5/8” hole.

Insert-Pencil

Cut a piece of sweater fabric, measuring about 4” – 5” high and 8” long. If you’re using a patterned sweater, be sure to plan where you cut to best highlight the pattern. Test fit your fabric piece around the ball to be sure it fits – the size of the fabric you’ll need may vary depending on the stretchiness of your sweater.

Fold your fabric in half lengthwise, right sides together, and stitch a ¼” seam. Turn right side out. Slip the ball into the center of your tube.

Upcycled Sweater Christmas Handmade Ornaments

Place a dab of white craft glue in the hole at the top and using a sharp tool such as a pencil, firmly push the cut edges of the fabric tube into the hole. Try to space the fabric folds evenly around the ball. Repeat at the bottom of the ball.

Tuck-in-sweater

Knot together the ends of a 6” – 8” length of ribbon, and push the knot down into the hole at the top. If you like, add a bow and jingle bell, or any other decorations, to the top of the ball. Let the glue dry before you hang your ornaments.

Red-Orns-on-Tree

Red-Argyle-Orn

I want to give a shout out to designer Kathleen George for helping out with these Sweater Ornaments. I have a few more ideas for repurposing old shirts to make ornaments in the Christmas Ornament series “Mad for Plaid & Paisley” over on Crafts ‘n Coffee. Please come by and check them out!

Repurpose-shirts-for-orname

Thank you so much for having me today, Johnnie. It’s a thrill to guest post here! I wish you, your family, and all of your readers a wonderful Christmas season!

Want more Repurposed Sweater Ideas? Check out our 50+ Ways to Upcycle Sweaters!

Happy crafting.

Sharon

DIY Fused Mini Amber Glass Bottle Earrings

DIY Fused Glass Bottle Earrings @savedbylovesSo, I am crazy excited to share today’s jewelry tutorial with you. These earrings are my go to piece for several reasons.  They are beautiful, unique and go with all kinds of outfits.  I got the idea when flattening wine bottles in my kiln.  I remembered the tiny bottles, or vials that people fill with mica powder and little notes and thought it would be so cool to flatten them.  I wasn’t sure what I would do with them flat, but as soon as the kiln cooled and I laid eyes on them, I knew I wanted to wire wrap and wear them!

MATERIALS

7 Gypsies Amber Apothecary Bottles

Round nose jewelry pliers

Flat nose jewelry pliers

20 gauge jewelry wire

Flush wire cutter

Earring findings

10 coordinating seed beads

Microwave kiln

 TUTORIAL

Fuse your bottles, one at a time in your microwave kiln.  I showed you how to use that here: DIY Wine Bottle Earrings. You can also use a regular kiln if you have that. Let them cool to room temperature before continuing.

How to wire wrap jewelry

Cut 7 inches of wire and string 5 beads onto it.

How to make fused glass jewelry

Place beads in front and situate wire at neck of fused bottle as shown.

How to wire wrap jewelry2

Bring the left side wire around the bottle neck and back to the front as shown.

How to wire wrap jewelry3

Wrap both wire ends around the neck a few times, ending with 2 wire tails in the back as shown.

How to wire wrap jewelry4

Wrap the two ends as shown so that they are vertical.

How to wire wrap jewelry5

Coil one end around the other as shown.

How to wire wrap jewelry6

Trim the end of the wire you just coiled.

How to wire wrap jewelry7

Use the flat nose pliers to bend the remaining tail to form a 90 degree angle.

How to wire wrap jewelry9

With the round nose pliers, form a loop as shown.

How to wire wrap jewelry10

Thread the ear wire onto the loop, then trim the excess tail.

Fused Amber Glass Bottle Earrings

I love them!  I can’t wait to make more.  Next I will use clear vials and color them with alcohol ink.  Exciting stuff!

DIY Liquor Bottle to Mercury Glass Bracelet Storage

Liquor Bottle Upcycle to Mercury Glass Bracelet Storage @savedbyloves

Bottle Bracelet Storage

 I am always looking for unique and decorative ways to organize my jewelry. Pretty up a long necked bottle to suit your style and display your bracelets for all to see. It doesn’t get much more straightforward than this project!

DIY Liquor Bottle Upcycle to Mercury Glass Bracelet Storage @savedbyloves

MATERIALS

-Long Necked Bottle

Screen Shot 2014-09-29 at 11.32.26 AM

-Glass Bottle of your choice

Krylon Looking Glass Spray Paint

Krylon Spray Adhesive Remover

-Epson Salt

-Kraft paper, plastic or other work surface protector

Bracelets galore

DIRECTIONS


1.  Remove any labels from your bottle with adhesive remover.  I love Krylon’s Spray Adhesive Remover.  Saves loads of time for wine bottle upcyclers like me!

2.  Pour Epson salt into bottle so that to about one inch from the bottom.  If your bottle is smaller, you can use less.  It is not important to be exact here.

 3.  In a well ventilated area with protected work surface, spray looking glass paint into mouth of bottle.  Make sure to follow instructions on label.  You want to shake the can vigourously before using.  If your bottle mouth is small in diameter like this genie bottle, you will have paint pooling in one spot and running down the neck.  That is fine.

4.  Shake the bottle like a snow globe, so that the salt grabs the paint and drags it around.  This will create the mercury glass look.

Repeat steps 3 and 4 a few more times, allowing each coat to dry for about 5 minutes before applying the next.  Stop when are happy with the look.

2. Place your bracelets and admire.

Wine Bottle Bracelet Storage 1

EXTRA TIPS

Decoupage the bottle or paint it with glass paint and stencils for a look other than mercury glass.  The customization possibilities are infinite!

Does DIY Jewelry Storage excite you?  Visit our 50+ Clever Jewelry Storage DIY Ideas!

Need some bracelets now that you have a stylish, eco friendly bracelet display?  We have you covered with 50+ DIY Bracelets to Make:

Cut Wine Bottle Bracelets

Create Bracelet From Wine Bottle Glass

Your friends will be amazed when you tell them these bracelets use to be wine bottles!  This project involves cutting glass and firing in a kiln, but you could do a version without the kiln too.  Use rub on transfers and alcohol inks to create a piece of wearable art!

MATERIALS

-glass bottle label removing and cleaning supplies (see techniques)

-glass bottle cutting supplies (see techniques)

-stainless steel measuring cup

-kiln

-kiln wash

-glass drilling supplies

-jewelry chain

-jump rings

-toggle clasp

-two pairs of jewelry pliers; flat and or needle nosed

-alcohol inks and felt pad applicator

-non stick craft sheet

-rub on transfers

-beads and charms for embellishing as desired

-permanent marker

 DIRECTIONS

 1.  Cut a ring from your chosen bottle (See How to Cut Wine Bottles)

Make jewelry from wine bottles

Wine Bottle Bracelets 3

2.  Carefully score ring with glass cutter and tap to break score, leaving you with a half circle.  Score this to the size you would like your bracelet to be, about 2.5 inches.

 Wine Bottle Bracelets 4

3.  Place bracelet piece on kiln washed stainless steel mold or measuring cup as shown and fire to full fuse (see techniques).

Wine Bottle Bracelets 5

4.  Once the bracelet is cool, remove it from the kiln.  Mark for placement of holes where chain will be attached with a jump ring.

Wine Bottle Bracelets 6

5.  Drill the holes using small diamond bits (see How to Drill Holes in Glass).  I use this diamond tipped micro engraving drill bit kit for my small holes.

Wine Bottle Bracelets 7

6.  Begin drilling at the mark, coming in at an angle to start your hole, then moving to 90 degrees as described in the techiques.  Make sure to cool the drill bit in water every 30 seconds or so to prevent glass from shattering due to heat.

Wine Bottle Bracelets 10

7.  Apply rub on transfer per instructions to the front surface of the bracelet.

Wine Bottle Bracelets 12

8.  Use felt applicator or brush to apply alcohol inks to back surface of bracelet.

 Wine Bottle Bracelets 14

9.  Open jump ring using two sets of pliers to twist each end in opposite directions.  Do not pull ends apart to open, rather twist open as shown.

10.  Attach the appropriate length of chain to get desired bracelet length and close jump ring by twisting ends back together.  Keep in mind the closure will add about ½ inch to the length of the bracelet.

Wine Bottle Bracelets 15

11.  To finish, attach toggle clasp ring to one end and bar to the other, using a jump ring for each.

 Bracelet on Fire

EXTRA TIPS

○ Create custom bracelets, earrings and pendants using this technique.  Use blank rub on transfer paper made for inkjets to transfer your own designs to your recycled glass jewelry!

Washi Tape Wine Cork Keychain DIY

Corky Washi Keychain

Carry your keys in eco-friendly style with this washi covered wine cork keychain.  This project is simple and quick, and makes a great handmade last minute gift or party favor.  Decorate with ribbon, paint, stickers and stamps as a variation!

MATERIALS

Corky Washi Keychain 1


-Cork

-Eye screw

-washi tape

-scissors

-keychain findings

-jump ring

-2 pairs of jewelry pliers

DIRECTIONS

1.  Cover cork with strips of washi tape as desired.

Washi tape craft

2.  Place eye screw in center on one end of the cork.

Corky Washi Keychain 3

3.  Use both pairs of pliers to twist open jump ring as shown.

Corky Washi Keychain 4

4.  attach key ring finding to eye screw with jump ring then close jump ring, using both pairs of pliers to twist it back to the closed position.

Corky Washi Keychain 5

Corky Washi Keychain 6

That is it!

For more inspiration, visit our 50+ WINE CORK CRAFTS:

And our 50+ Washi Tape Crafts

DIY Washi Tape Wine Cork Keychain @savedbyloves

DIY Easy Cork Monogram Earrings

[pinit]Mongram Cork Earrings[pinit]

 Did you know that wine corks can be sliced into disks, painted, inked and stamped to create beautiful custom jewelry.  Not only are these monogram stamped earrings stylish and eco friendly, but they are light as a feather.  The customization possibilities are infinite!  Follow the steps below to make your own, or use the same process to make pendants, charm bracelets and wine glass tags!

Monogram Wine Cork Earrings DIY Upcycled Jewelry from @savedbyloves

CLICK HERE FOR MATERIALS LIST AND TUTORIAL


50+ Ways to Upcycle CDs and Vinyl Records

[pinit]50 Plus Best DIY Upcycle Vinyl Records and CD projects to make @savedbyloves[pinit]

Since most of us no longer listen to CDs or records, our planet is left with a ton of these seemingly useless items. Today I am sharing with you 50+ upcycle projects that solve this dilemma using some outside of the box creativity. You will think twice before considering old records and CDs to be useless!


Privacy Policy