DIY Canvas and Burlap Stockings

[pinit]

Sew Stockings Burlap[pinit]

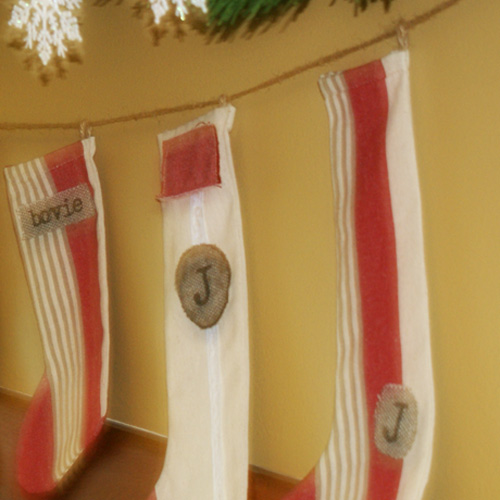
These Christmas stockings are made from canvas tea towels from Target, the same towels I used to make this stenciled pillow a few posts ago.   Two of the towels made all seven.  If you are looking for a quick, easy, inexpensive sewing machine project for your stockings this year, you are in luck.

Supplies:

  • Tea towels or canvas drop cloth
  • Fabric Scissors
  • Stocking Template (click here for the one I used)
  • Pencil for marking fabric
  • Straight Pins
  • Jute or twine
  • Embellishments of your choice

Burlap Christmas Stocking Pattern

Instructions:

  • Print stocking on to heavy paper and cut out
  • Iron fabric and trace stocking onto towel folded in half.  I used the seams already in the towels as the top of my stockings.  Cut shape from front and back halves at same time.

Christmas Stockings Pattern

Christmas Stockings tutorial

  • With right sides together, pin in place.  Loop a 2 inch piece of jute on the top at the heel side for hanging your stocking and pin in place.  Double back over the twine while sewing to make it extra sturdy.

DIY burlap stockings

  • Turn stockings right side out and embellish as desired.  I printed on burlap for the text, pieces of scrap towel and lace on mine.

Christmas Stockings Pattern

Handmade Christmas Decorations

Christmas Stocking Pattern

Tea Towel to Stenciled Pillow

DIY tea towel pillow

It is my first ever sewn pillow!!  I am proud, being that I have used a sewing machine very little.  This is made from a tea towel I picked up at Target, along with a 14 inch pillow form.  I created a LOVE JOY PEACE text in Photoshop and cut it from vinyl with my cricut.  I wish I had taken pics of the process, but I was totally winging it, and had little faith that I was going to end up with anything I would want to share!  I will describe as best I can…

This towel was the perfect size for the 14 in pillow form, so I lucked out.  I decided to have a slot to make the pillow form removable, so I folded over a flap for the back, ironed where my seams would be, and sewed a straight stitch using my machine with the pillow inside out.  Here is the back (the image was already on the towel):

Tea towel pillow DIY

Since that photo, I have put velcro strips to close the flap.  Thought about buttons, but that was just way to advanced!

Before inserting the pillow form, I used Martha Stewart craft paint in black and a stencil brush to create the text.  I love this stuff cause you can use it on every surface!

Tea towel pillow DIY


Click here to download the stencil file.

Free Love Stencil


Stenciled Pillow DIY

What do you think?  Any easy easy easy sewing project you want to recommend to a newbie?

Christmas Bunting With Template

Christmas Bunting

I am soooo excited about this project because I dusted off the sewing machine and stitched ribbon and paper triangles together for this Christmas bunting.  I got a lovely Martha Stewart Crafts delivery yesterday, and couldn’t wait to make something out of this gorgeous holiday patterned paper.

DIY Christmas Bunting

Using my cricut, and this template, I cut triangles from 12×12 double sided scrapbook paper, and sewed red ribbon across the top to make the bunting.  Super easy.  I am so very proud, because I don’t sew.  My husband took it upon himself to create a perfect place for my machine while I was away on a girls weekend.  That is a whole other post.

The mirror was a garage sale score that I spray painted white.  I love the double sided scrapbook paper against the mirror.  You can’t really see the effect to well in these pics.  It was dark out.  Flash… yuck.  Anyway, it is twice the fun, as you can imagine.

If you don’t want to sew, you can create a hole near each top points of the triangle, and string your ribbon or jute through, like I showed you here.

Handmade Christmas Decor

That is my story.  What do you think?  Bunting… yes or no?


Painted Pillow With Monogram Print Canvas

DIY Monogram Pillow
Wow, I “made” a pillow.  You may have noticed, there aren’t sewing projects here at SBLC.  I don’t do that.  I think about doing it occasionally, but it doesn’t happen.  Here is a project, sans sewing, that includes printing on canvas drop cloth material, painting a pillow with fabric paint, and attaching fabric to fabric using liquid stitch.  Easily and quickly make yourself a beautiful, custom, decorative pillow!

Graphics Fairy Pillow DIY


Supplies:

  • Old Pillow (Mine is a Goodwill score)
  • Martha Stewart Decorative Paint by Plaid and Fabric Medium
  • Drop Cloth Canvas cut to 8.5×11
  • Graphic image (I used frame image from Graphics Fairy, and put the letters in with Photoshop)
  • Inkjet Printer
  • Spray Adhesive
  • Paintbrush
  • Ribbon
  • Stitch Witchery
  • Liquid Stitch or other fabric glue

Monogram Painted Pillow

Instructions:

  • Mix paint with fabric medium as directed and paint your pillow!  It felt kinda cool to be painting a pillow.  I got some strange glances from family members wandering by,  but who has a an awesome pillow now?

Martha Stewart Fabric Paint

TIP:  The instructions for the fabric paint medium said to let dry for 24 hours.  I needed to add another coat over the black area of the pillow, so I dried the pillow immediately after the first coat with my heat tool.  Then I added the second coat and let dry overnight.

  • While your pillow is drying, you can prepare your image on your canvas piece.  Go on over to Graphics Fairy, and get yourself a lovely free image (I used this image).  Cut it to fit your printer, and using spray adhesive, adhere the canvas piece to a piece of photo printer paper or to cardstock.  A regular old thin piece of printer paper isn’t sturdy enough.  Insert the piece into your inkjet printer, fabric side down, and print your image.
  • Cut your image to the desired size, fuze ribbon to frame it with Stitch Witchery, then glue the piece onto your dried pillow using Liquid Stitch.  Let dry overnight.  You are done!

No Sew Monogram Pillow DIY

What do you think.  I love it.  The pillow is a little “crunchy” from the paint, but let’s face it, it isn’t meant to be functional.  Not bad for a new sew project!

Quilted Wall Hanging

SONY DSC
My first quilted wall hanging, inspired by an organization that has helped millions.

This was fun and easy. Debbie hooked me up with a bunch of old fabric scraps and I was on my way. I made the circle triangle in the center in photoshop, then printed it on fabric made for inkjet printers. I attached the pieces, layered and quilted, then attached a dowel rod and ribbon to the back for the hanger. I am super excited about mixing my love for graphic design with fabric for customized funky wall hangings. Busy girl. Busy…


First Attempt at a Quilt… Project FInished


So here it is. Not bad for a first time. It only took 5 days from beginning to end. And that included touching a sewing machine for the first time.
I got frustrated at some point, because the in almost all of the instructions I found during this process really emphasized perfection. I was getting stress at imperfect seems, alignment, puckering… By the time I got to the binding, I quit fighting the fact that I am kinda sloppy, and really just wanted it finished and on my bed 🙂
It got more fun at that point. If you examine closely, and imperfections bother you, you will be horrified. I am just so excited to have this piece to accent my room, and inspiration for all kinds of sewing projects spinning in my mind. Making stuff rocks. Blessings,

Quilting for Beginners


I finally made the jump from non sewing chic to proud (yet clueless) Singer Esteem II owner. I have tons of fabrics, because I like to decoupage various objects with funky prints. Don’t even get me started on all the cool things you can do with fabric that do not involve sewing.
So I find a great deal on this machine, bring it home, watch the instructional DVD, go to follow along in threading the bobbin, when it dawns on me that I have no thread. Pretty key ingredient. I guess I kinda assumed that in the big box bearing Martha Stewart’s smiling mug, would be everything I could ever need.
So off to the craft store AGAIN. They love me there. Back with thread. Good to go. Except for a plan…
Opted to cut 30 squares out of coordinating fabric, which I would stitch together in 6 rows, 5 columns. In my mind, I envisioned piecing these squares together to be the most difficult part of the endeavor. After cutting 30 not even close to square pieces, that resembled each other very little in size and shape, I called my sister. Aka Quilt Diva. She pointed me to a squaring quilt ruler thingy in combo with healing mat and rotary blade, and away from my big scissors. I have never in my life been able to cut a straight line. With the advice of the pro, I soon found myself with 30 real squares. They were square. And the same size.
I stitched them together in no time flat, creating the quilt top shown above. I was pretty impressed with myself. I had quickly thrown together a lovely quilt, fairly effortlessly…
Little did I know what remained to be done. More to follow, once I either go take a class, or kidnap my sis.

Hand Knit Fingerless Gloves’ – Malabrigo Wool

I knitted these from a pattern I found in the awesome book “Knit One, Embellish Too” (click here to learn more). My niece Ashlyn loves purple. This was her Christmas gift.

First time I had used Malabrigo wool (here). I love it. Can’t wait to do more with it.
But it’s gonna be a minute. I have ventured into the land of sewing. Never thought it would happen, and like everything I do, I am addicted. Stay tune for quilt pics. I am loving this sewing machine. My creative brain is in full force. A whole new world…
Privacy Policy