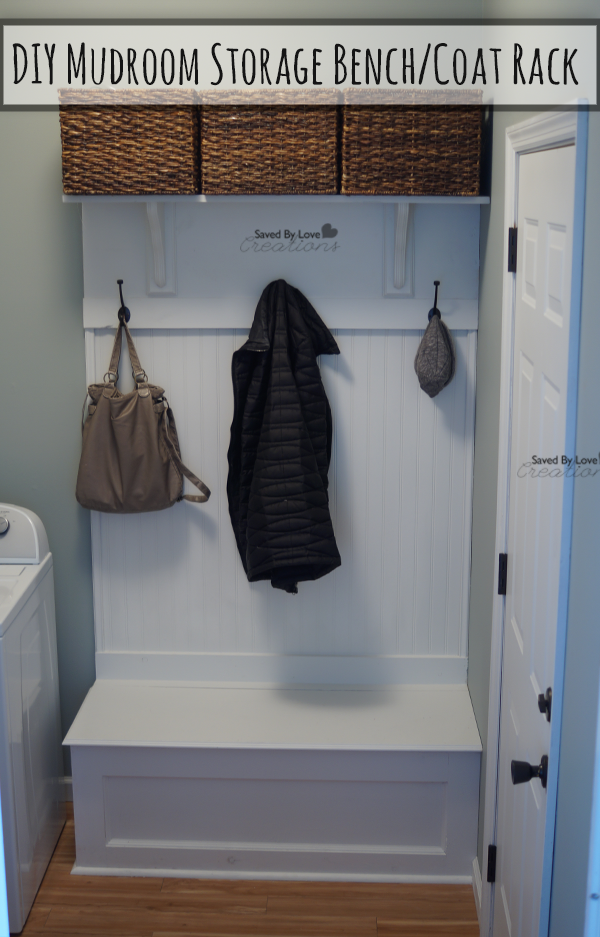
 Our laundry room is the high traffic area of the house. We go through it every time we come or go from the house. It had been crying out for a place to hang coats and to drop off “stuff” rather than haul it in and lay it on the kitchen table. One Saturday my husband decided that he was going to throw together some sort of a coat rack / bench that would serve our needs. Once he got me going on the idea it turned into a full blown re-do of the room. I have shown you the Free Laundry Room Printables and DIY Hardware Update, and today I am sharing how to make this fabulous mudroom bench/coat rack. This project was pretty easy once we got started, and cost under $150! We LOVE it. It is super handy, and it prompted us to paint and replace the floor in the room. It is now my favorite room in the house! On to the project.
Shopping List
1. 3/4-inch birch-veneer plywood to build the seat box. Get one 4×8 sheet.
2. exterior-grade beadboard plywood to make the back panel on the wall. One 4×4 sheet will cover the area.
3. 1×16 solid-wood panel to make the seat lid. Get one 6-foot board.
4. 1×12 solid-wood panel to make the fascia board and shelf. Get two 6-foot boards.
5. 2×4 to create a support strip for the hinges that hold the box lid. Get 6 feet.
6. 1×4 to create the applied paneling on the front and sides of the box. Get four 8-foot boards.
7. 1×2 to cap the unfinished top edges of the bench box. Get 10 feet.
8. 3/8×7/8-inch panel molding to add a picture-frame detail to the paneling on the box and to trim above and below the beadboard panel. Get five 8-foot lengths.
9. ½x1-inch parting bead to finish the edges of the beadboard plywood.
10. 3/4-inch quarter-round molding to trim the beadboard panel and the base of the box. Get 16 feet.11. ½x7/8-inch decorative shoe molding to trim out the shelf, seat lid, and fascia. Get three 8-foot lengths.
12. 9-inch shelf brackets
13. 2-inch L-brackets to secure the box to the floor. Get seven.
14. European cabinet hinges to allow the lid to overlay the box and open smoothly. Choose ones that are labeled “for frameless cabinets.” Get three.
15. Toy-box lid supports to keep the lid from slamming shut. Get two to support the weight of the lid.
16. 1 5/8-inch deck screws
17. 3½-inch deck screws
18. 2½-inch deck screws
19. 2-inch trim-head screws
20. 2d finish nails
21. 3d finish nails
22. carpenter’s glue
23. vinyl adhesive caulk
24. 180-grit sandpaper
25. Shims
THE BENCH
The bench I chose was modeled after a picture I saw of a classic entry hall built-in I saw on the This old house blog. It had everything we wanted; a place to sit, a place to store stuff, a shelf and plenty of coat hook space. All of this combined into a really nicely appointed, decorative piece that looks nice fits the room. We made adjustment to the plans to fit our needs where necessary. The dimensions were altered because our particular space required the bench to fit in a corner. Likewise, I changed a few pieces of the trim work to suit our taste. The shopping list I’m going to provide you will cover the better part of your project for the size bench we used. If you decide you want to expand or alter to fit your room then you might need to modify your purchase list accordingly. Here’s the one I used to start.
- Build and trim out the bench seat:
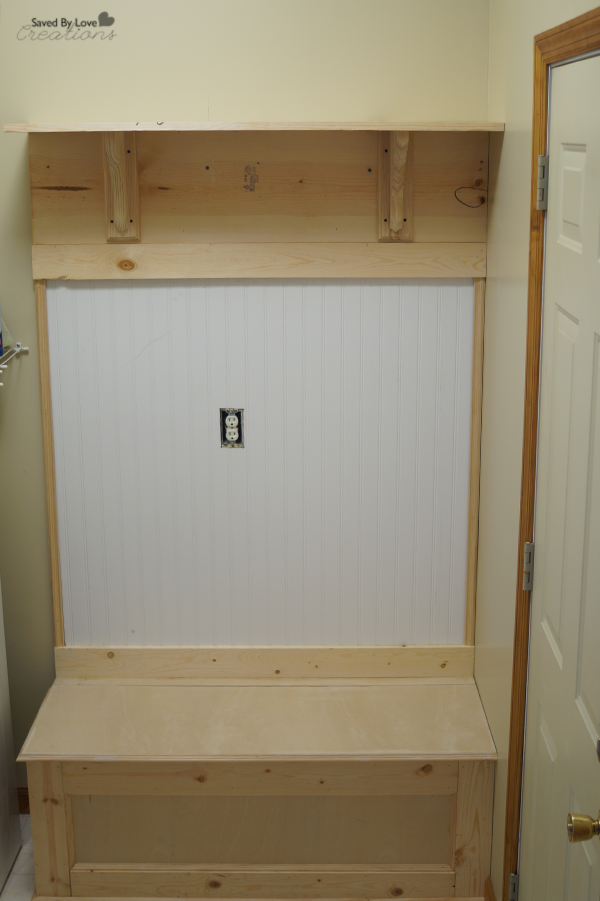
I found the best spot in my laundry room was in one of the corners. So the first thing I did was take up the baseboard around the entire room. Next I just built a simple plywood box that would become the bench. No need to put a bottom in it. The box dimensions for my particular spot turned out to be 451/2 inches wide by 18 1/4 inches deep by 16-3/4 inches tall. Build this box out of ¾ inch “good-one-side” plywood. Try to get the box to sit as level on the floor as possible and fasten through the back into the studs in the wall using 2.5 inch deck screws. Just a couple or three places will be plenty. The Top of the box (which will be the bench seat is going to be made from the same ¾ inch plywood. It will need to overhang the box by about ½ inch on the front and the sides. But it will not go all the way to the back. ( you will see why later) Also, if your situation is like mine, where the bench will butt up against a wall in the corner, the top wont overlap on that side. So the dimension of my Top piece was 46 ½ by 16 inches.
- Install the hinge support
Using a miter-saw, cut a 2×4 to fit the inside of the box along the back wall. Cut a 3½-inch-wide strip of plywood to the same length. Screw the pieces together with 15/8-inch deck screws. Position the 2×4 assembly along the back of the box, 3/4 inch above the back edge. Screw it on, through the box and into the studs, using 3½-inch deck screws. This piece will later be hidden by a plywood strip and molding. This is why the top is not as deep as the whole box. This is where the hinges are going to fasten.
Screw L-brackets inside the box and to the floor, three inside the front edge and two on each side, to hold the box in place.
- Attach the panel molding to the seat.Next, I trimmed out the front and the one visible side of my box with 1 x 4 boards. This gives the box a dimensional, shadow box appearance. Cut the 1 x 4 so that the long pieces fit inside the two shorter upright pieces. This way you don’t see a cut edge. To create a profile on the inner edge of the 1×4 framing, cut panel molding to fit inside the 1×4 rectangles. Miter the ends of the molding. Nail the molding to the box, tight against the 1x4s, with 2d nails.
- Cap and Trim the box
Cut a piece of 1×2 to the width of the box. Glue and nail it to the top edge of the box front with 3d finish nails. Cut two pieces the depth of the box and use them to cap the sides. The side caps should now sit flush with the 2×4 assembly secured to the wall. Trim the base of the box using quarter round molding mitered 45 degrees at the corner joints.
- Trim the seat lid
Using a miter saw, cut strips of ½x7/8-inch decorative shoe molding to fit the front and side edges of the lid. Miter the ends at the corners, but leave the back edges square. Attach the molding to the lid edge with wood glue and 2d finish nails.
TOH Tip: To avoid splitting narrow wood stock with finish nails, dull the points of the nails with the strike of a hammer before tapping them in.
- Install the Lid
Rip a piece of plywood to 2¼ inches wide and the length of the box This 45/3/4 inches in my case. Nail it down at the back edge of the seat box to cap the 2×4 assembly. This is labeled as the “Hinge support” on the above photo. Attach the lid to the 2×4 assembly using three European cabinet hinges, installed according to the “full overlay” instructions. This type of hinge allows the lid to open completely over the 2×4 assembly but conceal that same assembly when it’s closed. The lid should overhang the box by 1 inch on the sides and front. This sounds more complicated than it is…Since your top has been cut short of the box dimension by this amount, you will have this 2/1/4 inch strip across the back that does not open with the lid. (see pic). You have to have this to carry the hinges. Setting the hinges requires a little bit of patience. The proper distance will be determined after a couple of openings and closings. There has to be a slight space to allow the lid board to pivot by the stationary hinge mounting board.
- Mount the bead-board back panel
I ran the beads on my piece vertically. Since my bench was less than 48 inches I could use just one 4×4 sheet and rip it to the right height. In my case I liked keeping the board 4 feet above top of the lid. So actually you could purchase just one 4×4 sheet already cut. Where the bead-board meets the top of the bench seat I put a 1×4 trim piece to finish out the back. As you will see later, when I finish placing the shelf facia board later, I will put a matching piece at this seam. I think it finishes the back board nicely.
- Hide the Bead-board edges
I chose to use a small cove molding to finish out the vertical edges of the bead board. As with all of the trim in this project, take a look at the variety of Trim pieces available and get ones that suit your taste. There are lots and lots of styles available. Some will obviously not work at all and others will be great. There is no hard and fast rule to my knowledge. We often just use what we have left over from other projects.
- Finish the Trim
I chose to use lengths of quarter round trim along the bottom edge of the box where it meets the floor. I mitered the corner where it wraps to the side. Take a look at your finished box at this point and decide if there are any gaps or spots that you feel like you want to cover with trim work or if just caulking alone will fill.
- Install the Fascia for the shelf
Use a piece of 1×12 shelving board cut to the length of the top of the beadboard panel. This board will be called the fascia board for the shelf and will be where the coat hangers will ultimately goMount it to the wall using 2-inch trim-head screws installed through the studs
- Mount the Shelf Brackets
Measure and mark the placement of two shelf brackets on the fascia board.
Using the provided hardware, install the shelf brackets flush with the top edge of the fascia board and on center at your marks.
- Secure the Shelf
Cut a piece of stock 1×12 shelving board the width of the bead-board.
Set the shelf on the brackets and tight against the wall. Secure it to the brackets with 2-inch trim-head screws. Cut a 1×4 trim board and attach it to the top of the bead-board to fascia board seam. Attach with 2d nails. Caulk seams.
- Paint the Bench
Sand the entire bench with 180-grit sandpaper. Fill all the nail holes and gaps between moldings with caulk. Prime the bench, bead-board panel, shelf, and moldings, then paint them with two coats of semi-gloss latex.
- Attach the hardware
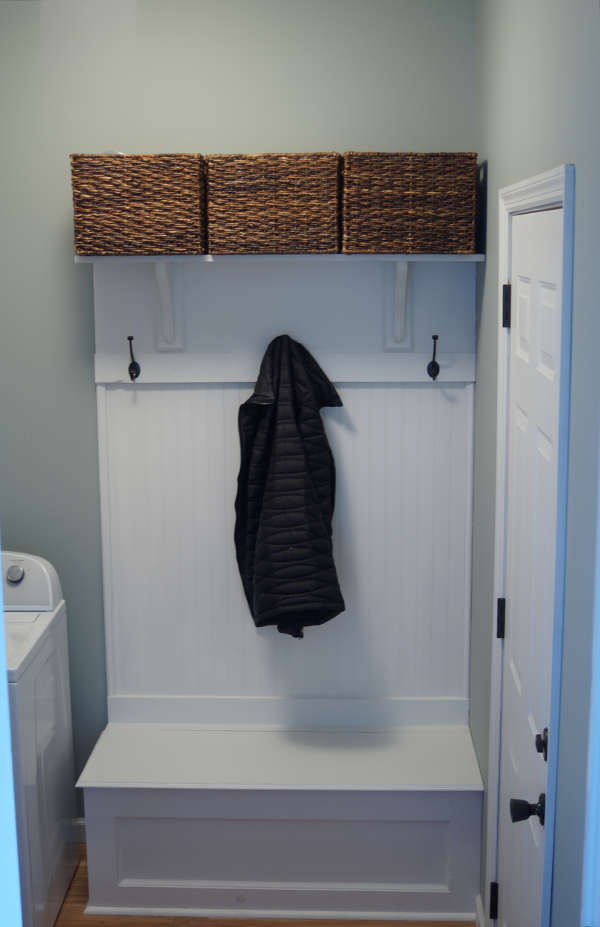
Screw coat hooks to the fascia board, spaced evenly between the brackets.
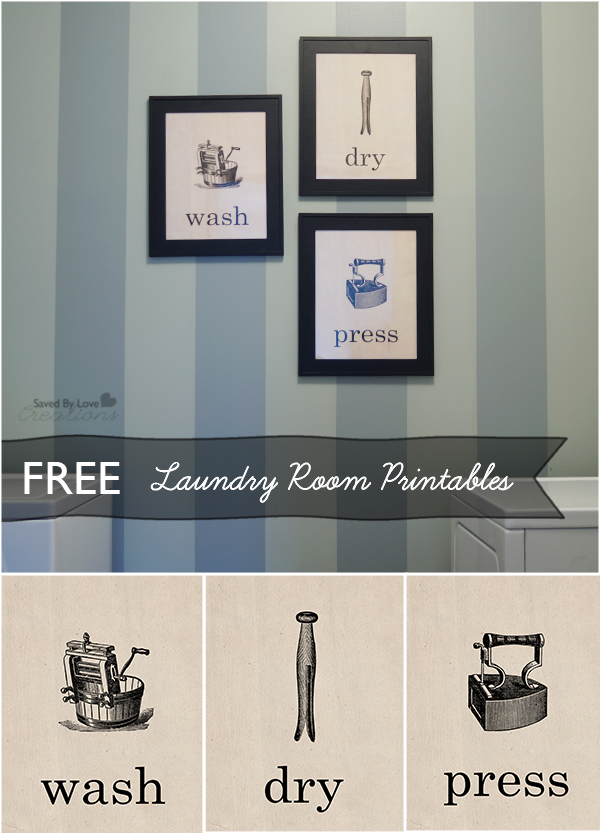
Here you can see the accent wall we painted with stripes. Click the image or text for the FREE Laundry Room Printables!