Archives for December 2014

How Use Google Plus to Make Free International Calls

Make Free International Calls from Your Laptop using Google Plus @savedbyloves
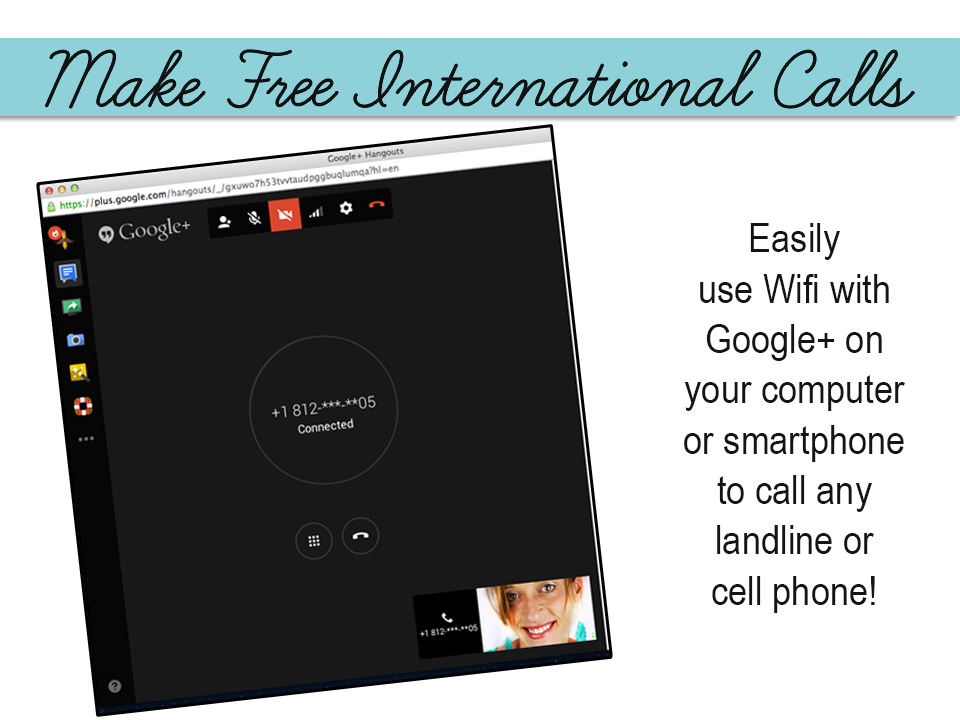
Our recent trip to Europe forced us to seek out the best options for keeping in touch with our loved ones back home. We added international to our cell phones, but that wasn’t cheap, and wasn’t unlimited, so it was time to get innovative. After all, I talk to my dear grandmother at least once a day. No way would either of us last 2 weeks without talking. Nor would my grandmother be figuring out Google Hangouts while I was away. I knew there had to be a way to make use of the hotel WiFi for calling cell phones and landlines from my laptop. I was correct… Google Plus is the way. Calling any phone number from your Google+ account is super easy, and at least from Paris and Germany to Indiana, it is free.

Here is how it is done:

How to Make International Calls For Free

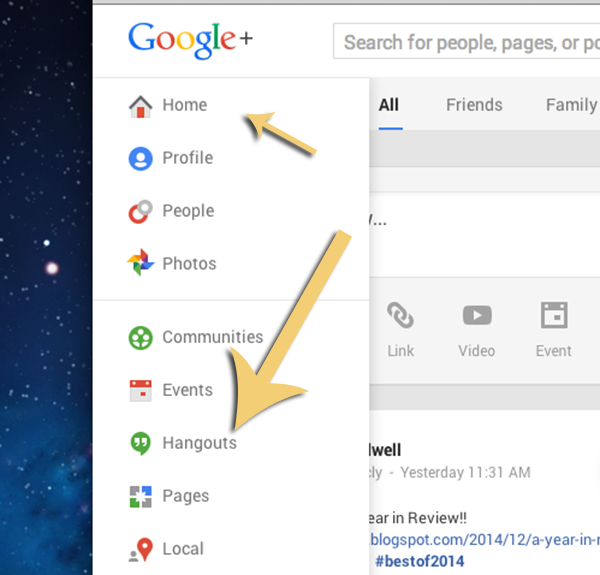
Log into your Google+ account and go to “Home” in the left upper part of your screen. Scroll over it to bring up the pull down menu and go to “Hangouts” (see the big yellow arrow).

Make Free International Calls from Your Laptop

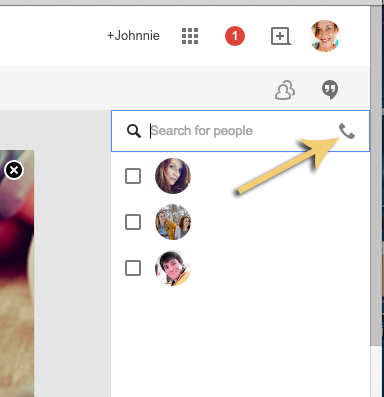
A new screen will appear, and near the top right, you will see the text bar with the phone icon. Click the phone icon and this will appear:

How to Make Free International Calls from Your Laptop

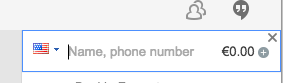
Enter the phone number (I dialed “1”, then the area code and phone number, and it worked)

How to call long distance for free with laptop

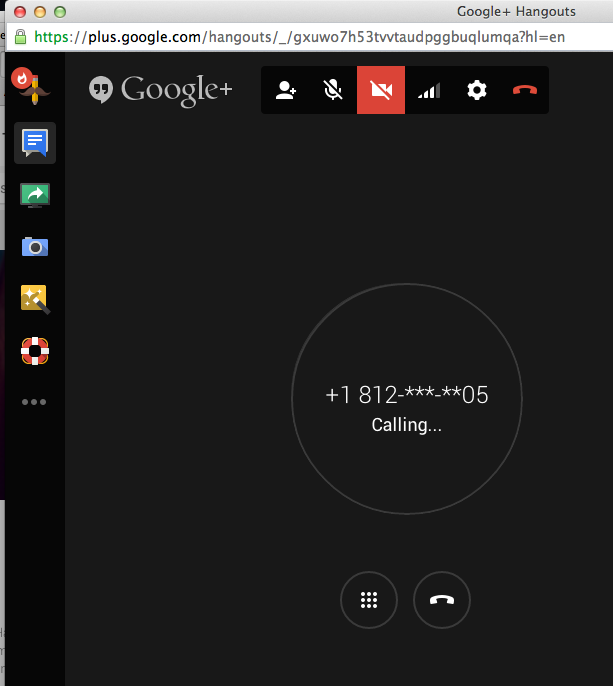
You will see this screen and hear a ringtone while it is calling. When the other person answers, you will see this:

How to Call the US from Europe for Free
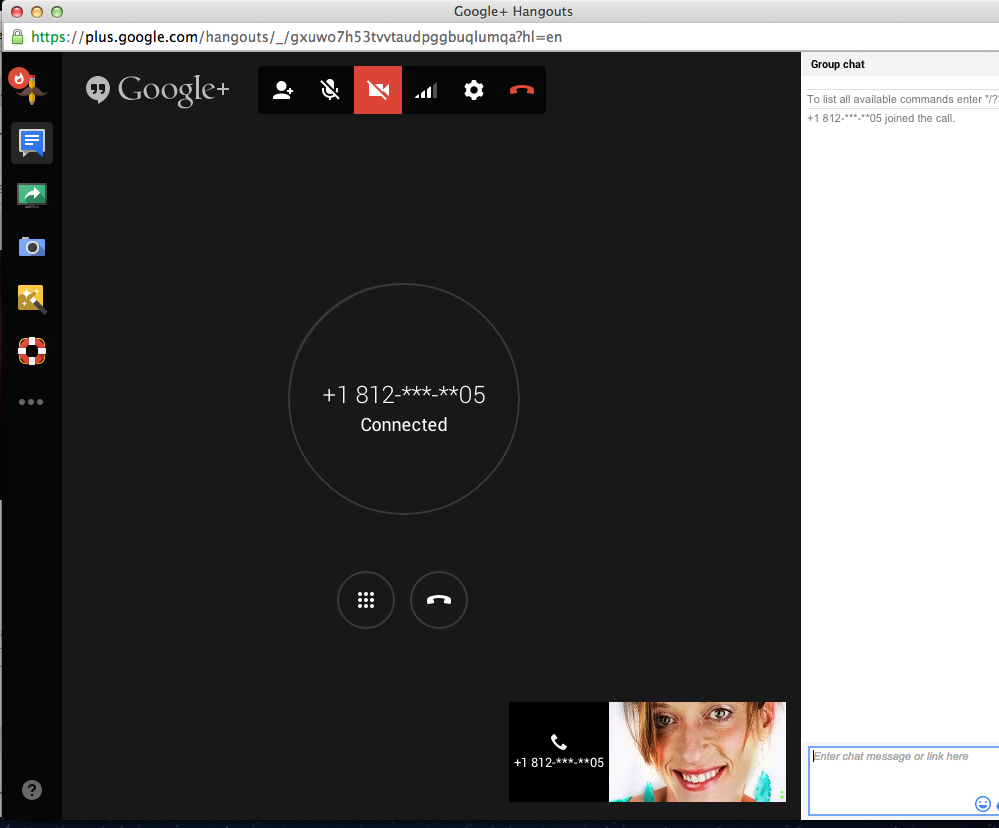
So this is how we kept in touch while I was away. It was perfectly clear, with no delay! Since the hotel Wifi was included in our bill, we just used it to make free calls. The caller ID on the person’s phone you are calling will show as “Unknown”, so you may want to let them know that beforehand (if they are anything like me, they won’t answer when they see that).

A couple of times I used my Google+ smartphone app to call from my iPhone over wifi too. Super easy!

Laduree Hot Chocolate Recipe Knock Off

Laduree Hot Chocolate Recipe Knock Off @savedbyloves

If you read anything about traveling to Paris, Ladurée hot chocolate and macarons are bound to be mentioned. We heard about the place first on Rick Steve’s audio Paris app, in one of his many interviews with Parisians.  Then pretty much everyone we talked to about “must see places” in Paris recommended we go there for chocolat chaud (hot chocolate).

Laduree Paris

Well we went there, and I must say, the hot chocolate was smooth and divine.

chocolat chaud paris Recipe

I came home, and much like with the french onion soup recipe I shared yesterday, I had to try to recreate the experience here in Indiana! After some time with Google, I found this Parisian Hot Chocolate Recipe. I followed it to the letter, using Ghirardelli bittersweet chocolate chips from the local Wal Mart. To grind them, I used my blender on “grind”. I also blended the mixture after adding the chocolate in the same blender on “Liquefy” for 1 minute.

Best Hot Chocolate Recipe

It was so much like the real thing! The next 10 minutes consisted of “mmmm….” and that’s about it. I have made it twice more since then, and it is a huge hit in our house. I won’t make hot chocolate any other way now.  If you can’t make it to Laduree, this is the next best option! Enjoy.

Best French Onion Soup Recipe


Amazing, easy French Onion Soup Recipe @savedbyloves


We had the awesome opportunity to travel to Paris, France over the holiday season. So. Freaking. Amazing. The history, the art, the architecture, the food, the food and the food awakened my senses like I could never have predicted! The first night in our hotel, we went for room service French onion soup, starting what became a daily must have. We ate it to warm us at the Christmas markets as we browsed the handmade soaps, colorful macaroons and stands filled with endless gifts, pastries and foods. By the time we landed back in Indiana, I already needed a fix. I asked Google how to make French Onion Soup just like they made it in France, and landed on a couple of recipes to give me a starting point, but then just made it my own. I tested out various combos until it tasted just like I remembered. Caramelizing the onions is key, and is about 30 minutes hands on, but then the crockpot takes over and you are free until serving time. Here is what I did!

INGREDIENTS

(Serves about 10-12 bowls, depending on size)

12 tablespoons butter
8 large yellow onions, sliced and separated into rings
2 tablespoon white sugar
4 cloves garlic, minced
1 cup cooking sherry
12 cups reduced-sodium beef broth
sea salt to taste
1/2 teaspoon dried thyme
2 bay leaves
8 slices of French bread
1 cup shredded Gruyere cheese
2/3 cup shredded Swiss cheese
1/2 cup freshly shredded Parmesan cheese
4 tablespoons shredded mozzarella cheese

French Onion Soup in the Crockpot @savedbyloves

 DIRECTIONS

Begin by caramelizing the onions

 Heat butter in a large pot over medium heat; cook and stir onions until they become translucent, about 10 minutes
Sprinkle onions with sugar; reduce heat to medium.
Stir constantly at least 30 minutes until onions are soft and brown.

Stir in garlic and cook about 1 minute.

Stir sherry into the  onion mixture and scrape bottom of pot to dissolve any browned food.

Transfer to Crockpot

Transfer onions into a slow cooker and pour in beef broth.

Season to taste with sea salt; stir in thyme and bay leaf.

Cook on high in crockpot 4-6 hours or low 8-10 hours.

10 minutes before serving
Arrange bread slices on a baking sheet.
Broil until toasted, 1 to 2 minutes per side.
Combine Gruyere, Swiss, Parmesan, and mozzarella cheeses in a bowl.
Fill soup crocks 1.5 inches from the top with soup and place bread slice on top of liquid.
Top with about 2 tablespoons of cheese mixture per bowl.
Place bowls onto a baking sheet, broiling until cheese topping is browned and bubbling, roughly 1.5 minutes.

Upcycled Sweater Christmas Ornaments

I am so happy to be here today sharing a tutorial for these Cozy Christmas Ornaments made from old sweaters. That ugly Christmas sweater you have? I bet it would make beautiful ornaments! This is an easy ornament to DIY, and you can make quite a few ornaments from one sweater, so let’s get started.

Upcycled Sweater Ornaments DIY from @savedbyloves @craftsncoffee

Fair-Isle-Sweater-Orn

You are going to need 3” balls of STYROFOAM™ Brand Foam (you could go larger or smaller, too); an old sweater or two; scissors; a sharp pencil; needle & thread; thick, white craft glue; and ribbon for hanging the ornaments.

Sweater-Ornament-Supplies

To start, mark the center top and bottom of your foam ball with a pencil. Then insert your pencil at each point to make a 5/8” hole.

Insert-Pencil

Cut a piece of sweater fabric, measuring about 4” – 5” high and 8” long. If you’re using a patterned sweater, be sure to plan where you cut to best highlight the pattern. Test fit your fabric piece around the ball to be sure it fits – the size of the fabric you’ll need may vary depending on the stretchiness of your sweater.

Fold your fabric in half lengthwise, right sides together, and stitch a ¼” seam. Turn right side out. Slip the ball into the center of your tube.

Upcycled Sweater Christmas Handmade Ornaments

Place a dab of white craft glue in the hole at the top and using a sharp tool such as a pencil, firmly push the cut edges of the fabric tube into the hole. Try to space the fabric folds evenly around the ball. Repeat at the bottom of the ball.

Tuck-in-sweater

Knot together the ends of a 6” – 8” length of ribbon, and push the knot down into the hole at the top. If you like, add a bow and jingle bell, or any other decorations, to the top of the ball. Let the glue dry before you hang your ornaments.

Red-Orns-on-Tree

Red-Argyle-Orn

I want to give a shout out to designer Kathleen George for helping out with these Sweater Ornaments. I have a few more ideas for repurposing old shirts to make ornaments in the Christmas Ornament series “Mad for Plaid & Paisley” over on Crafts ‘n Coffee. Please come by and check them out!

Repurpose-shirts-for-orname

Thank you so much for having me today, Johnnie. It’s a thrill to guest post here! I wish you, your family, and all of your readers a wonderful Christmas season!

Want more Repurposed Sweater Ideas? Check out our 50+ Ways to Upcycle Sweaters!

Happy crafting.

Sharon

Repurposed Toy Car Box to Sewing Notions Storage

Hello! I’m Steph and I blog at The Silly Pearl. I’m mom to 7 year old twin girls and I live in the San Francisco Bay Area.I love to repurpose containers into storage for my craft room. So I’m excited to show you what I made today here on Saved By Love Creations: I took a plastic toy car storage box (don’t worry, it’s not vintage!) and created a storage box for my collection of vintage trims that I’m always collecting from the thrift store. Thanks so much Johnnie for having me on your blog today to share my tutorial!

Repurposed Toy Car Box Storage to Sewing Notion Storage by The Silly Pearl

My girls do have a collection of cars themselves, but most are larger and wouldn’t fit into the compartments of the box. So I thought I could use it for myself in the craft room, to house all the little lengths of rick rack, seam binding, lace, and bias tape currently tangled in a box.

Repurposed Toy Car Box Storage to Sewing Notion Storage - Before

First step is to remove the label on the front and spray paint the entire box, inside and out. Choose a spray paint that bonds to plastic. Use a primer as well. Do several thin coats, allowing time to dry in between. Be sure to follow the drying time recommendations on the spray cans, particularly in between the primer and the color. I chose a turquoise color that I have a lot in my craft room.

repurposed_car_box_1

Once the paint is dry and you’ve allowed it to cure, you can start applying the scrapbook paper. An 8×12 inch piece of scrapbook paper fit perfectly on the front (I used my Xyron 9-inch Creative Station to apply adhesive to my scrapbook paper). Then I framed the paper with some red rick rack using my Xyron 1.5-inch sticker maker.

repurposed_car_box_2

Inside the lid, I created a pocket by folding an 8×12 inch piece of paper in half. I applied adhesive to just one of the folded sides and pressed that to the bottom half of the lid so that the other half of the paper unfolds out towards the bottom. Then I applied adhesive to another 8×12 inch piece of paper and pressed it to the inside of the first piece.

repurposed_car_box_3

Then I applied some double-stick tape to the edges of that unfolded half and pressed down the edges over that 2nd piece of paper. To allow some give for the pocket, I adhered the pocket at a slight angle on both sides.

repurposed_car_box_4

I grabbed some clothespins and wooden spools and wrapped my trims around them. For narrower trims, I used the wood spools, securing the ends with a little bit of washi tape. For wider trims, or for trims where I had a longer length, I used clothespins. Just make sure the clothespins and wood spools you use aren’t too wide or tall for the compartments. I was able to stack two of these one-inch spools into one compartment.

repurposed_car_box_5On the outside, I used a piece of cardboard that one of my trims came in, and with some letter stamps and more trims (of course), I created a label and adhered it to the front. All done!

repurposed_car_box_6

Inside, I stored some vintage trims that are still in their packaging. Plus, I added some trim along the edges of the pocket papers.

Repurposed Toy Car Box Storage to Sewing Notion Storage - Inside

Before and After!

Repurposed Toy Car Box Storage to Sewing Notion Storage - Before and After

Hope you’ll come on by my blog for more craft tutorials and check out my craft room ideas as well. Also, find me on Facebook, Pinterest, Twitter, and Instagram. Thank you again Johnnie for having me here on your blog today! –Steph @ The Silly Pearl

Upcycle a Table Runner into DIY Pillows

Hi Everyone, It’s Becky from Patchwork Posse. Home of fun sewing projects, quilt alongs, and a lot of chit chat!
A few years back I had picked up a table runner that I had loved. It didn’t fit anywhere, but I couldn’t let it go and brought it home. It was super long and on one side it had the striped fabric and the other it had a swirl design.

After sitting in my cupboard for way longer than I want to admit, I decided it was time to do something with it. The once table runner became two matching bolster pillows.

Table Runner to Pillows DIY Upcycle @savedbyloves

Materials Needed:

table runner that is double sided and can be ‘pulled’ apart– meaning the layers aren’t fused together.

pillow form the size you need or polyfil stuffing

tablerunnerpillow10

Table Runner to Pillow Tutorial~

1) Lay your pillow form on top of your table runner and figure out where you need to trim the table runner. You will need to remember to add a bit for your seam allowance.

tablerunnerpillow2

2) Stuff your pillow inside the inside of the table runner

tablerunnerpillow3

3) Fold the ends under 1/4″-1/2″ and pin in place. Hand stitch the opening closed

tablerunnerpillow4

You are done!

Now, if you are like me, I didn’t really want the pillow form to be trapped inside. So, I came up with a second closure solution. A foldover end. And, because the pillow is double sided, you are able to showcase the fabric design from the back and contrast with the front fabric.

tablerunnerpillow9

Quick how to for the folded end pillow~

1) Cut a piece of fabric measuring 6″ –this size you can custom for your pillow. This is the size I decided to do. Feel free to make it larger if you’d like

2) Fold over one edge and sew in place– you’re making a hem here

tablerunnerpillow5

3) Open the pillow ends just a bit and pin your foldover piece to the right side of the SAME fabric (remember that after you are done, it will be folded over to the opposite side)

tablerunnerpillow6

4) Sew across this edge– make sure you don’t catch the other piece with your needle when you are stitching it!

5) Turn the foldover piece to the front, mess with the corners so they lay flat and pin in place along the side

tablerunnerpillow7

6) Sew directly on top of the original seams on the sides– if you don’t have visible seams you can either stitch it still, or hand stitch along the edges to secure

tablerunnerpillow8

7) Stuff pillow inside and fold the flap over in place

tablerunnerpillow11

I seriously love these pillows! The reversible option with them. The removeable pillow form. The extra little detail of co-ordinating designs on top of each other with the flap. Yes, the pom pom ends were already there– double bonus!

Now I am looking at table runners in a whole new light! Can’t believe this wasn’t figured out before…and how much time this saves in making them!

For more easy sewing projects, stop by my blog or facebook.

DIY Upcycled Cookie Sheet Memo Board

Easy Upcycle Cookie into Copper Patina Magnet Board @savedbyloves @petscribbles

Hi everyone! I’m Laura from Pet
Scribbles
, and I’m thrilled to be guest posting for Johnnie
today!

I’ve got a fun DIY project to share: a copper patina magnet
board from an upcycled cookie sheet!

After seeing so many cookie sheet makeovers on Pinterest, I began
collecting some of our older ones. I also bought this new round one at
the dollar store:

Copper Patina Magnet Board

As regular readers of my blog know, I love the look of copper and
patina. I’ve made over quite a few pieces using this technique, from
glass
vases
made to look like copper pipes to large wooden planter boxes made to look
like metal. In each DIY, the steps are the same but the patina effect is
always different – just like real patina on aging copper.

Step One: Apply one coat of Modern Masters Copper Reactive
Metallic Paint to both sides of the cookie sheet.
Let dry.

For many surfaces, I use the Metal Effects Primer (also by Modern
Masters) as the first coat. On metal, it isn’t necessary as the first
step. However, as you’ll see in the image below, the first coat of paint
did go on a bit more streaky than I would have liked. (Using a primer
always provides some tooth for any subsequent coats of paint to adhere to.)

Copper Patina Magnet Board

Step Two: Apply a second coat of the copper paint to the back
side of the cookie sheet only.
Let dry.

Isn’t the paint gorgeous? There’s real metallic particles in the paint,
which is what reacts with the patina solution that will be added in the
next steps.

Copper Patina Magnet Board

Step Three: Apply a new coat of the copper metallic paint to the
front of the cookie sheet, then immediately spray the patina solution
onto the cookie sheet right over the wet paint.
The patina
solution comes in blue and green. I used the green shade:

Copper Patina Magnet Board

Using a sea sponge, I then played around pouncing the solution on the
cookie sheet, just making random patterns. It isn’t necessary to do
this, but it sure is fun!

Copper Patina Magnet Board

Step Four: Add a bit more of the copper paint, if
desired.
After everything dried overnight, I used the same sea
sponge and pounced a bit more copper paint here and there onto the front
of the cookie sheet. There’s no right or wrong way to do this, just play
with the look until you love it.

Here’s a close-up of the gorgeous patina finish:

Copper Patina Magnet Board

Step Five: Drill two holes into the cookie sheet. These
holes will be where you thread your ribbon through, to make the hanger
for your magnet board.

Copper Patina Magnet Board

Step Six: Cut two pieces of thin velvet ribbon (or a ribbon of
your choice), which will become small bows on the front of the magnet
board.
Cut two longer pieces of the same ribbon, which will be
used to create the hanger. (I didn’t measure my pieces, instead I just
eyeballed it.)

Copper Patina Magnet Board

Step Seven: Create the velvet ribbon hanger. Make a
loop with the smaller piece of ribbon (A), then thread
it (B) through the drilled hole, with both ends coming
through to the front. (C) Turn the tray over and slide
one end of the longer ribbon through the loop of the smaller piece.
(D) Tie the longer piece onto that loop with a simple knot.

Repeat this step for the other drilled hole.

Copper Patina Magnet Board

Step Eight: Pull the ends of the smaller pieces of ribbon all
the way through the drilled holes.
(They will be stopped by the
knots underneath that you made in Step Seven.

Step Nine: Tie the ends of each ribbon together with a simple
knot, then trim the edges to a length you like.
I trimmed mine
so each looks like a very basic bow shape and covers the holes
completely. (See image below.)

Step Ten: Tie the long ends together and make a large, floppy
bow.
Hang up on the wall and enjoy!

Copper Patina Magnet Board

Since it’s Christmas time, I decorated my magnet board with some of my
favorite vintage Christmas postcards. (I also made the glitter marble
magnets, and you can find that tutorial here.)

Copper Patina Magnet Board

I added a sprig of a faux pine branch too.

upcycled-cookie-sheet-memo-board

And when the Christmas season is over, my magnet board will be ready to
take on the new year and hopefully keep us more organized! (Unless I
decide to decorate it with more vintage postcards!)

Copper Patina Magnet Board

I’ve been a long-time admirer of Johnnie. Whether she’s crafting
bracelets or building furniture, her creativity knows no bounds!

Thanks Johnnie for having me guest post today, and thank you Saved By
Love readers too!

Happy crafting!

~Laura

60 Plus Christmas Cookie Recipes to Make

60-Plus-Easy-Christmas-Cookie-Recipes from @savedbyloves

We have moved things around a bit, and are now sharing with you our 60+ Christmas Cookies to Make from Taste Every Season. These will be great neighbor gifts and party treats this holiday season! Enjoy.


50 Plus Favorite Pottery Barn Knock Offs

50 Plus Best Pottery Barn Knock Off Ideas from @savedbylovesWho doesn’t love getting designer home decor and furniture for a fraction of the price? Today I am sharing our favorite Pottery Barn knock off decor DIY tutorials from around the web. If we missed your project, leave us a link!


Pottery Barn Knock Off Christmas Decor Printable

Pottery Barn Christmas Art Knockoff


Sometimes when I am having trouble coming up with a project, I visit my favorite store catalogs or websites for inspiration. This project is inspired by a Christmas Wall Art piece from Pottery Barn that cost $99 on the website. I got the print for $1.75 at Office Depot by downloading it to my flash drive and taking it to my local store. Total, my version was under $20!

Reindeer Wreath Printable

Download the 11×14 Reindeer Wreath Printable and grab a frame with your Michaels 40% off coupon and you can have your own Pottery Barn winter art knock off for 1/5 of their price. You can click the above link or thumbnail to pull of the full res version and save to your flash drive for going into the store, or save to your computer and order a print electronically.

*I used this classic wreath graphic from The Graphics Fairy and this Reindeer Silhouette from Lolly Jane on this burlap background in Photoshop to create the print!

I hope you enjoy!
Pottery Barn Christmas Printable Art Knockoff from @savedbyloves

Do you want to see more knock off designs for decor, jewelry and more? Visit our 50+ Knock Off Designs Roundup:

Privacy Policy