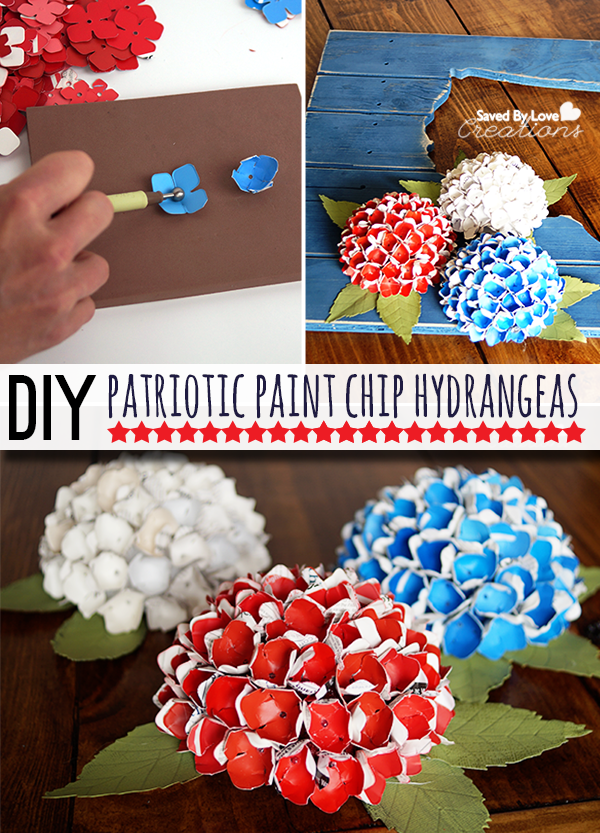
Archives for June 2014

DIY Patriotic Paint Chip Paper Hydrangeas

[pinit]Make Patriotic Paint Chip Craft Paper Hydrangeas @savedbyloves[pinit]

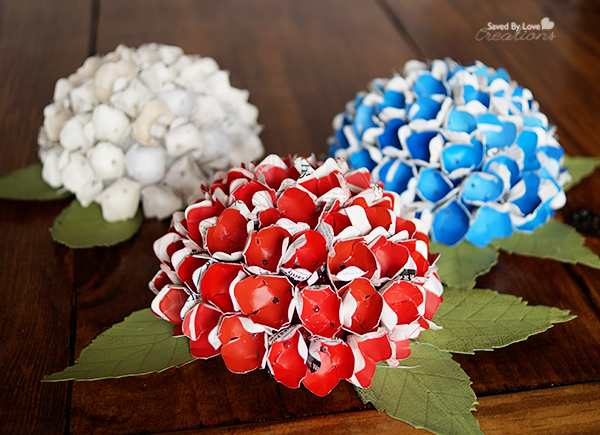
Show your American, upcycling spirit with this patriotic paint chip hydrangea craft!  These make a lovely centerpiece for your summer festivities and Fourth of July party tablescape.  This is a craft the kids can help with for some creative family time during school break.

Patriotic Paper Hydrangea Paint Chip Craft

CLICK HERE TO FOR SUPPLY LIST AND TUTORIAL

Chalk Paint Map Decoupaged Table Revamp

[pinit]Furniture Flip Chalk Paint Table Old Map Decor @savedbyloves[pinit]

Today I am sharing another furniture flip! We will be taking a retro 50’s side table to a chalk painted, old map bearing, stylish addition to the master bedroom.  A little decoupaging and glitter blast add a special touch.  Let’s do it!

SUPPLIES:

Table Before Furniture Revamp

Old table

Mod Podge Satin Finish

Decoupage Map Paper from Martha Stewart or actual old maps

Foam Paint Brush

Pen or pencil

 Scissors

Chalky Finish Paint in desired color

Americana Clear Creme Wax

Krylon Gold Glitter Blast

Krylon Glitter Blast Clear Sealer

TUTORIAL:

Americana Chalky Finish Paint Projects

I lightly painted 2 coats of Americana Chalky Finish in Timeless, allowing 20 minutes to dry between each coat.

How to Decoupage Furniture

I removed the doors/hardware and outlined them onto my decoupage paper, then cut out the paper to size.

Decoupage a Table With Mod Podge and Map Paper

How to Decoupage a Table

Next I added a layer of Mod Podge to the door surface with a foam brush.

Decoupage Table Tutorial

I smoothed wrinkles out from the center with the palm of my hands.  A brayer would work too.  Then I added a uniform layer of Mod Podge to the top of the map paper to seal everything.

Krylon Glitter Blast

I sprayed the pulls on the door, and the shoes on the table legs with Krylon Gold Glitter Blast.

DIY Old Map Table

I applied a coat of Americana Decor Creme Wax in clear to the whole piece and replaced the glittery hardware once everything dried.

DIY Map Craft

I love our new side table.  Just the perfect colors and style for our decor.

I hope you are inspired to get chalky and decoupagey!

DIY Wedding Gift Art

Hello friends! It’s Barbara from Chase the Star, as always elated to be here!

It’s wedding season! Whether you’re planning a wedding or going as a guest, you can’t deny that new nuptials are all around us.

[pinit]

DIY-Wedding-Art-via-Chase-the-Star-for-Saved-By-Love-Creations-wedding-diyArt-DIYcraft-silver

[pinit]

Although I’m already happily married, I am about to celebrate a milestone anniversary, 10 wonderful years! So many weddings are DIY these days, and they look amazing! For all of the brides to be, I have a pretty and easy to make craft for your wedding decor, that can even be used in your home later on!

DIY Wedding Art

Here’s what you’ll need:

Wood plaque

Wood applique

Wood letters and ampersand

{I picked all of these up at Michael’s}

Glue gun/glue stick

Silver and white craft paint {or any color combination you like}

Make DIY Wedding Art or Gift 550px

DIY Wedding Art 550px

How to Make DIY Wedding Art:

Step 1:

Paint the wood pieces. I used silver on the plaque and letters, and white on the applique.

550px DIY Wedding Art

Step 2:

After all of the pieces have dried, glue the applique to the plaque with the glue gun. Then, glue the letters to the applique in the pattern you like.

Step 3 {Optional}:

Glue a 2 inch strand of jute or heavy string to the back of the plaque, or a saw-tooth hanger for easy hanging!

I bet this would be gorgeous in gold too! Any combination of colors to go with your wedding or home decor makes sense. I also love this idea to use as a family crest, or to give as a gift, there are tons of possibilities.

DIY Wedding Art via Chase the Star for Saved By Love Creations #wedding #diyArt #DIYcraft #silver

This will be up on my bedroom wall just in time for our big anniversary!

Check out my DIY Wedding round up for more ideas. For more crafts, recipes and home decor visit me at Chase the Star, and on Facebook, Google+, Pinterest, and Instagram!

Until next time friends!

New Signature

Stenciled Burlap Bags Vase Wraps

[pinit]Stenciled-Burlap-Bags-DIY @savedbyloves[pinit]

Hello! It’s Colleen and I’m back with a fun paint craft today. Are you a fan of burlap like I am? I saw these little burlap bags in that store that starts with Wal and ends with Mart and couldn’t resist them. A set of 3 for under $3? Oh yeah. I would’ve bought more but I had no idea what I was going to do with them.

They’re not quite large enough for wine bottles so that was out. They’d make cute party favors but I’m not throwing any parties. And I simply couldn’t wait for the holidays – although I did buy another set so I’d have them for Christmas presents.

They are the perfect size for canning jars. But who wants to cover up Mason jars, even with burlap? I just grabbed some regular ol’ jars, filled them with water, slipped them inside the burlap bags and made a cute burlap vase!

However the only thing cuter than burlap is painted burlap so let’s paint!

Stenciled-Burlap-Bags

Supplies:

  • Burlap Bags (available at Walmart and craft stores)
  • Mod Podge peel ‘n stick stencils
  • Sharpie marker
  • Stencil Pouncer or foam brush
  • #8 paint brush
  • piece of cardboard to fit inside the bag
  • painter’s tape (optional)
  • wax paper (optional)

Paint:

  • Folk Art Calypso Sky (for the dragonfly)
  • Folk Art Fresh Cut Grass
  • Folk Art Aqua (for the butterfly)

Stenciled-Burlap-Bags

We’re going to start with stenciling the bags. Usually stenciling burlap is tricky because of the weave and the nubbiness. But Mod Podge just came out with a line of stencils that are self-adhesive that I just love.

Stenciled-Burlap-Bags

These stencils adhere pretty well to the burlap but I found if you lay a piece of wax paper underneath the bag, when you lay the stencil over it, the edges will grab the wax paper and anchor the stencil so it won’t move. I also put some painter’s tape on both sides but that was to protect the burlap from over-stenciling.

Stenciled-Burlap-Bags

After your stencil is placed, load your pouncer or foam brush with the green paint. Then tap it a few times on a paper towel or on your palette plate to ‘off-load’ some of the excess paint. This helps to prevent bleed-thru under the stencil.

Stenciled-Burlap-Bags

Pounce in an up and down motion, making sure you have full coverage with the paint. Rather than pressing hard, tap lightly and repeat the application as needed. I found the coverage to be really good and only had to touch up a couple of areas with one application.

Stenciled-Burlap-Bags

While the paint is still wet, carefully lift the stencil off, place it on the wax paper and wipe the paint off of both sides with a damp paper towel. Even though these stencils are self-adhesive, you can reuse them over and over again. Once the stencil is clean, place it back onto the mylar strip it comes with.

Stenciled-Burlap-Bags

If you’re stenciling more than one bag, toss your foam pouncer (or brush) into a plastic baggy to keep it moist while you’re cleaning the stencil. If you put the foam into water, even with wringing it out thoroughly, you’ll still get an excess of air bubbles in the paint.

Stenciled Burlap Bags

Let the paint dry thoroughly and keep the cardboard inside the bag.

Now we’re going to draw a little dragonfly. If you don’t trust your freehand skills, you can grab a dragonfly pattern here that I drew. There is a butterfly pattern in there too. Since I draw a lot, I make quite a few patterns for my readers. But you can always find clip art on Google too or practice drawing your own. Yes! You can only get better, the more you practice!

draw dragonfly

Okay, to draw a simple dragonfly, start with a dot and a long oblong shape. That would be his head and his body.

Then draw two more elongated ovals, and then under those two more that are a little shorter.

Add a couple of antennae and you’ve just drawn a dragonfly!

Stenciled-Burlap-Bags

Fill in the wings with Calypso Sky using the #8 brush, or any other brush you have on hand.

Allow the paint to dry and then go back over the outline with the Sharpie.

Stenciled-Burlap-Bags

Next, go grab one of your clean jars and fill it with water.

Stenciled-Burlap-Bags

Now I’m gonna share a top secret florist trick! Just kidding. I was a florist but I used floral tape, not scotch tape. (works about the same though, ha!) Criss cross some tape over the mouth of the jar, creating a gridwork. Then gather your flowers in one hand and when you have them arranged how you want, wrap a twisty-tie around the stems. Place the stems thru the centermost opening in the tape grid.

Ta da! You can arrange flowers now!

Stenciled-Burlap-Bags

Then slip the jar with the flowers into your stenciled burlap bag.

Stenciled-Burlap-Bags

Isn’t this a cute way to use some plain ol’ jars? They’d make a pretty gift too!

What else would you use these bags for? I’d love to hear your ideas too!

Thanks so much for hanging out with me today! I hope you’ll come visit me at Just Paint It too. You can also find me on Facebook, Google+, Pinterest and Instagram. And of course, I’d love for you to drop by my Etsy and Zazzle stores.

I’ll see you next month!

signature

Side Table Flip Distressed With Chalk Paint

[pinit]Furniture Flip Chalk Paint Distressed Table DIY[pinit]

My mom gave me an outdated oak table that she was ready to let go.  I saw curves that would look fantastic with some chalk paint distressing, so that is what I did.  See how some paint, crackle medium, antiquing medium and a change in hardware went into this fun furniture flip.  As an aside, mom wants her table back now.  Should I charge her?!

How to paint furniture

I removed the hardware and painted a layer of Chalky Finish in “Vintage” as the base layer.

DecoArt Chalky Finish Paint

Once that dried, I painted a thick layer of crackle medium from the Chalky Finish line.  When that dried I painted a layer of Chalky Finish “Treasure”..

How to Distress Furniture

I rubbed away the top layer of paint on the edges in random places to show the base layer in a chippy paint kinda way.  For the drawer, I followed the same steps, using the Treasure as my base paint and Vintage as the top paint layer.

How to create an antique effect

I sealed the entire piece by brushing on Clear Creme Wax, followed by Aging wax.

Table Flip @DecoArt_Inc Distressing with Chalk Paint @savedbyloves #chalkyfinish

I am loving the transformation!  What do you think?  Have you used this paint?

50+ Ways to Upcycle CDs and Vinyl Records

[pinit]50 Plus Best DIY Upcycle Vinyl Records and CD projects to make @savedbyloves[pinit]

Since most of us no longer listen to CDs or records, our planet is left with a ton of these seemingly useless items. Today I am sharing with you 50+ upcycle projects that solve this dilemma using some outside of the box creativity. You will think twice before considering old records and CDs to be useless!


DIY Window Treatment for Double Deck Doors

[pinit]Window Treatment for Double Deck Doors[pinit]

If you have double deck glass doors, you may be wondering what kind of window treatment works and looks best with them.  I ran into the same dilemma in the living room of our new residence.  Hanging a rod above the door frame would leave me with curtains hanging in the way every time I opened the door.  That is why I decided whatever went up there needed to be contained within each door.  I ended up altering regular 84 inch curtains and using tension rods for the perfect solution.   Want to see how?

SUPPLIES:

Farmhouse Decor Window Treatments

Curtains about 2 times wider than the glass in  the door at least 3 inches longer than the glass

Tension rods that fit inside the window (I got 22-36 inch rods at Target for my 24.5 inch wide glass)

Sewing machine or liquid stitch or stitch witchery

Fabric scissors

Iron and ironing board

Measuring tape

Pencil or chalk for marking fabric

TUTORIAL:

Measure the length of the window and cut curtains to 3 inches longer than that length.

DIY Window Treatment

Fold 3 inches  from the bottom of the curtains back and iron to make a hem (the hem will be at the length of the glass).

Pin in place and sew all the way across the width of the curtain.  This doesn’t need to be perfect, or even close, since the curtains will be bunched up around the rod and the seam won’t be visible.

Ruffle Curtains

Hang with tension rods in the top and bottom and you are done!

TIPS:

If you don’t want to or can’t use a sewing machine, follow the instructions but use Liquid Stitch or Stitch Witchery to secure.

You can do this with a piece of fabric at least six inches longer than your glass by sewing a 3 inch seam at the top and bottom, instead of using curtains.  I just happened to have the curtains on hand.

For more ideas, visit our 50+ Curtains and Other DIY Window Treatments to Make:

DIY Tissue Paper Scripture Chalky Finish Wall Art

[pinit]DIY Chalk Paint Reclaimed Wood Scripture Art @savedbyloves[pinit]

On a recent trip to Michaels, I found Hazel and Ruby tissue paper that just had to come home with me.  It is big, comes in super cool prints and is perfect for decoupage projects.  I used it to make this scripture word art on reclaimed wood, with a stencil mask technique.  Today I will show you how to create your very own.  You can use the text provided in a downloadable file below, or bring your own verse to the game.  Let’s do this, want to?!

SUPPLIES:

Decoupage Home Decor

Hazel & Ruby Tissue Paper

Mod Podge

Paint Brush

Wood Surface

Chalky Finish Paint (I used color “Relic”)

Vinyl Sheets and Cricut or Adhesive Word Stencils

TUTORIAL:

Tissue Paper Decoupage Wall Art DIY

Apply a generous layer of Mod Podge to your wood surface.  I am using the back of the art I showed you several years ago here:

DIY Cheap Wall Art Faux Oil Painting

It was time to change this art to fit my new decor!

https://savedbylovecreations.com/2011/03/bird-faux-oil-painting-frugal-wall-art.html

Apply the tissue, smoothing out wrinkles with the palm of your hand.  This tissue didn’t really wrinkle, so that was pretty awesome! Apply another layer of Mod Podge to seal the tissue and cut or tear the excess paper from the edges.  I actually cut mine to fit the board before applying, so there wasn’t excess.  Either way is fine.  The edges don’t have to be perfect since you are painting over them in a future step!

Phillipians Bold

I used the jpg file to cut the text out of adhesive vinyl using my cricut and Sure Cuts Alot.  You are free to use this file as well.  Just right click the thumbnail to pull up the full resolution version and save to your computer.

DIY wall Decor

I applied the stencil to the tissue paper after letting the Mod Podge cure overnight.  I used Cricut transfer tape to transfer the vinyl words.  You can do this by hand, but the transfer tape makes the process way easier, faster and neater.

DIY Wood Sign

Next I painted over the entire surface with Chalky Finish Paint in “Relic”.

Cricut Home Decor Project Tutorial

I used tweezers to remove the letters before the paint dried completely.

DIY Scripture Sign

I sealed the piece with Clear Creme Wax to finish.

DIY Budget Friendly Wall Art

I am super happy with how it turned out!!

If you like this project, be sure to check out 50+ Scripture Art DIY Tutorials:

50 Plus Awesome Ways to Upcycle Clothing

[pinit]50 Plus Best DIY Upcycled Clothing Tutorials to make @savedbyloves[pinit]

Before you haul that pile of old clothes off to Goodwill, you may want to check out this collection of 50+ awesome upcycled clothing tutorials! Up the style of your wardrobe with some simple and inexpensive creative ideas to refashion those old clothes. Did we miss your favorite? Let us know. We love a good clothing upcycle!


How I Maintain My Wellness with 5 Healthy Habits

I am a member of the Collective Bias®  Social Fabric® Community. This shop has been compensated as part of a social shopper amplification for Collective Bias and its advertiser.

Are you a woman with an active lifestyle, approaching her 40’s?  How is your health awareness?   Have you noticed that things like your memory, digestive health and energy level have changed since the twenty year old you was in town?  It is impossible to think that5 years ago I ran two full marathons, and all of the training that goes with that endeavor.

FirstMarathon


As a full time DIY blogger, wife, step mom, doggie momma and caretaker of my grandparents, and avid runner to name a few things, I need all the help I can get maintaining a healthy lifestyle.  As I age, I have to supplement my diet to stay on top of things physically, mentally and emotionally.
Walgreens Women's Health

Thankfully, Walgreens is just the spot for my women’s health needs.  I can score my vitamins and supplements in a snap, for great prices.


#HerHealth #CollectiveBias

[pinit]

#HerHealth #CBias #shop #CollectiveBias[pinit]


 My top 5 habits for staying energetic, alert, focused and healthy are:

1.  Lots of water.  So much water.  My mom got me on a water kick recently.  Before she stepped in, I was all about coffee and diet soda.  Now I am drinking 70-80 ounces of water daily.  At first, I would just chug from my water bottle and get it over with, but now I enjoy and even crave the stuff.  I feel more energetic and have better skin!  I am sure my kidneys are happier too.
Fish Oil Supplements copy

2.  Omega-3-Fatty Acids.  I swear that can see a notable increase in my ability to remember things, like names of people I meet, when I consistently take daily fish oil supplements.  These essential fatty acids are not made by the body and therefore must be ingested.  We need them for optimal health!


3.  Women’s Daily Vitamin – Ok, so they are gummies.  Don’t judge.  They still contain vitamin D and Calcium for women’s bone health.  These help me cover all bases when I may be skewed one way or another with my diet.

4.  Digestive Health Probiotic Supplement – Years of eating like a rabbit and on the go have decreased the “good bacteria” in my stomach that aid in digesting what I need from my food.  The result is super unpleasant and includes bloating, irregularity and poor nutrition.   It is important for us ladies with crazy schedules to get the most out of those times we do stop to eat.  That is where probiotics come to the rescue.  They replace the helpful bacteria and improve digestion of nutrients and regularity.  Bye bye bloating!

5.  Sweat, everyday.  Get my heart rate up for at least 30 minutes.   For me, this comes from running, which I wouldn’t feel like doing much at all without 1-4!


No marathons are in my calendar this year, but I am tackling an obstacle, muddy 5k, which is a first for me!  What are your healthy habits?   Do you participate in races?

Privacy Policy