Archives for January 2014

DIY Chalky Glitter Heart Mason Jar Votive Holders

[pinit]DIY Chalkboard paint Mason Jar Valentines Day Lanterns @savedbyloves [pinit]

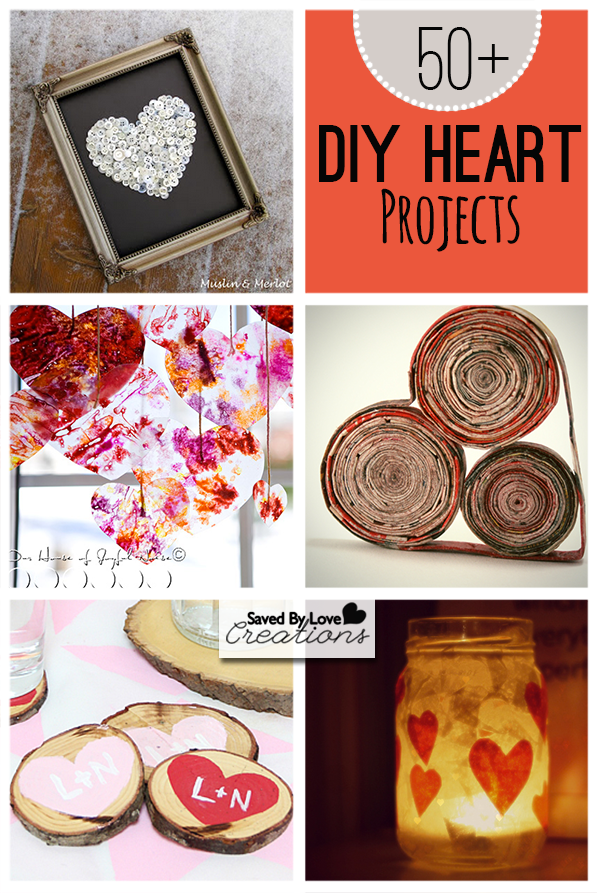
Today I am sharing how to make these fun chalk and glitter paint mason jar lanterns.  They are super simple to make, and will compliment your Valentine’s Day decor perfectly.  Let’s get started!

Valentine's Day Mason Jars

SUPPLIES:

Mason Jars

Deco Art Chalky Finish Paint in Everlasting

Deco Art Crystal Glitter Glass Pain in Red

One inch paintbrush or foam brush

Adhesive Jewels

Heart Stickers or Cut out hearts from Foil tape with paper punch or Sizzix Heart Die

Rubbing alcohol

Lint free towel

TUTORIAL:

Mason Jar Lanters

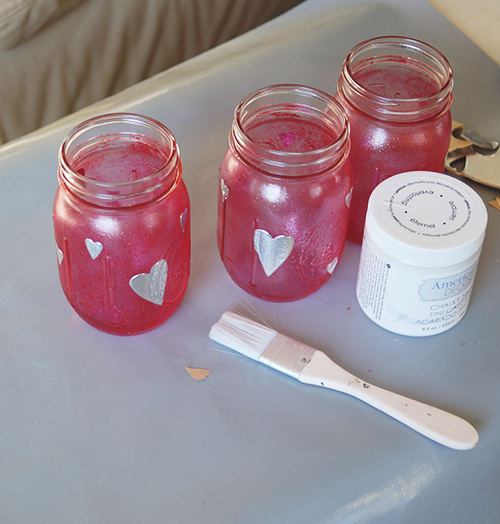
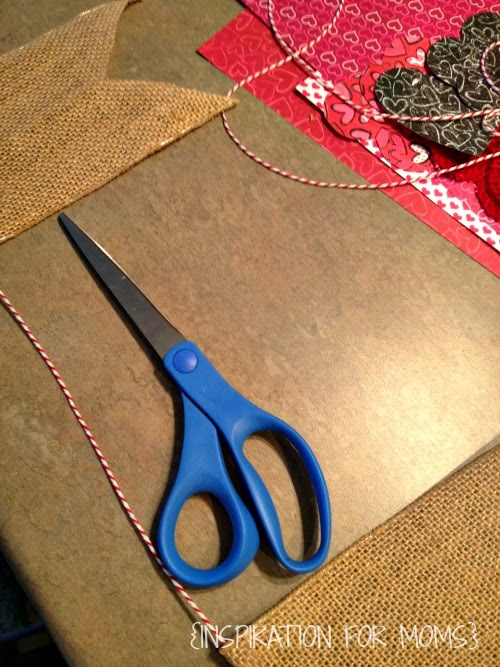
Clean mason jars with alcohol and lint free cloth, then paint with red glitter glass paint by DecoArt.  Let dry completely then place heart stickers where you want your hearts to be.  I used foil tape and my sizzix heart die because The foil sticks well and the paint won’t seep under in the next step.

How to Paint Mason Jars Chalkboard

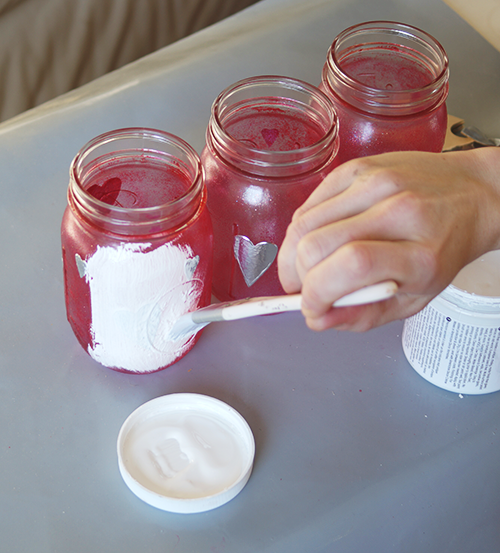
Use a soft brush to paint on chalky finish paint.  I liked the look of the red showing through a little, so I just did one coat, but you can let dry for 30 min and add another coat of you want a whiter look.  When you have painted on your final coat, use tweezers to carefully remove heart stickers after about 10 minutes.  You don’t want to let your project dry completely with the stencils still adhered.  If you do, you run the risk of peeling away adjacent paint when you remove them.

Mason Jar Valentine's Day Craft DIY

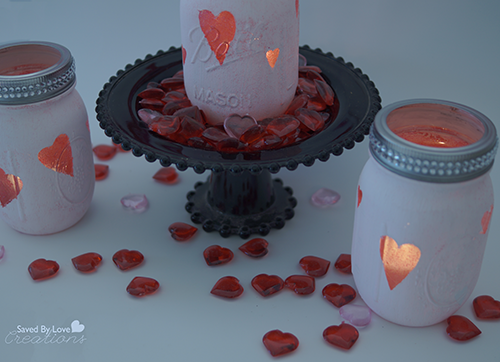
Apply adhesive rhinestones to jar lid as shown in pics, insert candle and that is the end!

DIY Painted Valentine’s Day Coffee Mugs

[pinit]DIY Painted Valentine's Day Mugs
[pinit]

Hi there! My name is Colleen and I’m so excited to be a new contributor here. I blog at Just Paint It and, as you might guess by the name, I do a lot of paint projects.

While I am an artist, I am completely self-taught and nothing brings me more pleasure than helping others create their own ‘masterpieces’. . . even if they are cute l’il painted mugs.

Painted-Mug-A

I picked these guys up at the dollar store. You might not be able to find the exact style but any white mug will work for this project.

Once you’ve cleaned the mugs with soapy water and they’ve dried, take a cotton ball and rubbing alcohol and go over the areas that’ll be painted. Let air dry.

The alcohol removes and traces of oil left by your fingers that would prevent the paint from adhering.

Painted-Mug-B

There are now a few different companies that make “multi-surface” paint. I happen to love Martha Stewart’s for a few reasons:

1) there are different sheens in the same color way, like the Pearl finish I used on these mugs, and

2) she has tips that screw on to the bottles allowing you to use the paint as a writer or for detailing. You’ll see more about that one below.

Painted-Mug-C

Since these mugs already had little oval indentions, I used those as a base for my “pattern”. I used two coats of Satin finish, allowing each one to dry thoroughly.

Painted-Mug-C1

Next, I applied two coats of the Pearl finish in the same color as the basecoat. You could easily leave the Satin as it but the Pearl adds an extra shimmer which is really pretty.

Painted-Mug-D

Since Valentine’s Day is right around the corner, I painted a couple of hearts with the Satin paint – two coats – and followed up with Pearl in the same color.

Now, if you’re a little uneasy about painting the heart freehand, I have a little “secret” that might help. Of course, if you have a stencil, you could always use that too but I like the relaxed look of the hearts not so matchy-matchy.

Painted-Mug-E

Okay, if you’re like me, sometimes it’s hard to ‘stay within the lines’, right?

Here’s a super easy way to “erase” a paint boo-boo:

Painted-Mug-F

Get a clean, slightly damp paintbrush and carefully stroke it once across the paint needing to be removed. Then rinse, blot excess water on paper towel, and repeat as needed.

Painted-Mug-G

This little ‘eraser’ saves loads of time and aggravation, believe me.

Now that you have some blocks of color and a couple hearts painted, you can add some detailing. Don’t panic! This is easy-peasy stuff.

Painted-Mug-H

As I mentioned above, Martha’s craft line includes a set of three different-sized tips that screw right on to the paint bottle. Love that.

If you’re not using Martha’s paint, you can get little squeeze bottles but since you only need a smidgen of paint, it’s not really worth the time and trouble.

Painted-Mug-I

Using the Pearl paint, I outlined the color blocks and then squeezed a few dots here and there. No big deal.

You could also use the end of your paintbrush to “dip-dot” too. Dip dots are so much fun and you can even make flowers with them!

Painted-Mug-J

You’ll want to “cure” the paint so the mugs will be washable – either by hand or top rack in the dishwasher.

You can either let them air dry for 21 days or if you’re impatient like me, use the oven. Set the mugs on a rack in a cool oven, turn it on to 350 degrees and bake for 30 minutes. After 30 minutes, turn the oven off; let the mugs cool completely in the oven. Painted glass should heat up and cool down in the oven. Set aside for 72 hours.

Painted-Mug-K

Aren’t these fun? If you paint two, you’ll either have a set or one to give away and one to keep!

And by all means, feel free to create your own design too! Painting glass and ceramic is great because if you don’t like the way something looks, you can just wipe it off with a damp towel and start over (as long as it hasn’t air cured for 21 days).

Thanks so much for hanging out with me today. I’ll see you again next month with another fun paint project. In the meantime, please drop by Just Paint It and say hi. I’m videotaping Spring classes that should be ready in a few weeks. You can also find me on Facebook, Google+, Pinterest and Instagram too.

signature

Polymer Clay Valentine’s Angel

[pinit]

Polymer Clay Tutorial Valentine's Day Angel[pinit]

It has been awhile since I brought you a polymer clay project, and today’s is a sweet Valentine’s Day angel for you to love!  The inspiration for this project came from Prims, a publication I recently started enjoying.  It is a simple process that requires just a few basic supplies.  Most of the shaping of the clay is done by hand.  Other than the clay, all you need is acrylic paint, and some paper crafting embellishments to create your own whimsical figure!

Prims Magazine

Here is the publication that gave me the idea; Prims Holiday Edition .

Prims

Tina Haller made these adorable Halloween clay dolls.  I went with a Valentine’s Day version!

TUTORIAL:

Polymer clay doll tutorial

Create the head, arms and body in separate parts with conditioned polymer clay.  I used scrap clay for this part.  I wasn’t sure what color I wanted in the end, but it didn’t matter since I knew I could paint the doll whatever color I wanted with acrylic paint.

The arms are long and skinny, which lends to the creepy Tim Burton kind of feel.  I used scissors to cut the fingers.  For the red gown, I used a marker to shape the rolls.  Just use what you have on hand.  The most useful sculpting tools you have are your fingers.

For the eyes and lashes and mouth, use a toothpick or needle tool to etch the lines.  Pinch with fingers to make the nose.   Bake each piece with wire inserted where it will attach.   I bake at 250° for 1 hour.


Polymer Clay Tutorial DIY Valentine's Day Angel mixed media @savedbyloves

Paint the pieces as desired.  Attach together with super glue, which works great for polymer clay.

For the wings, I used aluminum cans and cut them with the Sizzix Angel Wings Die.  I embossed with a dots folder and used ICE enamels by Susan Kazmer.

The heart I cut from corrugated cardboard and covered with washi tape, which I then painted with Distress paint pink.  I outlined the edges with my Black Soot Distress marker.

Polymer Clay Valentine's Day Angel DIY

The sign, bunting, washi tape and bakers twine are all from Rhonna Farrer’s Chalk Studio Collection with My Mind’s Eye.  This is my new obsession.  I love all of the paper, embellishments and washi tape in this fantastic line!  I found it at Joann Fabrics.

That is it.  I hope you enjoyed this little angel!


Easily Screen Print Custom Designs with Lumi Inkodye; Video Tutorial

[pinit]How to Make a Custom Print Tshirt with @lumi inkodye @savedbyloves[pinit]

How to Screenprint

This year at CHA, I saw so many amazing new products that I am busting at the seams to tell you about, and this is one of my favorites!  Watch the video to see how you can use Lumi Inkodye to make prints on natural materials.  I found this white cotton t-shirt at Walmart for $4.88 and came knew it would be perfect to try out this cool product.

Inkodye Lumi Screenprint

I made this negative in Photoshop and printed it on Lumi’s transparency film.

Lumi

Using the DIY Printing Kit in Blue, I followed the steps in the video below to make my custom logo tshirt!

Lumi Inkodye Tutorial

I used a baking pan as my flat surface and pinned my negative on top of the area coated with the solution.

Lumi Inkodye Tshirt

After 10 minutes in the sun, I had a great print. Make sure you wash in the detergent after bringing inside, so the developing stops!

This was so easy.  Look at the detail in the text!  Super impressive.  I am doing more prints as we speak.

Now for the video DIY straight from the Lumi Booth at CHA 2014…

How to Make a Custom Print Tshirt

Over 50 Superbowl Party Recipes

[pinit]50+ Super Bowl Appetizer Recipes @savedbyloves[pinit]

Are you ready for the Superbowl?  I will be honest, I couldn’t really care less about the game, but parties are my thing.  This collection of over 50 superbowl appetizer and game night recipes will help make yours a hit!  Enjoy.


DIY Winter Felt Tree

Hi, I’m Vidya from Whats Ur Home Story. Very excited to be a monthly contributor at SBLC. I blog about how our family of 4 is turning a cookie cutter into a unique and interesting home that tells our story. I believe that no project is too small to try be it home decor, DIY, crafts, gardening, sewing, or organizing.

Today I would like to share with you an easy winter craft, a winter felt tree.

[pinit]

Winter felt tree, diy paper cone trees tutorial, paper cone Christmas tree @savedbyloves

[pinit]

I made both the trees myself but the one on the right is by far the easiest and most forgiving project I’ve done.

Materials

 
White Felt
Paper mache cone or you could make a cone out of poster board
Scissors
Glue gun
White craft paint and brush – not necessary but if you are a sloppy crafter like me you’ll need it.

Winter felt tree, diy paper cone trees tutorial

Tutorial

 
  • Start by painting your brown paper mache cone white with the acrylic craft paint. This way the brown base will not show through any hot glue misses later on.††If you are using a poster board cone, skip this step.
  • Cut felt strips in varying widths. My cone was 14″ tall. So I ended up using four 1 inch strips, two 3/4″ strips, two 1/2″ strips, and a small 1/4″ strip. It is important to lower the width of the strip as you go up the tree to simulate the look of smaller leaves on the top and wider leaves on the bottom. These are not exact measurements, I just eyeballed them.
  • Cut out triangles on one side of the strip as shown below. Take care not to cut all the way through. Again no need to be precise here, just free hand.

Winter felt tree, diy paper cone trees tutorial

  • When you make these you will end up with a lot of felt triangles (the parts that you remove from your strip). I didn’t want to waste these so for my first layer on the tree I hot glued each of these to the base. If you are not a fan of gluing each petal down you can start with the strip instead.

Winter felt tree, diy paper cone trees tutorial

  • From then on hot glue each strip around the tree making sure there is some overlap between the layers.

Winter felt tree, diy paper cone trees tutorial, paper cone Christmas tree

  • Remember to switch to the thinner strips as you go up the tree. When you reach the top cut the extra felt off and carefully hot glue the felt to cover the pointy top.

Winter felt tree, diy paper cone trees tutorial, paper cone Christmas tree

  • No worries if there are any empty spots where the paper cone base is visible. You can use the extra triangles that you removed when you made the strip intially to cover up these spots.

Winter felt tree, diy paper cone trees tutorial, paper cone Christmas tree

  • Gently fluff up the ‘leaves’ and you are done!

Here’s it is adding glam to my rustic winter mantel.

Winter felt tree, diy paper cone trees tutorial, paper cone Christmas tree, rustic winter mantel

Hope y’all enjoyed this fun wintery craft. For more easy DIY ideas stop by Whats Ur Home Story or follow me via Facebook, Pinterest, Twitter, or Instagram.

New Alcohol Ink Colors from Ranger & Video Tips from Tim Holtz CHA 2014

[pinit]New Ranger Ink Alcohol ink colors and DIY Flower with CHA 2014 Tim Holtz Video @savedbyloves[pinit]

I am so excited about the new alcohol ink colors from Ranger that I had the chance to demo at CHA 2014.  We used them making these beautiful flowers from the Tim Holtz Tattered Florals Die from foil card stock.  They were quick and easy to make, and can be used as barrettes, corsages and more!

New Ranger Ink Alcohol ink colors and DIY Flower with CHA 2014 Tim Holtz Video 2

Here are the supplies we used.  Make stripes of various ink colors on the blending tool.  Drag across the flower layers and the flower button for the center.  Once dry, shape flower layers and attach wiht brad through accordion folded organza rectangle.  Use glue dot or hot glue to attach flower button to center of flower.  The end!

Check out the following video where Tim Holtz talks about the new colors in the Ranger alcohol ink line, and gives really cool tips on how to use the alcohol blender pen to color with the inks!

50+ Heart DIY, Crafts and Jewelry Projects to Make

[pinit]

Heart Crafts Valentine's Day Ideas[pinit]

It’s all about hearts today, with this collection of over 50 DIY heart projects you can make. You will spy jewelry, crafts, wall decor, clothing and more, sure to inspire your Valentine’s Day festivities.


Mixed Media Valentine’s Day Free Printable + iPad Art Journaling App

Procreate and scanned mixed media are used to create this free Valentine's Day 8x10 Mixed Media "Love" printable #mixedmedia #valentinesday #freeprintable @savedbyloves[pinit]

Today at Printable Decor, I am sharing this mixed media LOVE Valentine’s Day Free Printable.  I made it using some hand sketched elements scanned into the computer, then edited in my favorite new art journaling iPad app, Procreate.

scan art for #procreate #digitalartjournaling #artjournal

You can incorporate your own hand drawn elements via your touch screen, using the amazing selection of mediums for any brush stroke or line you would like to create.  This piece was a pencil out line of the woman on white paper I scanned in (see above), placing over a fun background in Procreate, where I changed the blend mode to multiply.  This leaves just the dark outline and gets rid of the white space.  I painted her all in the app, decreasing the opacity of the painted layers so that the background was visible underneath the skin and clothes.

You can save your files as PSD for further editing in Photoshop if you would like.  Procreate also uploads and downloads directly to dropbox.  Love it!  Super addictive and a great way to journal on the go.


DIY Burlap Hearts Valentine’s Day Banner

Hi there! My name is Laura and I’m so excited to be contributing on Saved By Love Creations! Today I will be sharing with you a super easy Valentine’s Day craft.

[pinit]

[pinit]

All you need to make this lovely Burlap Valentine Banner is some scrap book paper, a few burlap hearts, a roll of burlap, some baker’s twine, scissors and a glue gun. Basically any  crafters essentials! 🙂

The first step was to make my hearts. I used my burlap hearts as a guide for tracing my hearts on the scrap book paper.

After I cut out my hearts it was time to make my individual burlap banner. I cut my my first burlap banner at 7 inches long. I then folded it in half and cut at an angle to make the triangle cut. To make sure all the entire banner was cut to the same size, I used this one as a guide for cutting.

After the burlap was cut, I folded the top of each piece over about an inch to create a lip for the twine.

Next it was time to measure my twine. I knew that I wanted to do three rows in a zig-zag type of pattern.  So I decided to even out burlap banners to three per row.

I took the twine an laid it on the counter and placed my burlap pieces on top. I just used my scissors to space them out. (I’m a very hard-core crafter, can you tell?)

When I got everything spaced just right, I placed the twine inside the lip and a little hot glue and then pressed it close. 

I flipped the banner over and then attached my hearts with some hot glue as well.

That’s pretty much it. I just repeated those step to make all three rows.

I love how the banner adds a subtle touch of Valentine decor to my home without going over the top. 

I hope you enjoyed this easy holiday craft. If you would like to see more of my projects or keep up with my latest updates, follow me onFacebookPinterestTwitterGoogle+ or Instagram.

For More Valentine’s Day Crafts, Gifts and Decor, check out SBLC’s 50+ Valentine’s Day DIY Gift Ideas and 50+ Valentine’s Day DIY Decor Ideas!


Privacy Policy