Archives for August 2013

Coffee Table Revamp with CeCe Caldwell Paint & Recycled Gift Cards

[pinit]

Makeover a table with CeCe Caldwell Chalk and Clay Paint @savedbyloves http://wp.me/p1BUxN-2Qm[pinit]

I have been dying to share this project with you for-like-ever!  I had this table I wanted to paint with fabulous paint.  So, I contacted my good friend Debi from Debi’s Design Diary and ordered CeCe Caldwell Paints.  Nothing else was going to do for this table.  The stuff is wonderful.

One of the big things that sets CeCe Caldwell paint apart from other brands is that is is non-toxic, containing no VOC and all ingredients are listed on the label.  Many low volatile organic compound paint brands don’t list their ingredients because they are not required to do so.  Many low voc brands still contain lots of harsh chemicals.  You aren’t washing anything harmful down the drain and you don’t have to worry about paint fumes or using gloves when waxing.  That is a plus!

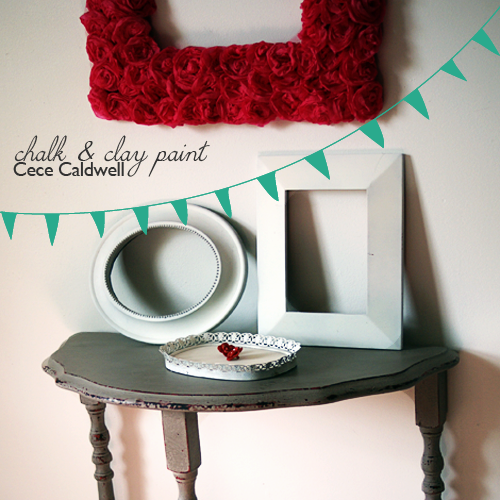
Remember when I revamped this little junky table?  It was the first time I had used CeCe’s product, and it was love at first brush stroke.  You can read all about it by clicking the image or link, but basically I had zero experience and getting the look I wanted was super simple.

Back to today’s project:


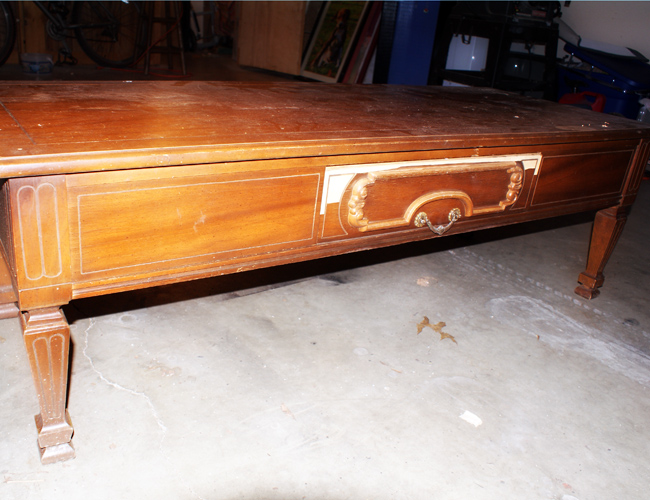
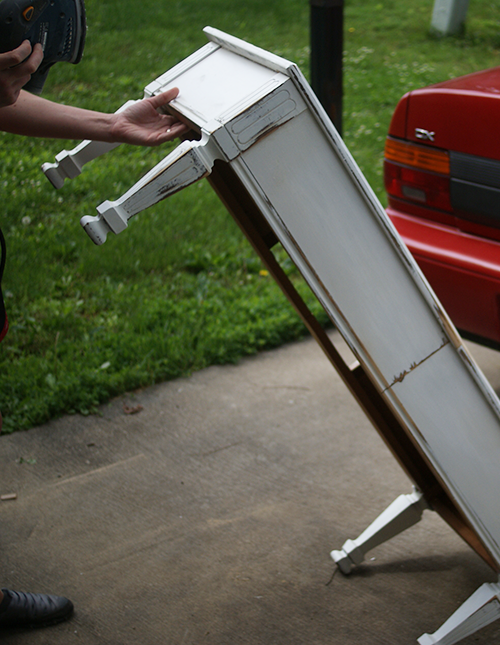
I found this thing roadside, brought it home and painted it with a quatrefoil design on top:

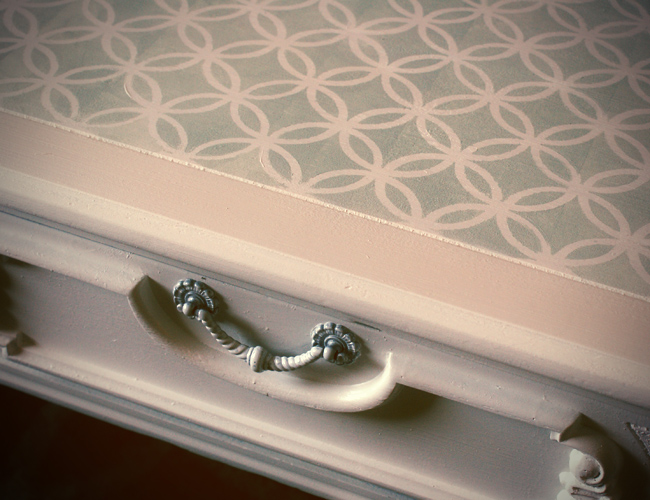
You can click the image or go to Martha Stewart Coffee Table Revamp to read about that project.

How to custom Cut a Table to fit a space

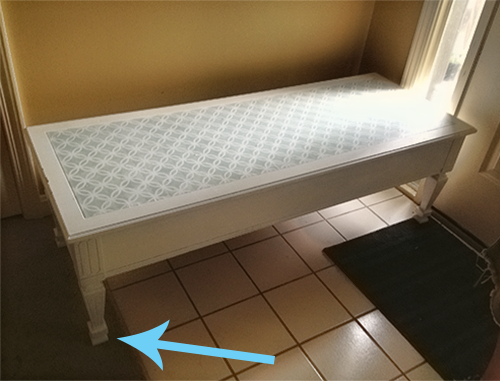
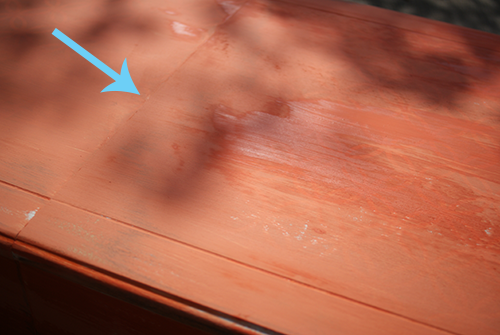
Not only did I want to paint the table, but I wanted it to fit in a spot that it turns out was about 5 inches to small for it.   See how it sticks over to the carpeted area where the arrow is pointing?  No good. That is when John and I decided to cut the table in half, remove 5 inches, and put it back together using the Kreg Jig.  Whaaaat?  I know.

How to Revamp a Coffee Table

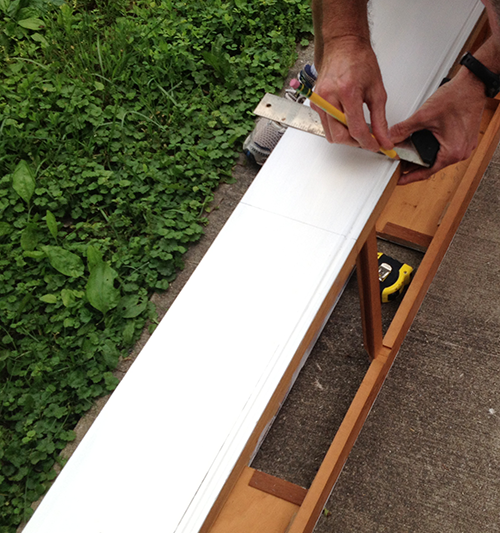
We took the top off the table then marked a 2.5 inches on either side of the center.

How to Use a Circular Saw

Making a Custom Coffee Table

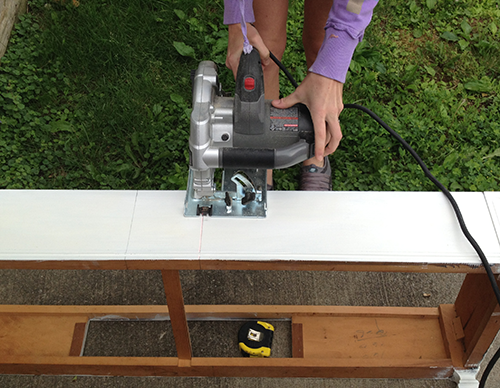
I used a circular saw and cut along the lines to remove the 5 inch segment.

How to Clamp Wood

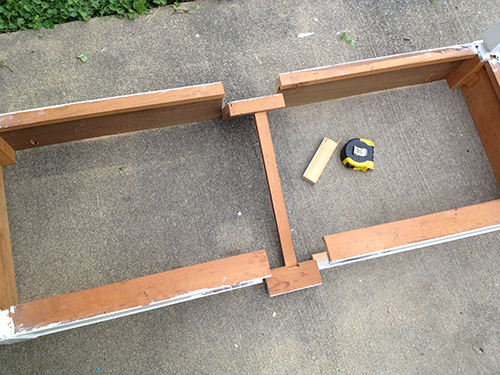
I drilled pocket holes with my Kreg Jig (love you, Kreg Jig) and attached the two shortened table halves together with Kreg screws.

Using Kreg Jig to Join Wood

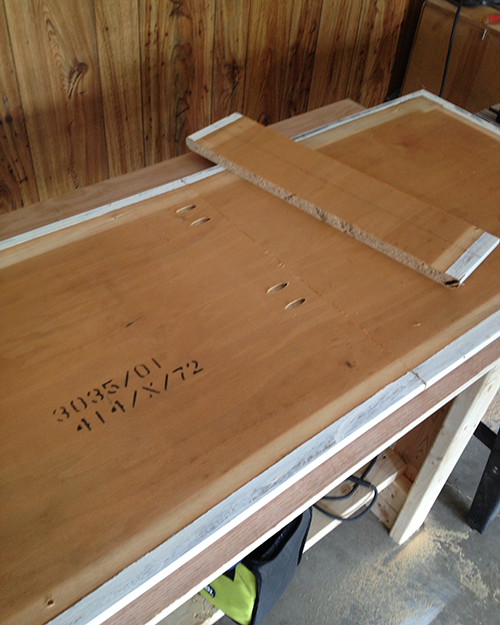
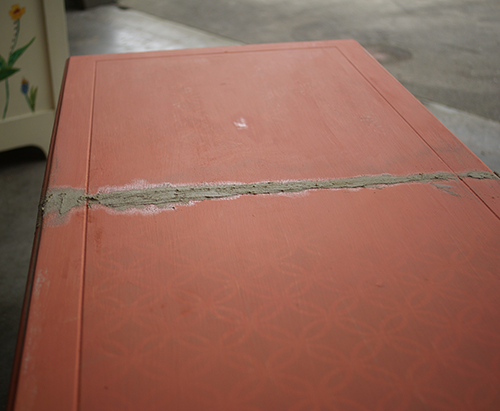
Here is the top of the table joined with pocket holes and screws.  You can see the segment I removed in this photo.

How to cut a table in half and rejoin

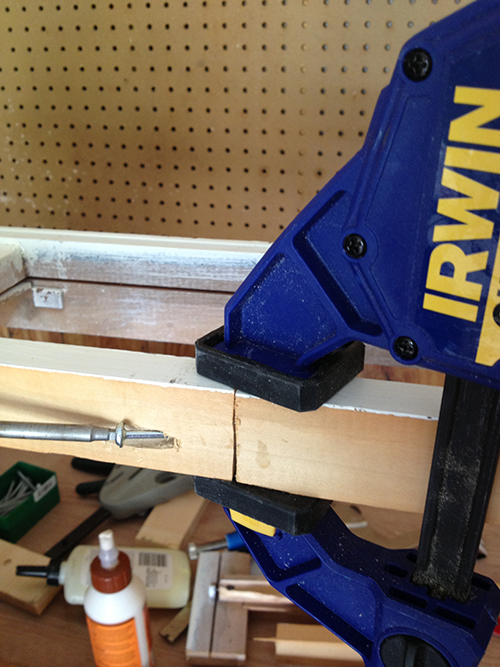
I used the Kreg mini, clamping it onto the sides of the table on the inside to make pocket holes to attach the top of the table.

Distress Sanding a table

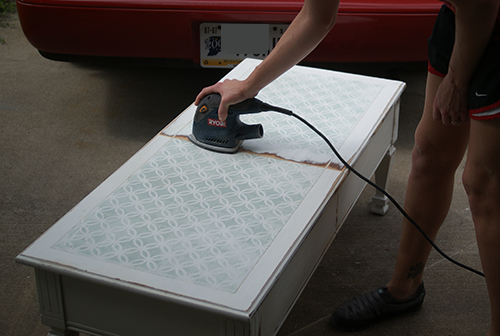
You can see the seam, just a little.  O.k., a lot.  I sanded the table with my Ryobi sander next.  You totally don’t need to sand or prime when using CeCe Caldwell paint.  I did this to try and even out the seam area.  For the first project linked above, I didn’t prep much at all.  That is my kind of paint!!

Ryobi sander for table distressing

Kissimmee Orange CeCe Caldwell Paint

After I sanded and wiped away the debris, it was time to get painting.  I am all about orange, and this Kissimmee Orange is beeeaauuutiful!

CeCe Caldwell distressed table

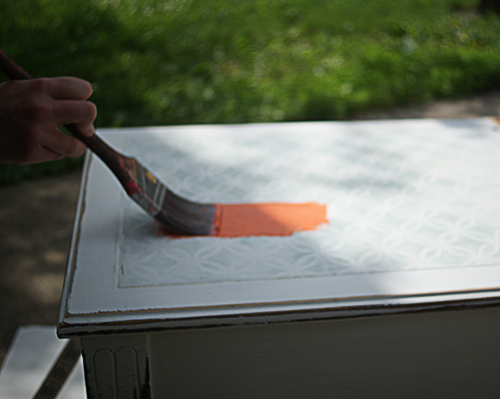
It goes on smoothly, with great coverage.

How to Join wood using Kreg Jig

This photo shows the seam at the blue arrow, which still needs some work.  It also shows wet paint vs. dry.  In the sunlight, the paint dries enough to do the top coat in 30 minutes.

How to use wood Putty

Before doing the next coat, I filled in the seam with wood putty.  When that dried, I sanded it down with the Ryobi sander.

Recycled Gift Card Craft

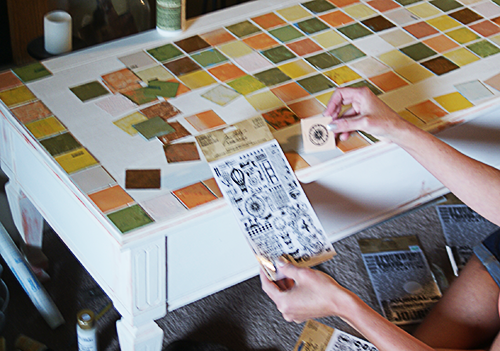
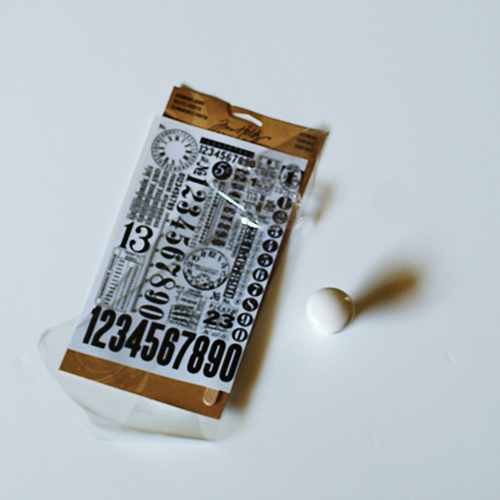
I did one more coat of the Kissimmee Orange to cover the wood putty and seam, then one coat of the Vintage White.  When that dried, I added tiles that I created from recycled gift cards and painted with Tim Holtz Distress Paint.  I showed you how I made and adhered the tiles in this Mosaic Frame from Recycled Gift Cards Tutorial.

How to Sand Distress a Table

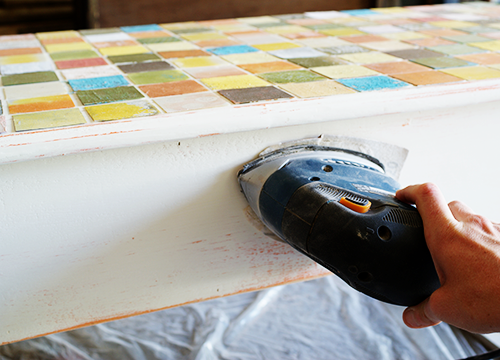
Once the tiles were all in place, I used the sander to distress and bring out the orange under coat.

How to Distress Furniture

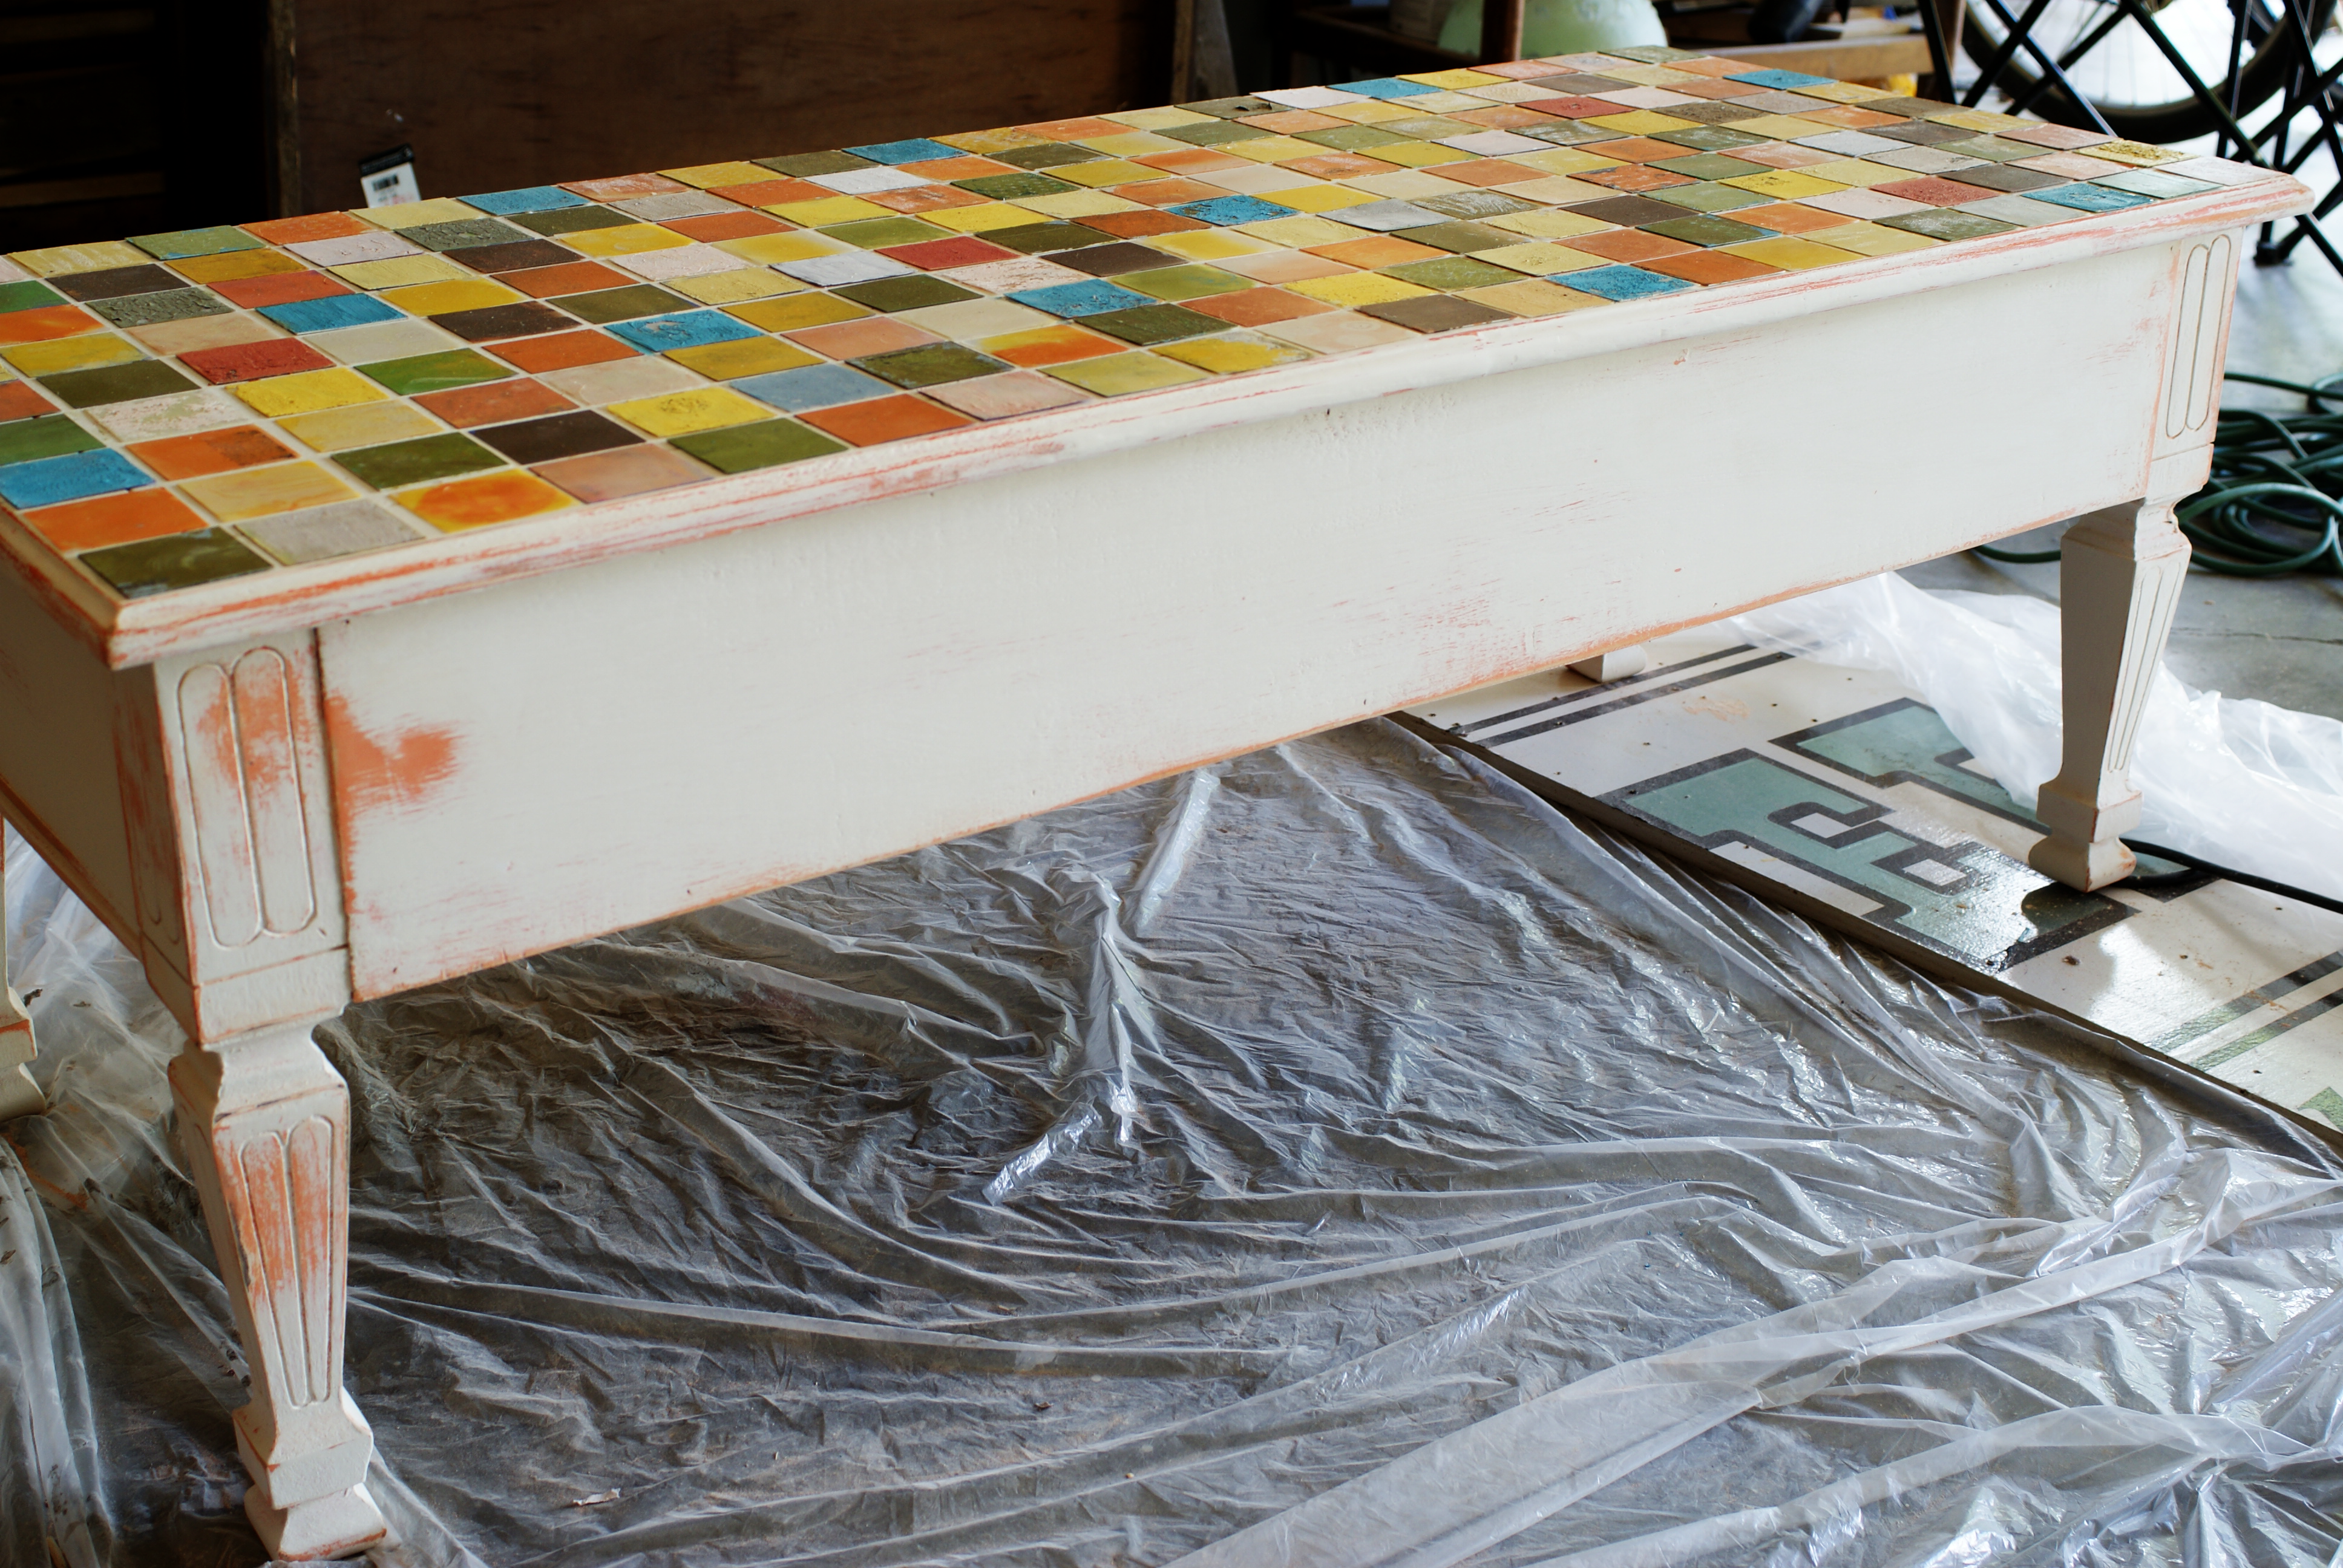
I went at it pretty aggressively.  You can sand a little or a lot for the look you want.

Clear Wax CeCe Caldwell

Applying Finishing Wax to Table

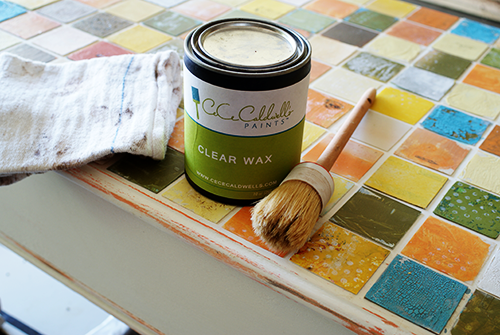
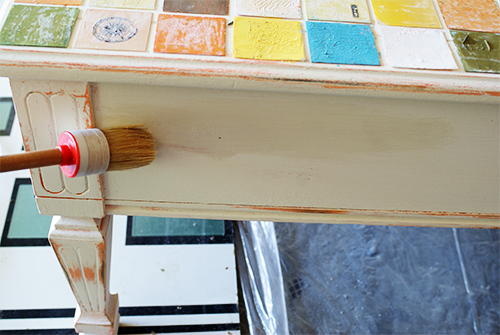
I applied the clear wax with the wax brush.  It is easy.  Just a light, even layer does the trick.

CeCe Caldwell Dark Wax

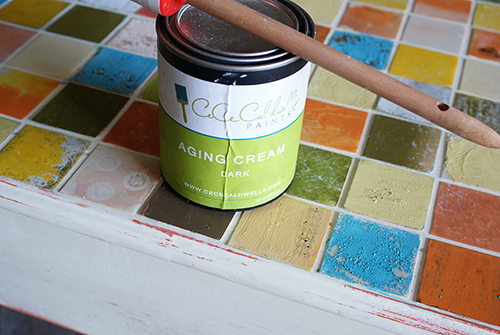
I applied CeCe Caldwell aging cream over the clear wax  to grunge it up a bit.  It is a subtle, nice antiquing effect.  I buffed with a soft cloth after an hour or so.  That makes a shiny, more durable finish.

How to Distress a Table

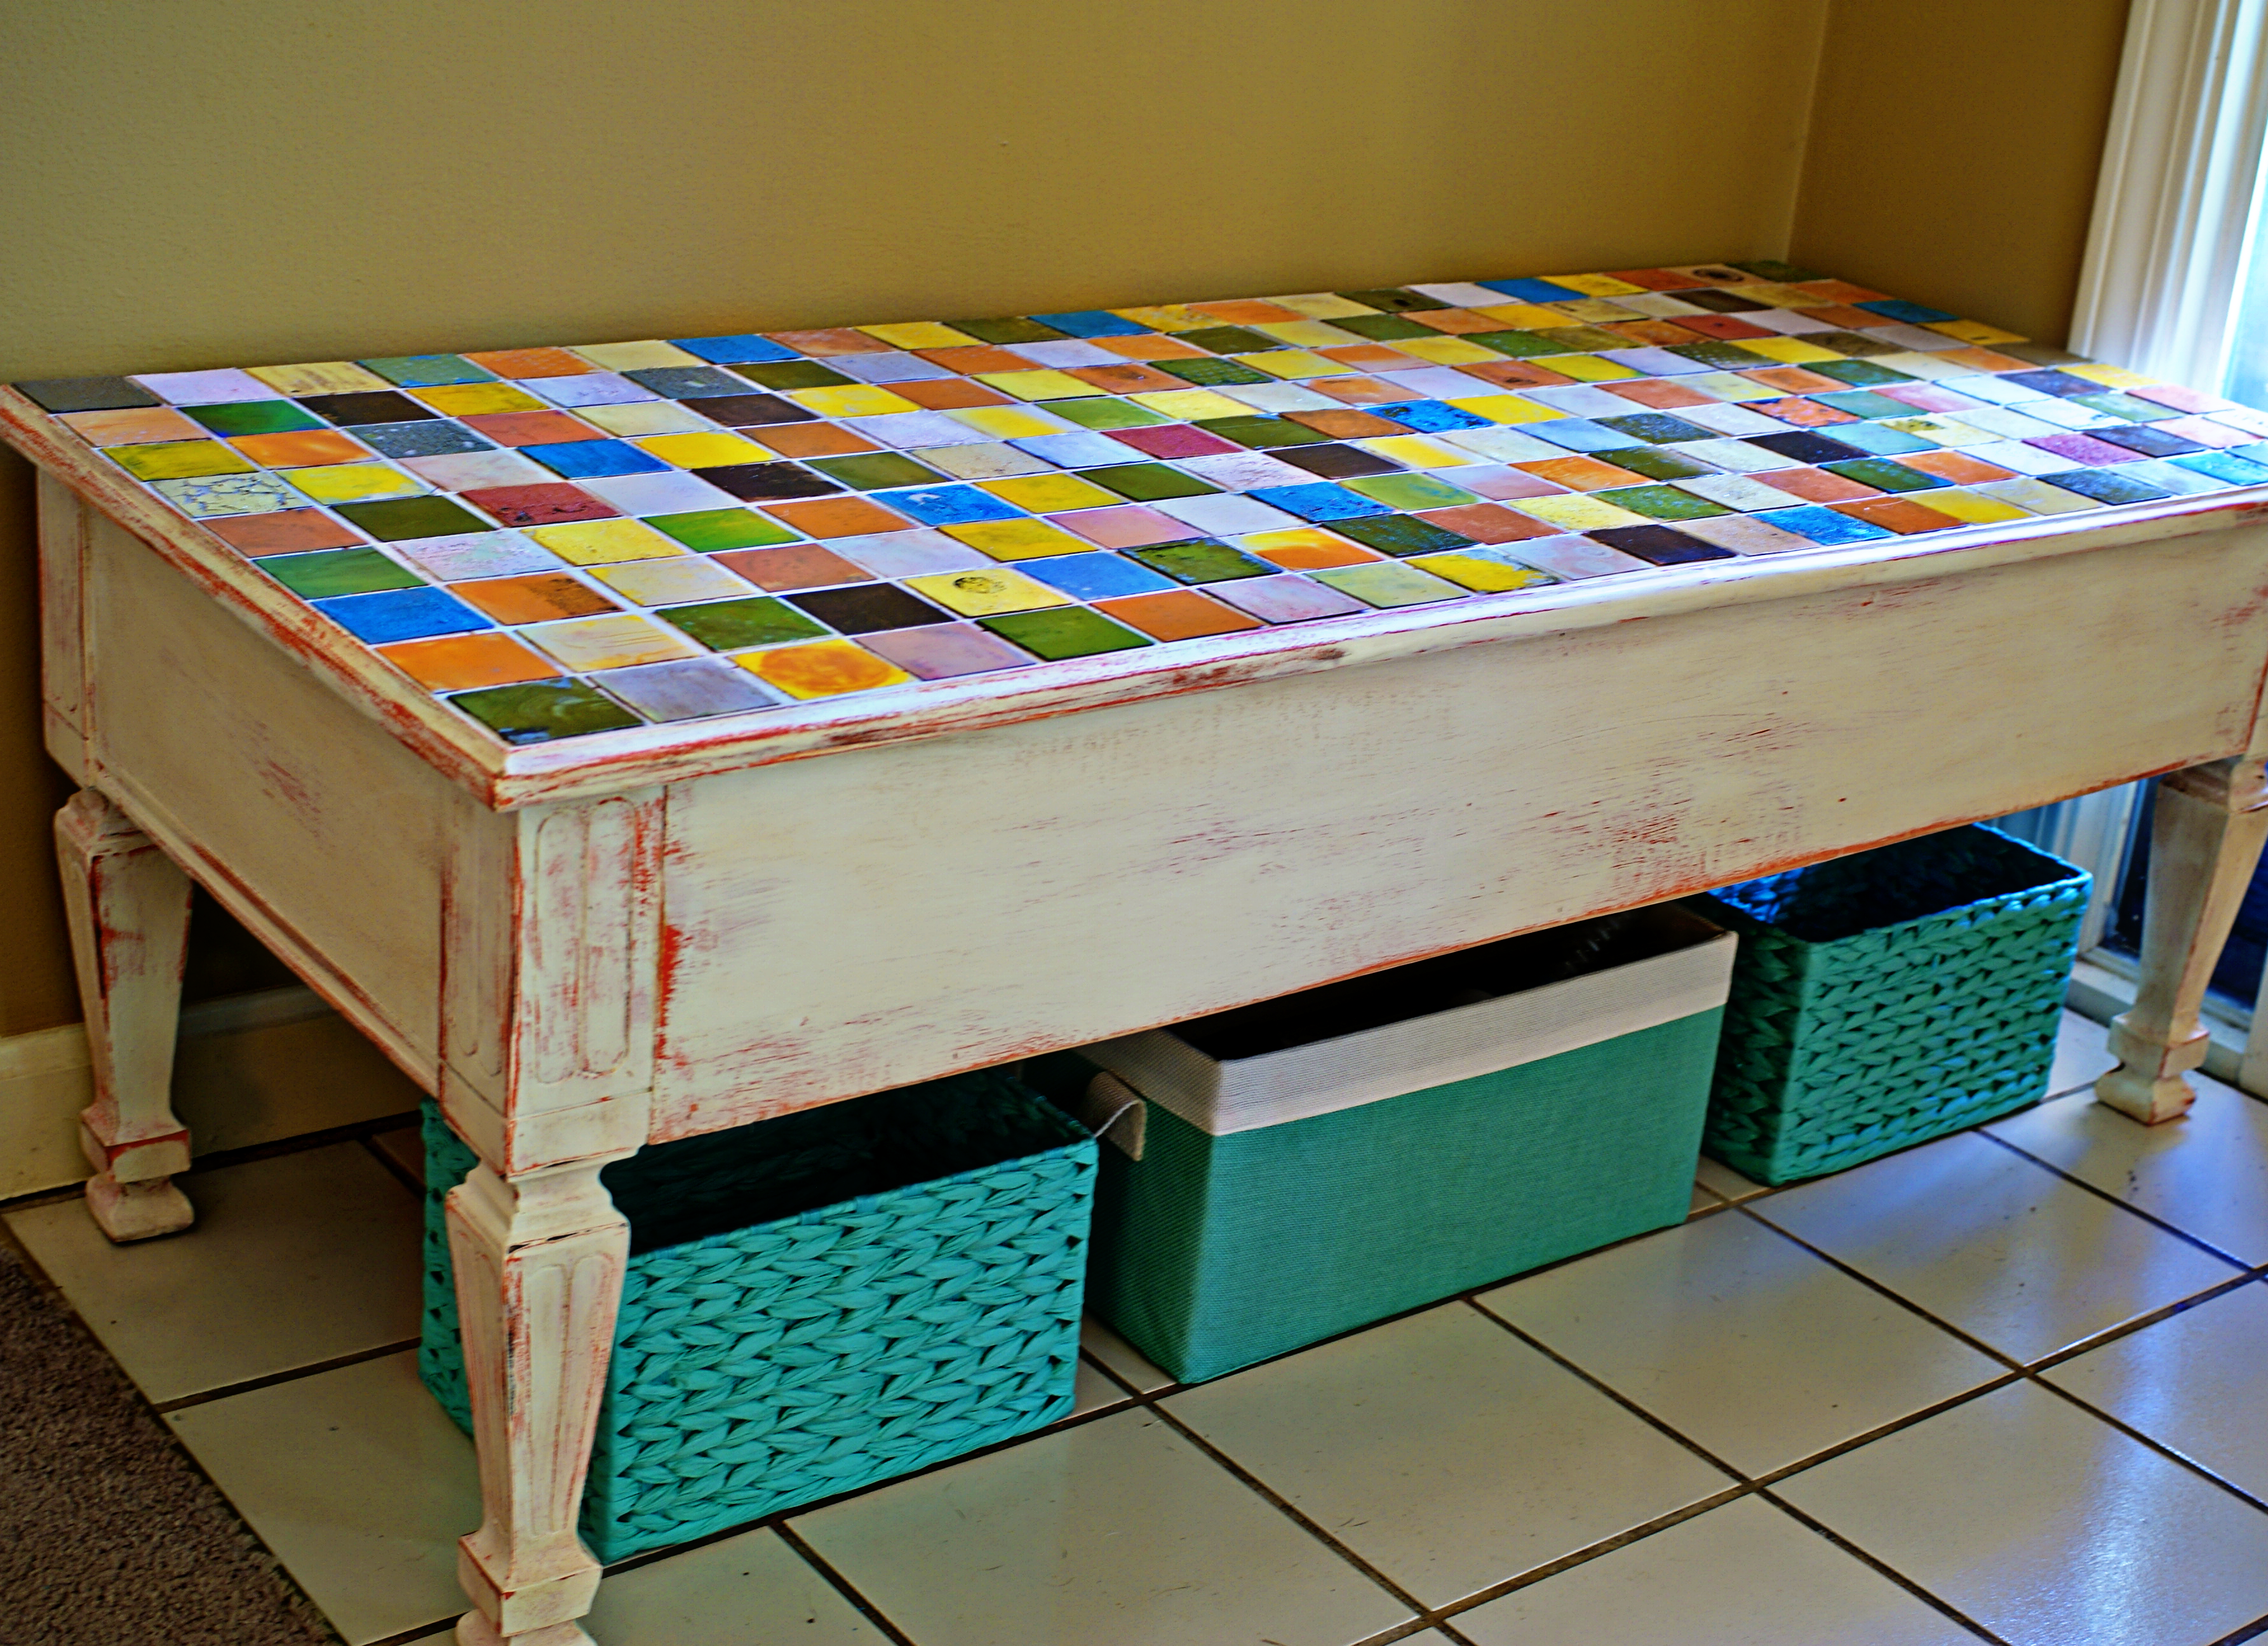
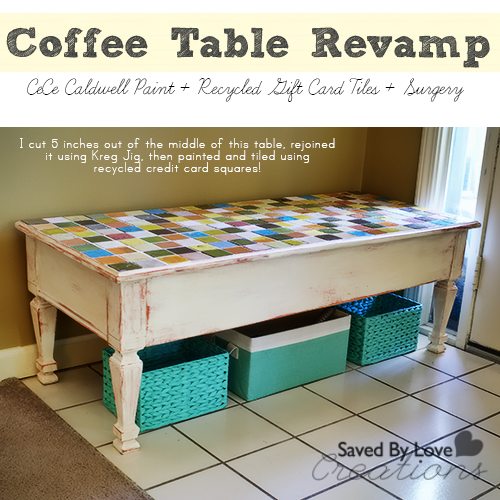
This is the final piece. I adore it.  I am off to order more paint!  I can’t get enough.

To find a CeCe Caldwell distributor near you, visit this Map of Retailers page.

For loads of inspiration on the amazing things you can do with this paint, visit Debi’s Design Diary the blog, Debi’s awesome YouTube channel, Facebook page and Pinterest!

Make Quick & Easy Inspirational Doodle Art

[pinit]

Mother Theresa artwork


[pinit]

How excited was I to discover that Unity Stamp Company has a new line of stamps designed by Stephanie Ackerman?!  The answer is very… much… tons.  I ordered several from this line and others.  They are full of inspiring words and I couldn’t wait to get creating with them.  Today I am sharing the easiest project out there.  Just stamp, scan, enlarge, print, cut out and frame!

Inspiring artwork tutorial

Inspiring art tutorial

You can color with copic markers if you want, or scan and open in Photoshop to color digitally.

Stamping techniques

For this one, I added shading in Photoshop with the drop shadow function.  Stephanie has a great class (several great classes, actually) teaching you how to shade the letters.  I told you all about it my Marker Art post over the winter:

This was my first class from Stephanie, and I would take them all if I had time!  She has a wonderful way of explaining her techniques so that about anyone can create lovely art in no time.

Make your own stamp art with Unity Stamps @savedbyloves @unitystampchick

I love the Mother Teresa quote!  I colored the heart with red copic markers in 3 shades before scanning and enlarging.

Framed Scrapbook Paper Art TutorialThis one I scanned in without color and added the yellow/blue-green in Photoshop.  Pretty cool because I can just change it if I don’t like the outcome.  That is the biggest perk of digital art in my opinion!

Framed stamp artwork

I think next I will go the other way  with these designs and shrink them down for creating a soldered pendant, or shrink film jewelry!

How do you use stamps in your artwork?

This is not a paid post!  I just wanted to share Unity Stamps and Stephanie’s new line because I love them.

How to Make Fabric & Wooden Bead Jewelry

[pinit]

Easy, Quick Fabric Bracelet Tutorial @savedloves
[pinit]

Make a fabric Necklace and Bracelet

I had the pleasure of attending a DIY blogger conference, Haven, in Atlanta over this past weekend.  I could write for days about the awesomeness of that whole experience, but that is not what this post is about.  While there, my friend Jessica from Mom4Real was sporting a cool necklace that I photographed and knocked off.  This is a super fast and easy project.  I used a sewing machine, but I will tell you how to make it the no sew way.

SUPPLIES:

How to make Upcycled jewelry

Fabric Scraps

Fabric Scissors

Wooden Beads 2 Sizes

Beacon Fabri-Tac

TUTORIAL:

Make a dollar store bracelet

You can use old t-shirts, old sheets, any fabric piece you can think of, really.  I used fat quarters and the above picture shows a headband I found at Dollar Tree.  The cool thing about using that is it is already a tube, so I didn’t have to sew or use liquid stitch.  If you use fabric not already in a tube, just cut a rectangle about 14-16 inches (depending on how long you want your necklace or bracelet).  Sew into a tube inside out, then flip right side out.

how to make a knotted bracelet


 Tie a knot like above, put bead, tie another knot and continue until it is as long as you like.  I use an odd number of beads so there is a central one.

Jewelry Making Supplies

Pick out coordinating ribbon and cut to length you want.

Jewelry Tutorial

Sew on ribbon to each end or adhere with Fabri-tac.  I use clothespins to apply pressure.  Fabri-Tac dries super fast and is basically hot glue in a bottle, but not hot 🙂

SONY DSC

For some of the bracelets, I just used the end fabric to tie them instead of adding ribbon.

SUPER EASY, and adorable, I must say.

Fabric Scrap Bracelet Tutorial

Recycled Plastic Bottle Projects to Make

Back to School Craft, recycled bottle craft

There are tons of cool things you can make from recycled plastic bottles, and let’s face it, they are one of the biggest components of our landfills today.  One of my favorite projects using them is this adorable DIY apple treat cup pictured above that Malia from Yesterday on Tuesday shared with us last year.  I wanted to bring it back in case you missed it since it would be a fantastic back to school teacher gift, or party favor for you fall flings.

For tons more ideas, check out our 50+ plastic bottle projects roundup!

Do you have any  projects you have made using recycled plastic bottles that you want featured?  Let me know!

How to Make a Wood Pallet Recycle Bin

Make-Wood-Pallet-Furniture

I am crazy about wood pallet projects.  If you have been here long, you know already know that, and you also know I am equally gaga for creating with recycled aluminum cans.  Today’s project combines those two eco-friendly obsessions into a lovely aluminum can recycle bin made with reclaimed wood pallets!  The piece is topped off with a cool knob and chalkboard sign.  Come see how you can create your own…

SUPPLIES:

table saw

miter saw

Ryobi Air Strike Nailer

tape measure

pencil

square

knob (optional)

2 hinges

broken down shipping pallets or other scrap wood (I use a circular saw to do mine)

HERE IS A GREAT VIDEO DEMONSTRATING HOW TO BREAK DOWN PALLETS (By Ryan Schmitz):

How-to-Make-Wood-Pallet-Furniture

I got the idea for this wood pallet recycle bin from this post at My Carpentry:  Wood Waste Basket.  I followed the instructions there, using pallet wood instead of fence board.  You may have to adjust measurements based on the wood you have on hand.

wood-pallet-DIY

When I got done, I wasn’t in love with it like I should be for a DIY aluminum can recycle bin hand made from discarded shipping pallets… you know?  So I decided to take it up a notch.

Wood-Pallet-Furniture

That is when I came up with the idea to add a knob, and a framed chalkboard label to seal the deal.

How-to-take-apart-wood-pallets

I used these Tim Holtz rub ons to add a vintage grunge number to a white knob I picked up at my local Habitat for Humanity Restore.

I just drilled a hole and screwed into the knob with a flat top screw just long enough to go through the wood and grab the knob.

How-to-Make-Wood-Pallet-Furniture

How-to-make-a-chalkboard-sign

For the sign, I spray painted a dollar tree frame and glued chalkboardpaper to the back.  Then I glued jute to the back of that to form a loop for hanging.  LOVE my new storage for cans!

Privacy Policy