Archives for April 2013

Over 50 Succulents, Terrariums and Creative Planters

Over 50 Terrarium Succulent and Creative Planter Projects to make @savedbyloves
I went to SNAP, a creative blogging conference in Utah, where I took a super fun class on succulents and terrariums taught by Cynthia Bee.  Terrariums have been all the rage in the design world for a few years now, and it is no surprise.  They are lovely, hardy and versatile, and can be planted in just about anything!

In the class I took, Cynthia taught us to make lovely live succulent terrarium necklaces.  She posted a great tutorial here:

How to make a living terrarium necklace

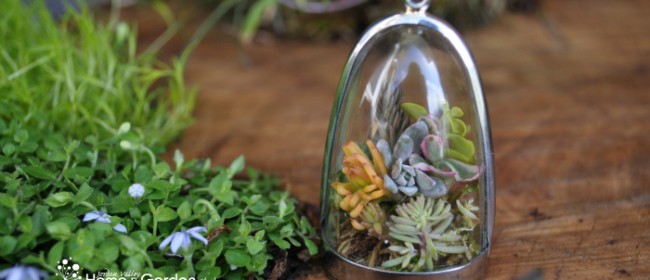
Living Arrangements: Terrarium Necklace Tutorial

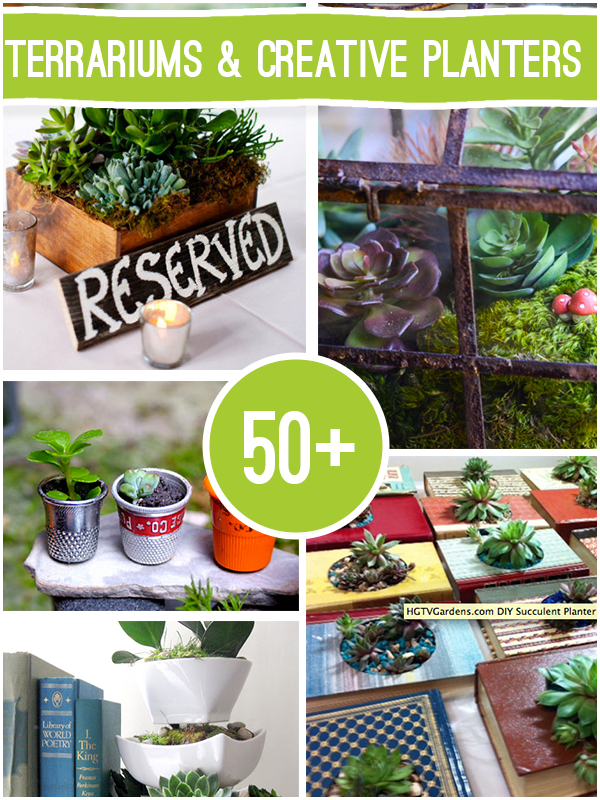
I am in the process of making a Mother’s Day terrarium gift, and created a round-up of some of my favorite projects I found during my research.  You will find succulents, terrariums and creative planters of all kinds.  Enjoy!


What are your favorite terrarium projects?

Easy Doily Etched Wine Bottle Upcycle

[pinit]

Martha StewartEtched Wine Bottle Upcycle #marthastewartcrafts @savedbyloves


[pinit]

You guys know I love to upcycle a wine bottle.  I am always bugging the neighbors for their empties since we aren’t drinkers here.  It is not uncommon for me to raid the local recycling center, where they kindly let me dumpster dive…

There are tons of ways to repurpose bottles, from cutting to painting, making lanterns, vase, candle holders and more.  Today I am excited to share with you how to easily etch intricate designs into your bottles and glass of all kinds.

How to upcycle wine bottles

This process is soooo easy.  Just clean your wine bottles with soap and water, vinegar water if the labels are being stubborn.  Clean off all adhesive and debris. Wipe clean bottle with rubbing alcohol.

Marth Stewart Glass Etching Cream

Adhere stencil or silkscreen to bottle and tape off with masking tape to prevent etching cream from ending up where you don’t want it.  Use dauber or sponge to generously apply etching cream.

Martha Stewart Glass Etching Tutorial

I love the doily adhesive silkscreen from Martha Stewart!

Martha Stewart Glass Etching Tutorial

You want a very thick layer of the etching cream.  Let it sit 15 minutes, then rinse away under faucet.  Remove and clean stencils or silkscreen.

silkscreen from Martha Stewart3

Can you believe the detail?

Easy One Hour Etched Wine Bottles

I saw other people’s projects using this etching cream and decided they must just be really skilled.  I was judging based on my experience with a cream in the past.  I can’t remember the brand, but it came in a white and purple bottle and I got it at Michaels.  It didn’t work even a little.  I was so frustrated because I had a project I really wanted to complete and I finally gave up.

How thrilled was I at the ease of use and effectiveness I found with Martha’s version?!

VERY!

I sat down to do a Mother’s Day project (which I will be showing you next week) and ended up glass etching all day.  So fun and simple (did I mention it was easy?)…

Stay tuned for what is going to end up being a glass etching week around here 🙂

Don’t forget to check out my other Adventures in Wine Bottle Repurposing:

How to cut wine bottles

HOW TO CUT WINE BOTTLES – VIDEO TUTORIAL

Over 50 Wine Bottle Projects to Make

50+ WINE BOTTLE PROJECTS TO MAKE

DIY wine bottle repurpose

MAKE WINE BOTTLE ADDRESS LANTERNS

Ombre wine bottle tutorial

PAINT OMBRE WINE BOTTLE – TUTORIAL

Things to make from wine corks

Lets not forget those corks – PROJECTS TO MAKE FROM CORKS

DIY Cabochon Flower Hairpins: Easiest Project I’ve Ever Done

[pinit]

adorable, easy DIY flower hairpins @savedbyloves[pinit]

I gotta tell you that I don’t think I will ever outgrow flower cabochon hairpins!  I love them to itty bitty pieces.  Do I look silly?  Maybe.  Will that stop me from sporting them.  Nope.  If you aren’t into them cause you think you are too old, you’ll still love this project for the little ones.  Learn how to make these precious pins in just one step!

SUPPLIES:

adorable, easy DIY flower hairpins @savedbyloves

Resin flowers from ( I got mine from Pick Your Plum)

Hairpin blanks

E6000 Glue

TUTORIAL:

adorable, easy DIY flower hairpins @savedbyloves

Ready?  Place a dab of E6000 on the back of a flower and place on hairpin blank.  Ta-dah!

I told you it was the easiest project on the planet.

adorable, easy DIY flower hairpins @savedbyloves

I showed you a similar project in the past.  Remember my Anthropologie hairpin knockoffs?

Anthropologie Hairpin Knock off


These would make great Mother’s Day, birthday or bridesmaid gifts.  Fun for a slumber party craft for the girls too, don’t you think?

What are some of your favorite quick crafts?

50+ The Best Instagram Crafts on Earth

Over 50 DIY Instagram Projects to Make Updated Square @savedbyloves

Instagram is a wonderful way to document life in photo form. I love looking back and remembering all of the moments, and checking in to see what my friends are up to. Not only do pictures say it all, they are also great for some super awesome DIY projects. That brings me to today’s post, 50+ DIY Instagram crafts that rock!


Over 50 DIY Instagram Projects to Make Updated Square @savedbyloves

Washi Tape Rose Earrings & a New Site

DIY Washi Tape Earrings from @savedbyloves @Sizzix_USDo you love washi tape crafts?  Are you thinking, what the heck is that?  Either way, I am sure you will want to check out washitapecrafts.com, a new crafty site featuring…uh… washi tape crafts.  I love the stuff, and pretty much everything in the craft industry that Amy Anderson brings us, so of course it is right up my alley.  The site was recently launched, and is already packed with fabulous home decor, craft, and holiday projects featuring the decorative paper tape.
www.washitapecrafts.com new site by @modpodgerocks

For those of you who don’t know Amy!

DIY Washi Tape Earrings from @savedbyloves @Sizzix_US

After browsing the projects for a few minutes, I occurred to me that I could use washi tape to make these rose earrings that I now wear everywhere I go:

DIY Washi Tape Craftsfrom @savedbyloves

To see how I made them, check out my Duck Tape Rosette Earrings I showed you last week.  Follow those steps using washi tape in place of the Duck Tape and seal before the adding jewery findings step.

Seal paper earrings with Mod Podge

I sealed using Mod Podge Antique for an aged look on my Tim Holts Tissue Tape pair.  Any paper sealer will do.  Just brush it on and let dry.

DIY Washi Tape Earrings from @savedbyloves @Sizzix_US

Here are the ones I haven’t rolled into the 3D rose shape yet.  I got a little obsessed because they are so cute.  They are so fun to wear, and would make lovely gifts!

Washi Tape Crafts

Head to washitapecrafts.com and be inspired!

Sizzix Embossed Birds Bracelet

Jewelry Tutorial Embossed Metal Squares

It has been a whirlwind of a weekend at SNAP 2013, and I can’t wait to share all of the creative awesomeness with you.  I missed you while I was away and it’s good to be back!

Today I am over at the Sizzix blog sharing this funky metal square embossed bracelet.  I wear the thing all of the time.  It has quickly become a favorite since it goes with so much and I love the design.  Go check out the easy step by step.

Stay tuned for some terrarium fun and so much more!

Painted Burlap Tag DIY From Fox Hollow Cottage

Hello Saved By Love Readers I’m Shannon.

While Johnnie is off at SNAP! I am here to share a quicky craft with you from Fox Hollow Cottage.

I recently completed a Linen Closet Makeover and made some fun burlap label/tags for the baskets that I used to help contain the clutter! I thought you might like to make some for you home too so I am sharing a simple tutorial. They are really easy to personalize so you could use then in a bathroom, kids room, a pantry… or like I did here, to for citrus in the kitchen.

Maison Blanche La Craie Colette Burlap Craft DIY foxhollowcottage 500X

How To Make a Painted Burlap Label/Tag

To make label/tags like mine, you will need;
-burlap
-felt (for backing)
-paint color(s) of choice
-paint pen
-paint brush; med and small/fine size
-twine
-glue gun
-Elmer’s craft bond spray adhesive
Step One
Cut your burlap to desired size. Next, cut your felt a pinch smaller then your burlap so it fits nicely behind it. You will back the burlap with a pc. of felt.
Step Two
Lightly spray your felt with the Elmer’s craft bond and place the felt and burlap together.
Press firmly and smooth.
(Tip; I sprayed my felt piece right over my trash can to avoid worrying about over spray messiness.)
Step Three
Place your paint color of choice on the burlap surface and paint away! I used the new Maison Blanche Paint La Craie shade in “Colette” because it’s aqua. If you have ever read Fox Hollow Cottage, or follow me on facebook, you’ll know I am a total aquaholic so this was a given for me!
(If not… Hello, my name is Shannon and I am a total aquaholic!)
(tip; You can get nice straight lines if you follow the texture of the burlap weave as you cut. The Lines are sort of built-in.)
Step Four
Place your text of choice on the burlap with a Elmer’s paint pen. The paint pen offers more control then a paint brush, and I find it easier to use my regular hand writing to put the text on the burlap this way.
Step Five (optional)
If you like, you can go over the paint pen text with a fine brush and black craft paint to bulk it up a bit and fill in.
Step Six
Tie your twine in a knot, then knot again. Snip ends to desired length. Affix with glue gun to corners or the desired location on your project.
Note: You can also attach a small piece of twine
as a hanger (shown below) to the back of the label/tag
or you can glue/affix it directly on your basket or surface of choice, like this…
These are the tags I made for the baskets I used when I organized my linen closet.
The makeover needed a little oomph and they sure did the trick!
Don’t you love it when the little things just make a space really come together? I do!
And I love them lots more when they don’t take a lot of skill or time to achieve.
That’s It.
Cute. Cheap. Easy.
Have fun if you make some!!
Thanks for having me today Johnnie! Hope you are having a BLAST at SNAP!


Easy May Day Gift

Hi Friends! My name is Malia and I blog over at Yesterday on Tuesday where I love creating crafts and recipes. Thank you Johnnie for having me over. I am a big fan! Today I want to share a super simple May Day project… you know that day where you get to spread the love by leaving flowers for people?

[pinit]

Easy-May-Day-Gift

[pinit]

All you really need are some flowers and quick feet so you can leave them on your neighbor’s doorstep and DASH away!

MayDay2

But these printable circles can will make your flowers extra special. Keren from FPTFY created them to use as tags for your May Day surprises. Just download, print and cut out or punch (I used a 3′ scallop circle punch)… and you can stick them on a popsicle stick or coffee strirrer to tuck them in your bundles.

MayDay3

Blooms from the grocery store are prettied up with some craft paper and rik rak.

MayDay4

There are four different flower/spring quotes to choose from:

MayDayWebEx

Simple Download Instructions

1. Click this link for the May Day Tags

2. Click actions, then view all sizes, then select “original,” save to your computer and print.

Enjoy and Have Fun! Thanks again Johnnie.

YOT sig 3

A Lamp Transformation; Kelly @ View Along the Way


Rub-N-Buff Lamp Makeover

Hi fellow fans of Saved by Love! I’m Kelly and I blog at View Along the Way about our attempts to fix up our broken-down foreclosure on the tiniest of budgets.

Kelly at View Along the Way
Saved by Love is one of my favorite sources for repurposed-fabulous DIYs, so I thought it’d be appropriate today to tell the story of how my husband and I found a poor, lonely, down-on-his-luck lamp and gave him new life and a hope for the future. When we saw our little rescue lamp, forgotten, abused, marked down to $1 at a yard sale…
Garage Sale Lamp
We knew we had to rescue him and give him a good home.

It appeared Lamp had been abandoned to fend for itself, and there was evidence it had been abused, such as its broken leg:
3
(It couldnít even stand up straight.)
4
Plus a few wayward bruisesÖ
5
Öits skinny appearance and, most of all, its skittish, shamed demeanor:
6
First, my husband used needlenose pliers and brute strength to mend Lamp’s dents and broken bones so he stood straight, proud and tall. Then, I got to play with his finish.

Lately I’ve found myself being more and more attracted to this weathered bronze/brass/whatever, like here on our DIY office bookshelves:
8
The trick to fabulous, expensive-looking bronze is avoiding that harsh, shiny finish… you know, like poor little Lamp. So I pulled out my trusty Rub-n-Buff and an old sock, and wiped away the 90s gold to replace it with the look of aged, well-loved bronze. (See how I did that in this post.)

Suddenly, Lamp was standing taller, straighter, prouderÖ
9
But we weren’t finished yet! We wanted him to live on our desk which is centered in the middle of our office:
10
And we couldn’t have that happen with his pesky cord needing to be plugged in to the wall. So we hacked little Lamp to run on batteries. (See how we did that here!)
And now? Our little rescue lamp has found home with us here. Sometimes I catch Lamp alone at night, remembering its past life on the streets. Look at it, just sitting there, pondering its past.
11
Truly a story of how love can transform even the most battered, broken down mutts and make them shine. Have your lamps spayed or neutered.

I have lots more DIY projects like this on my blog. I’d love to connect with you there! You can subscribe to the blog via RSS or email, or follow via Facebook, Twitter or Pinterest.

Johnnie, thanks so much for letting me hijack your blog while you’re off having tons of fun at SNAP! Such an honor to be here!


10 DIY Projects With Jamie

Hi Saved by Love Readers! I’m Jamie from C.R.A.F.T. (It’s an acronym for Creating Really Awesome Free Things), and I’m at Snap! conference meeting Johnnie in real life! So. Much. Fun! I totally suggest attending a blog conference, if you’re at all interested in blogging. Whether you write a blog or not, I know you love DIY! So, here are 10 fun DIY projects you can do today!

facebook-timeline

1. Turn a boring fence into an awesome fence with marble and drill. Here is a full tutorial on how to make a marble fence.

Marble fence

2. Make an interactive travel map:

travel map  Jamie Dorobek

3. Give a thrift store side table a makeover:
paint wood furniture

4. Organize your kitchen on a door:

Kitchen organizer on a door CRAFT

5. Make a t-shirt quilt… the super easy way!

How to make a tshirt quilt

6. I know you have Post-Its at home… here are tons of Post-It projects ideas:

Tons of Post-It Note Project Ideas (via @thecraftblog )

7. I know, I know Halloween is months away… but making costumes is always fun! Here are 29 DIY kid Halloween costumes!

DIY kid Halloween Costumes CRAFT

8. If it’s nice out, get the kiddos to help you make stepping stones for the garden!

How to make stepping stones

9. Here are tons of ideas for hand and foot print art:

Handprint art CRAFT

10. Since it’s wedding season, I thought 10 DIY wedding ideas could be useful!

DIY wedding ideas CRAFT

And there you have it 10 fun, DIY projects you can do today! If you want to see more C.R.A.F.T.’s, check out the C.R.A.F.T. tutorial page! Thanks Johnnie for letting me hang out on your awesome blog today!

Privacy Policy