Archives for February 2013

Embellished Heart Lights

Hey there SBLC friends!  Amy from Plucking Daisies here to share a quick and easy Valentine’s Day decor project.  Today I’m going to show you how to update a set  of string lights and turn them into ribbon wrapped heart lights.  You probably have all the supplies you need to create this project and if not a quick trip to the dollar store will have you “Lighting the way to LOVE” in no time!
ribbon-wrapped-heart-lights-beauty-text-2

I’m in the midst of a MAJOR studio purge and found this beat up set of heart lights (among other things) squirreled away in my stash.  These heart lights were looking less than “lovely” so I decided to give them a makeover.

ribbon-wrapped-heart-lights-text.jpg

How to make Ribbon Wrapped Heart Lights

If you don’t have a set of Heart lights in need of an update regular white string lights will work just fine!
Ribbon Wrapped Heart Lights | @PluckingDaisy #DIY #ValentinesDay #DollarStoreCraft
STEP 1:  Start by cutting a length of thin ribbon.  Don’t worry about measurements, you can always cut more if you run short.
Ribbon Wrapped Heart Lights | @PluckingDaisy #DIY #ValentinesDay #DollarStoreCraft
STEP 2:  Attach one end of your ribbon (as close as possible to the light) with a drop of hot glue.
Ribbon Wrapped Heart Lights | @PluckingDaisy #DIY #ValentinesDay #DollarStoreCraft
STEP 3:  Wrap ribbon around wire allowing some of the white to show through as you go.  Be sure to hold it tight to prevent unraveling.  Keep wrapping until you get to the end and secure with Hot Glue.
*If you run out of ribbon simply cut another piece and attach with hot glue wherever you left off.
Ribbon Wrapped Heart Lights | @PluckingDaisy #DIY #ValentinesDay #DollarStoreCraft
STEP 4:  Trim off any excess ribbon so it is flush with the wire.

Embellishing Ribbon Wrapped Heart Lights

Now for the fun part, embellishments!  You can use whatever your little “heart” desires to embellish your lights.  Use your imagination and especially your stash!  Anything goes here so put a pom-pom, a bird or whatever you want ON IT!
Ribbon Wrapped Heart Lights | @PluckingDaisy #DIY #ValentinesDay #DollarStoreCraft
For my lights I used Heart Table Scatter, Glitter Heart Stickers, and Felt Heart Stickers from Dollar Tree.
Ribbon Wrapped Heart Lights | @PluckingDaisy #DIY #ValentinesDay #DollarStoreCraft
STEP 1:  Count the spaces between each light and select the items to embellish your lights.  Lay them out creating a pattern if you wish.  Cut a 7 in piece of thin wired ribbon to hang a large embellishment between each light.  *I used felt heart stickers from Dollar Tree.
Ribbon Wrapped Heart Lights | @PluckingDaisy #DIY #ValentinesDay #DollarStoreCraft
STEP 2:  Attach ribbon to back of embellishment (Felt Sticker) and place a matching piece on top to secure.
Ribbon Wrapped Heart Lights | @PluckingDaisy #DIY #ValentinesDay #DollarStoreCraft
STEP 3:  Curl your ribbon around a dowel or paint brush handle.
Ribbon Wrapped Heart Lights | @PluckingDaisy #DIY #ValentinesDay #DollarStoreCraft
STEP 4:  Find the center between the lights and wrap the end of your curled ribbon around it.  Secure with Hot Glue.

Adding Floating Hearts

The last time I was here at SBLC I showed you how to create floating stars using Monofilament (Winter Tree project) .  Monofilament makes it easy to create a whimsical “floating” effect on almost any project.
Ribbon Wrapped Heart Lights | @PluckingDaisy #DIY #ValentinesDay #DollarStoreCraft
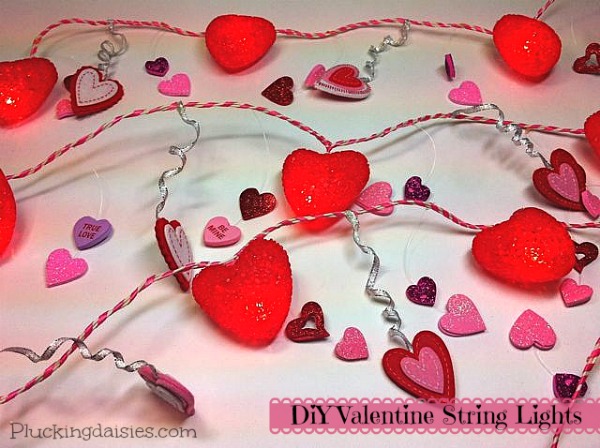
I used the same technique for the felt hearts only this time with monofilament.  By layering Glitter stickers from Dollar Tree onto a 3-4 in piece of monofilament I was able to create floating hearts on either side of the felt hearts.
Ribbon Wrapped Heart Lights | @PluckingDaisy #DIY #ValentinesDay #DollarStoreCraft
To attach floating hearts just add a dab of hot glue to the back of your light string (preferably on the ribbon wrapped part).  *Remember a “Dab’ll do ya!”
Ribbon Wrapped Heart Lights | @PluckingDaisy #DIY #ValentinesDay #DollarStoreCraft
That’s all there is to it folks!  Now simply hang and enjoy your new and improved heart lights.   Kick back with a box of Russell Stovers (in a heart-shaped box) and let your “Love” lights shine!
Have a Lovely day!
Amy*

Find me at Pluckingdaisies.com | Pinterest | Facebook | and Twitter for more creative ideas and tutorials.

Faux Stone Bracelets from Salt Dough

[pinit]

Faux  stones with salt dough Clay

Hi everyone,

I’m Carolyn from homework. Johnnie is away for a few days enjoying some time with family and I was thrilled when she asked me to share a project with you. This is a fun craft that can be adapted for little kids or made more sophisticated for grown up jewelry.Can you guess what they are?

Faux stone bracelet #DIY #Jewelry #tutorial from Carolyn's Homework @savedbylovesThese faux stone beads are made from salt dough. This is another project that has been on my list to make for quite awhile and I was really happy with the results.
These bracelets are the inspiration. I wear these a lot!  The blue bracelet is turquoise and I’m not sure what type of stone the white bracelet is.
 
I love these bracelets. They’re easy to throw on since they’re on stretchy jewelry cord and their chunky size and variegated tones make a nice statement.
I started by making some salt dough beads. I don’t have a picture of the beads before I painted them but here’s the recipe I used:
4 cups flour
1 cup salt
1-1/2 cups cold water
Note: I cut the recipe in half and had more than enough dough to make a lot of beads.
Thoroughly mix the flour and salt together. Add the water and mix well. Knead the mixture for ten to fifteen minutes. Shape your beads and make a hole with a wooden skewer. Bake at 250 degrees for 2-3 hours or until they are completely dry and hardened.
Tip: The holes on most of my beads closed up during the baking process. I may try baking them on a piece of wire or the skewer next time I make these.

Once the beads were cooled, I started painting them with the craft paints. I used two coats of Martha Stewart High Gloss in Wedding Cake for the white and while the white paint was still wet added Metallic Sterling for the accent. The trick is to just dab on the silver color and swirl it slightly. Dry your beads on toothpicks. Once they are completely dry, finish with a coat of clear gloss sealer.
And here they are… my favorite bracelets; turquoise, white stone and salt dough.
I hope you enjoyed the project I shared here today. Stop by and visit me anytime at homework
 Blog Header 0828 Final
Signature Box flower 

Duct Tape Wreath

 [pinit]

duct tape flowers wreath

I am super excited to have Angie here from Country Chic Cottage.  She is one busy lady, coming up with great projects and tutorials that you can do yourself, on a budget even!  Angie knows me well, and my readers too.  That is evident by the fact that she created a duct tape craft to share with us.  Thank you Angie!

Hello all!  My name is Angie and I blog over at The Country Chic Cottage.  I am so happy Johnnie asked me to guest post.  I am tired of winter already, aren’t you?  I decided to make a new wreath but put a happy spin on it.  We could all use a little cheer when we open the front door don’t you think?  And yes I am in love with duct tape lately.  My duct tape flowers wreath uses duct tape to create a simple, happy wreath that you can enjoy into the spring and even the summer.

Start with any picture frame (mine was already covered in some white fabric).  Add in some colorful fabric and duct tape and you are ready to get started.


duct tape flowers wreath


Tear your fabric into strips and wrap around your frame.  Cover the frame completely then use a dot of hot glue to secure the end of your fabric.


duct tape flowers wreath

Now it is time to break out that duct tape.  We are going to start by making a duct tape flower.  You will need a small square of duct tape plus one long strip.

duct tape flowers wreath

Fold your long strip over about 2/3 of the way as shown below.  Also as shown below, it does not have to be perfect.  🙂

duct tape flowers wreath

Gather your long strip onto your square as shown below.  Continue wrapping around and around until you run out of strip.  The longer the strip, the closer to the outside of the square you can start, and the larger your flower will be.

duct tape flowers wreath

You will end up with a gathered flower something like this.

duct tape flowers wreath

The back does not look as pretty but we are not worried about that!  Note that if any of your “square” peeks out around the edge of your flower, just fold under to hide it.

duct tape flowers wreath

Now attach those flowers to your wreath with hot glue.

duct tape flowers wreath

I also added a couple of buttons to the center of my flower.  They added just the right amount of bling.

duct tape flowers wreath

Now we need to make that duct tape “Welcome” banner.  You will need string (I used baker’s twine), duct tape, and foam letters.

duct tape flowers wreath

Start with a square of duct tape and fold it into a point as shown.

duct tape flowers wreath

Then fold the sides of your square in to make a mini pennant flag.

duct tape flowers wreath

Add your foam letters to each pennant flag.

duct tape flowers wreath

Tie the baker’s twine onto your wreath.  Add the flags by folding the duct tape over the baker’s twine and securing the flap with hot glue.

duct tape flowers wreath

It is really that simple!  Add a cheerful touch to your front door with this duct tap flowers wreath.  You know you could use a little cheer during these dreary months.

duct tape flowers wreath
Thanks so much Johnnie for having me!  Y’all stop by the cottage anytime for a visit.  I blog about crafts, recipes, DIY, and everything in between.  Follow along on facebook, twitter, or pinterest so you won’t miss a beat.
Thanks,
Angie
Don’t forget to check out Angie’s Etsy Store:  Country Chic Cottage on Etsy
Privacy Policy