Archives for January 2013

DIY Upcycled Pop Can & Resin Heart Pendant

[pinit]#Recycle aluminum cans into gorgeous jewelry #Resin #Upcycle @savedbyloves #DIY @Crafts

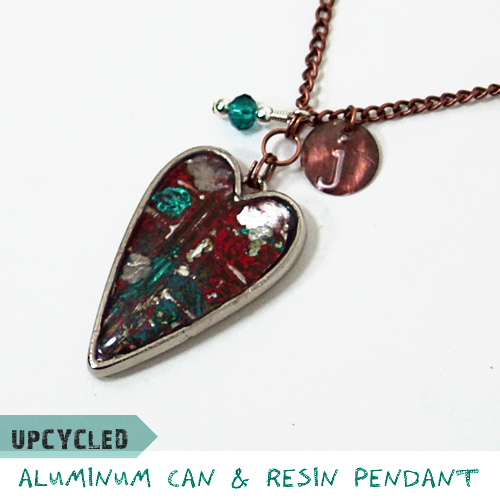
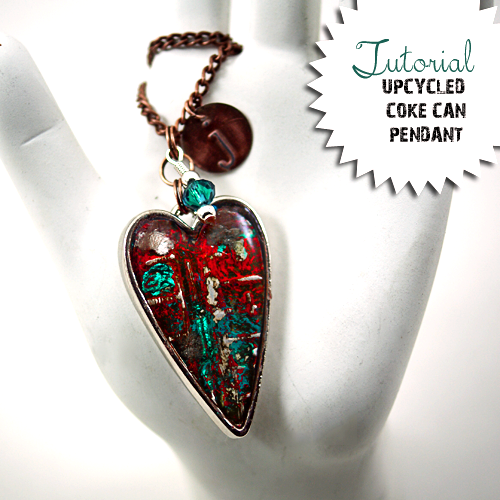
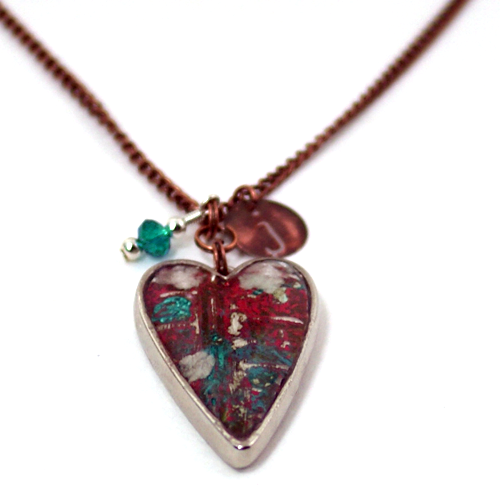
Do you have a pile of aluminum cans in recycling bin purgatory?  Well, if you have been around here long, you know I love to cut my cans and form them into various upcycled jewelry pieces.  Today, I am going to show you how I used a coke can, a bezel and some resin to create this fun, one of a kind heart pendant.  It would make a lovely gift for many occasions, and especially the rapidly approaching Valentine’s Day Holiday.  I made it for a gift and personalized it with a monogram stamped charm.  You don’t need a lot of expensive supplies and equipment to one of these yourself.  Here is how…

SUPPLIES

Empty Soda Can, rinsed with warm soapy water

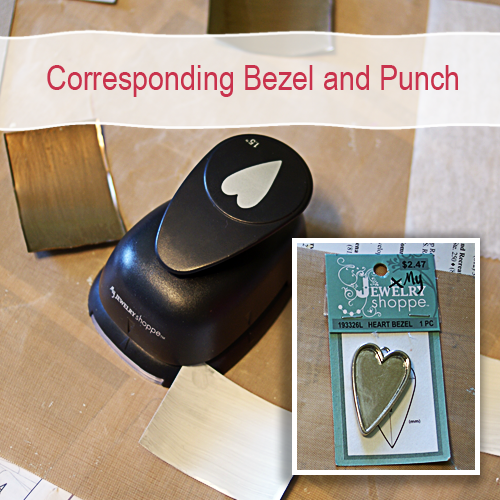
Jewelry Shoppe Heart Bezel and corresponding heart paper punch (got mine at Hobby Lobby)

Resin Jewelry Tutorial, Upcycled Jewelry Tutorial

-OR-

Any heart shape bezel and a sharpie or other permanent marker

Glossy Accents or other metal glue

Grungeboard or scrap cardboard

Embossing folder and machine

Perfect Pearls

3 colors of acrylic paint

Metal paint primer (I used Martha Stewart’s)

Vintaj Sanding Block

Magic Glos Resin

INSTRUCTIONS

#Upcycled Recycled aluminum can jewelry #DIY #Craft tutorial @savedbyloves [pinit]

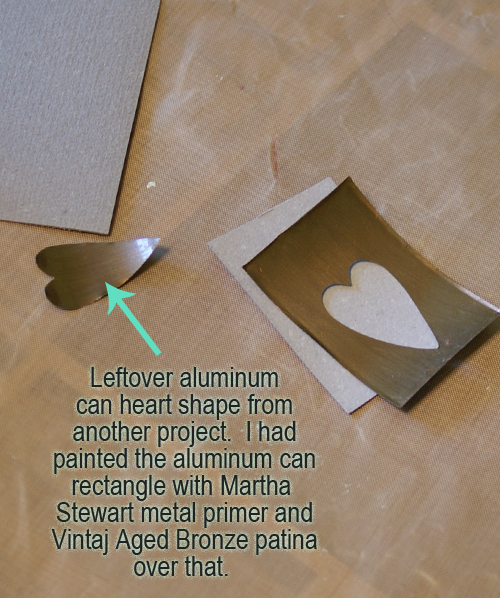
This project came about as I was doing another project that I haven’t shared with you yet.  There was a leftover aluminum can punched heart shape, and I remembered I had the corresponding bezel.  I found the bezel and paper punch at Hobby Lobby (by My Jewelry Shoppe) a couple of months back.  I decided to emboss the heart and add some acrylic paint and Liquid Pearls for a cool effect.

#Recycle aluminum cans into gorgeous jewelry #Resin #Upcycle @savedbyloves #DIY @Crafts

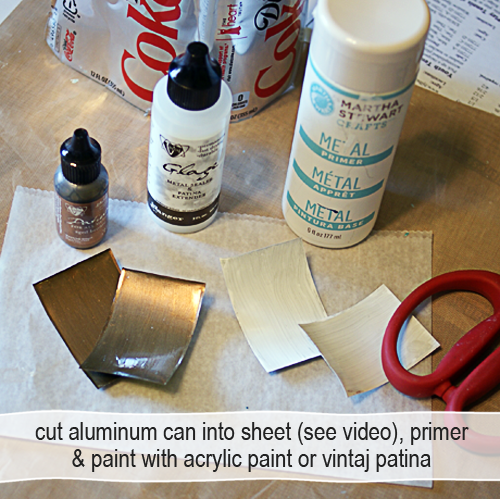
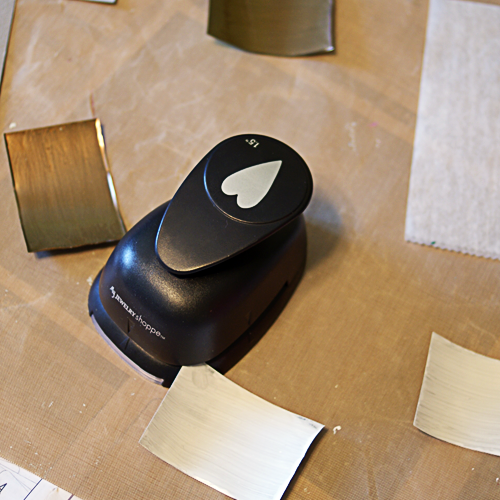
For the other project, I needed rectangles with a heart cut out in the middle.  If you just want the heart shape used in this tutorial, you don’t have to worry about cutting perfect rectangles.  Just primer and paint your can sheet and punch the heart shape from it.  I showed you how to cut the cans into a sheet in the video here…

Make an aluminum can pendant
Trace the heart twice onto grungeboard, thick cardstock or cardboard and cut out inside the outlines with scissors.  Glue the cardboard hearts together, then glue to bezel.  Use clothespin to apply pressure for good adhesion.  This gives thickness to the thin can top layer.
Emboss your painted and primed can heart.  I used Tim Holtz Texture Fades embossing folder – Pattern and Stitches Set and my Sizzix Vagabond.  It you don’t have an embossing machine, you can hand emboss, or use the folder and a rolling pin like in this video by Sarah Hamer:

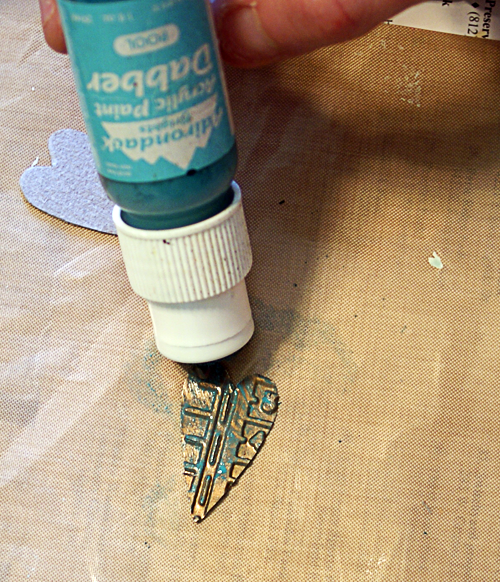
Now apply a second paint color over your base (Ranger Paint Dauber color Pool used here).

Ranger Paint Daubbers Pool

Ranger Paint Daubbers Pool

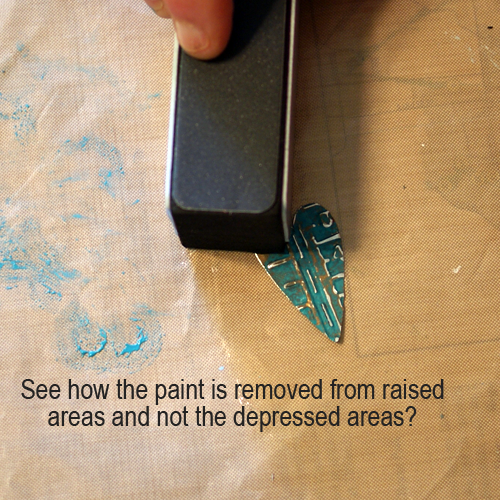
Let dry and and sand with sanding block to distress as desired.  Not shown here, but in my final pendant, I added a third paint color.  The red made the pendant pop.  If you sand away too much paint, it’s ok.  Just paint again and sand until you are happy with your piece.  The raised areas will lose color when you sand, while the depressed areas hold color.  The embossed design is enhanced by the contrast.  So fun!

How to emboss metal jewelry

How to emboss metal jewelry

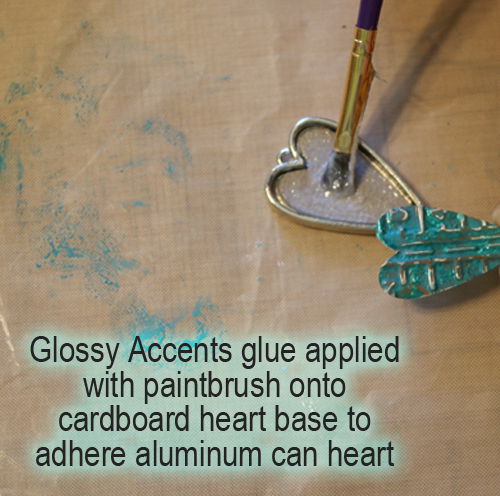
When you are happy with your paint job, glue heart into pendant bezel on top of cardboard base as shown.  Hold in place with clothespin while glue dries.

How to emboss metal jewelry2

How to use Magic Glos resin

Let glue dry completely, then apply Magic Glos resin like I showed you in this Plaid Ring Bling tutorial.

You can use any resin you want.  I just had this on hand, and love the fact that it cures in minutes vs. the hours it takes 2 part resins to cure.  Maybe you are more patient than me!

Add chain and charms as desired and you are done!

#Upcycled Recycled aluminum can jewelry #DIY #Craft tutorial @savedbyloves

HeartBezelPendantDIY8

Amazing Hot Wings Recipe

#Recipe for easy to make, AMAZING hot wings from @savedbyloves

[pinit]

My husband is a chicken wing fanatic to say the least.  I decided I wanted to do something unexpected for him, and one thing he has learned not to expect from me is… well, cooking in general really.  When I do take on the kitchen, it usually involves tossing frozen meat into the crock pot, turning the knob to low, and coming back 8 hours later to retrieve the result.  Ever noticed you don’t see many recipes on here?  There is a reason.  Not my area of expertise or interest.  Usually if I attempt something new, it doesn’t come out exactly photograph and share worthy.  This chicken wing recipe, however, did.  I don’t even like wings normally, and I couldn’t get enough of these.  The aficionado was quite impressed too…

How to make amazing #ChickenWings

That is his “Oh my goodness, there better me 20 more of these” face.  I was delighted to see how pleased he was with the outcome.  I actually went out and bought this deep fryer (yep, had never used one) for the recipe.  It was only 29.99 at my local Kohl’s, down from $59.99.  The house smelled like a county fair, but it was totally worth it, and we will be having these frequently.

Here is how I did it…

INGREDIENTS

3/4 cup all-purpose flour
1/2teaspoon paprika
1/2 teaspoon cayenne pepper
1/2 teaspoon salt
15 chicken wings
oil for deep frying
1/2 cup butter
1/2 cup Frank’s hot sauce
1 dash ground black pepper
1 dash garlic powder

INSTRUCTIONS

  1. Mix together flour, paprika, cayenne pepper and salt. Place chicken wings in a casserole dish and evenly coat them with flour mixture.  I just sprinkled one side, flipped over and sprinkled other side.  Lots of the mixture will be in the bottom of your dish.  That’s fine. Cover dish with aluminum foil and refrigerate for 60 to 90 minutes.
  2. Heat oil in a deep fryer.  I used Vegetable oil in the Presto Cool Touch deep fryer and filled it to the max line.  This allowed me to cook five wings at a time in the basket in the next step.  I heated the oil for 15 min per instructions with the deep fryer.  There is no temp gauge on this model.  It automatically knows like magic.
  3. To make the wing sauce, combine butter, hot sauce, pepper and garlic powder in a small saucepan over low heat. Stir together and heat until butter melts. Remove from heat and put to the side.  Move on to cooking the wings.
  4. Fry coated wings in hot oil for 15 minutes, or until parts of wings begin to turn brown. Carefully remove from deep fryer.  The Presto has a cool hook that you can sit the basket on to let the grease drain.   Place wings in serving bowl, pour on hot sauce mixture and stir together. I served with celery and blue cheese.

Just writing this post makes me want more!  Now that John knows I can do this, BW3’s isn’t going to cut it anymore.  What are your favorite wing recipes?

Amazing Chicken Wing Recipe from @savedbyloves

[pinit]

Marker Types & Free Valentine’s Day Printable to Color

free Valentine's day printable with doodle font to color by Tried and True, featured @savedbyloves[pinit]

If you are looking for an adorable handmade Valentine’s Day gift, look no further.  Vanessa at Tried and True created this hand doodled free printable for you to color in with marker or water color.  This is super exciting to me at this point in my creative journey, since I am developing my hand lettering and experimenting with various markers and watercolor media. Printing this beautifully written sentiment and adding color is going to be a blast.

The markers Vanessa used are some that I recently picked up at Joann Fabrics, and are alcohol based – Spectrum Noir.  I am playing with these, copic markers and Chromatix.  All of these are alcohol based, and marketed as being blendable.  Copic markers are significanltly more expensive than the Chromatix alcohol based markers (available at Michaels) and Spectrum Noir.  Once I get more comfortable with all of them, I will be sharing with you a head to head comparison of each.  I am still experimenting with various paper types, stamped images and combinations, and learning as much as I can.  My sweet friend Amy at Plucking Daisies has several projects using Copic Markers if you are curious about them.

Blending markers with water by Just Paint it

Another creative friend, Colleen at Just Paint It discovered markers at Michael’s that are water soluble, blendable and inexpensive.  She shows you how to use them in creating beautiful cupcake paintings!

What are your favorite markers to use and why?

Wanna Sponsor our Totally Green Crafts Contest?

totally green contest call for sponsors

We are at it again, planning our next Totally Green Crafts contest.  So far, they have been super fun, and the lucky winners have scored over the top prize packages.

Here it from our most recent winner:

Dear Suzy,

I just wanted to take a moment to thank you for all the prizes that arrived at my house in December. My children and I had so much fun opening all the packages. It was kind of you to wrap them as gifts. It made things even more exciting.

Please pass my thanks along to everyone who made the Totally Green Crafts ~ Holiday Edition contest possible.

Wishing you a wonderful and happy new year. I look forward to following your blog in 2013.

Cheers,

Monica Rudy~ http://www.homemakingwithmonica.com/

Newspaper Ornaments by Monica Rudy

Monica won a prize package worth over $450 for her ornaments made of recycled newspapers.

Suzy and I are calling for sponsors for the next round of the Totally Green Contest, beginning January 28, 2013. The contest challenges readers to create awesomeness from recycled items.

It will run for approximately one month, with contestants submitting their theme based projects for the first two weeks. At that point, Suzy and I will narrow it down to the top ten and then put it out to the readers for a vote to narrow it to the top three. The top three will have a chance for a final vote, the winner receiving fame, fortune…oh, and an awesome prize package.

totally green crafts prize package

What is in the prize package?

Well, that is where you come in! This is your opportunity to get your product out there and get a bit of free advertising in the process. Start the new year out with a bang!

What will Totally Green Crafts do for you?

  • TGC will host your 150 x 150 button on the sidebar for the entire length of the contest (about one month). There are new posts on TGC at least six days a week- so that is a ton of exposure!
  • All sponsors will be featured in an introductory post during the first week of the contest.
  • Suzy’s Artsy Craftsy Sitcom will do a feature post on the sponsors during the first week of the contest.
  • The prize package will be featured on it’s own page in TGC.
  • And the final post of the contest will give you one more shout out.

That is free advertising at its best!

And what is your part of this deal?

  • Provide a prize of at least $25 in value. Really. That’s it!

If you are interested in becoming a sponsor of the next Totally Green Contest, all you have to do is contact us at admin@totallygreencrafts.com. We will give you instructions as to where to ship your prize so that we can create one big prize package for our winner.

Need button help?  We have your back!

Make a Variety of Gorgeous Paper Roses

Make gorgeous crepe paper roses with Design Improvised, featured @savedbylovecreations

[pinit]

Paper roses are one of my favorite things to make.  Roses in general, but especially paper ones.  Design Improvised shows you how they used a template from Martha Stewart to create these beautiful crepe paper roses.  Last year, you saw several paper roses here at SBLC.  One tutorial I ran across called for crepe paper sheets, which I couldn’t find anywhere.  My grandmother picked up a couple of packs of it that she spied while at Ben Franklin.  I had forgotten about it until seeing these from Design Improvised.  I can’t wait to try out some crepe paper roses.

Make a paper rose

This is the pattern I plan to use, which I shared with you in my Paper Rose DIY With Template.

How to make paper roses

Here is a paper rose tutorial I shared with you using .  I ended up embellishing a frame with the little beauty.

These two roses were created from a printable template by Ellinee that I showed you in my Paper Roses Another Way post.  They are so beautiful and I have them all over my house!

Here is another paper rose that I shared with you in my Coffee Filter Rose Tutorial.   There is a fantastic video from Cassie Chappell on the Martha Stewart Show.  It was not the easiest process, I won’t lie, but well worth the effort.  Not only that, but you will have roses made from coffee filters.  How cool is that?  You will be amazed if you watch the video.  Cassie’s roses are quite difficult to distinguish from real ones, and her colors are stunning.

Monogram Art From Washers

Make Monogram Art from washers with Love Grows Wild, featured @savedbyloves

It is no secret I love a great repurpose project.  Outside of the box thinking is all over this washer monogram art by Love Grows Wild!  Liz gives a detailed step by step so you can make your own.

Valentine’s Day Mixed Media Art

Home Is Wherever I'm With You Mixed Media from @savedbyloves

[pinit]

This is my second project adapted from Stephanie Ackerman’s Doodle Too Class (a class that totally rocks my socks off, btw).   I made four houses to represent each place John and I have lived in over the course of our marriage.  I will show you how I added text, and provide you a printable of the phrase.  I am not going to show you the details of the process creating the scene, because I want you to take Stephanie’s class for that.  In general, you just Mod Podge shapes cut from scrapbook paper onto a background created with acrylic paint.

Mixed Media Valentine's Day Art Gift from @savedbyloves

Once your background is fairly complete, at least having the main elements in place, scan it into your computer, open in Photoshop and play with various fonts and phrases.  When you are happy with your text, print it and transfer to the original background as shown.  You can print my text below to use for your piece if you would like.  Just right click it to pull up the full res version and print that.

EPSON MFP image

HomeWithYouScannedLettered

This is what my text looked like over the scanned image.  I turned off the background layer of my art and printed just the black text on white paper for the transfer.

Transfer Text to mixed media artwork with transfer paper @savedbyloves

HomeIsWhereverImWithYouTut3

The Ott light is super helpful and awesome for transferring text and for seeing what the heck is going on in my mixed media art!

HomeIsWhereverImWithYouTut6

HomeIsWhereverImWithYouTut4

Pitt Artist pen, size small

How to create mixed media art @savedbyloves

Pen-touch White Pen

Make Valentine's Day mixed media art @savedbyloves

After I was happy with the text and the outlining of my shapes, I applied a coat of my favorite Mod Podge ever.  It is an antique finish and it is so cool.  I use to glaze my final pieces to pull the layers together with an antique tone.  Then when that dried I would seal.  Now I do it in one step with Mod Podge antique, and it turns out exactly how I love it.  Thank you Plaid!

Dollar Store Valentine’s Decor

Dollar Store Valentine's Day Decor EASY and Cheap @savedbyloves

[pinit]

If you are looking to get festive for Valentine’s Day, and decorate quickly for little cost, this is the project for you!  I made it to the dollar store yesterday for the first time in way too long (ok, since Christmas), and found myself in a wonderland of pink, red, LOVE and hearts.  I noticed some fun Valentine’s Day gift bags, and the wheels started turning.  It occurred to me that I could frame them for a lovely mantel, cupid style.  I grabbed three bags, 2 frames.  For that $5 + some items I already had, and about 10 minutes of my time, I created a lovetastic scene.  So can you!

Supplies:

Frames (one I had on hand, the other 2 are from Dollar Tree), bags from dollar store, scissors

Dollar Store Valentine's Day Decor EASY and Cheap @savedbyloves

Tutorial:

Cut area of bag to fit frame and insert.  The end!

Dollar Store Valentine's Day Decor EASY and Cheap @savedbyloves

For the smaller frame, I removed the 3D heart that was on one side of the gift bag and placed it on the outside of the frame for depth and interest.

The little pink and red heart scatter are from Dollar Tree too.

Dollar Store Valentine's Day Decor EASY and Cheap @savedbyloves

Not bad for under $10, huh?  I have the other sides of the bags to create with too!

Don’t forget to visit our Valentine’s Day themed 50+ Roundups!

IF you want to see more Dollar Store Valentine’s day projects, or want to share your own, be sure to visit the Dollar Store Themed Valentine’s Day Link Up hosted by Fox Hollow Cottage and Debbidoo’s!  Click the thumbnail below…

Valentine’s Day Window Hearts

Make crayon hearts for faux stained glass Valentine's Day decor via House of Joyful Noise, featured @savedbyloves

[pinit]

What to do with all of those broken crayon shards?  Laura at House of Joyful Noise created these gorgeous crayon hearts, just perfect for Valentine’s Day festivities.  I personally would keep them up all the time.  Head over for Laura’s detailed step by step photo tutorial and create your own window love.

Mixed Media “Believe”

Mixed Media flower art by @savedbyloves

[pinit]

Maybe you read in an earlier post that one of my New Year’s resolutions was to get messy in my studio and create art daily.  Part of that for me has been taking some classes.  This piece is from the first project I did in Doodle Too, a class by Stephanie Ackerman of Homegrown Hospitality.  I loved the process of creating the acrylic paint sky background, and Mod Podging paper scraps to it to create the scene.  I scanned the finished piece and printed/framed it.  The original is part of my art journal.  I have taken the novel approach of just enjoying the process of putting color on paper and letting go of the final outcome.  Way too fun.  Highly recommended.

Mixed Media flower art by @savedbyloves

Believe5

Privacy Policy