Archives for 2012

Duct Tape Poinsettia Gift Topper

[pinit]

Duct Tape Poinsettia Gift Topper #Christmas #Repurpose #Christmas #DIY @savedbyloves

Duct Tape Poinsettia Gift Topper #Christmas #Repurpose #Christmas #DIY @savedbyloves

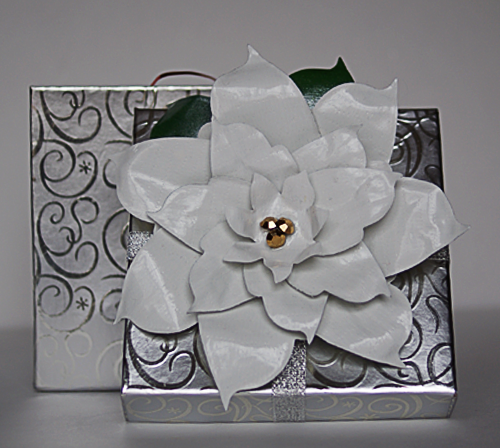
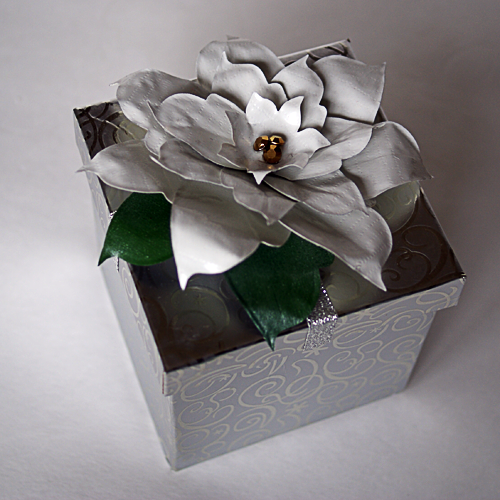
What can’t you do with duct tape, really?  Today, I have a great gift topper idea for your Christmas wrapping, using duct tape and a foil lid.  Make several and create a wreath, or garland.  This is a unique, inexpensive way to add a handmade touch to your presents this year.

I used my poinsettia Sizzix die, but I showed you in this DIY poinsettia wreath tutorial a great template for creating poinsettias by hand from Eri Doodle.  This can be done easily by hand.

SUPPLIES:

Poinsettia die or template

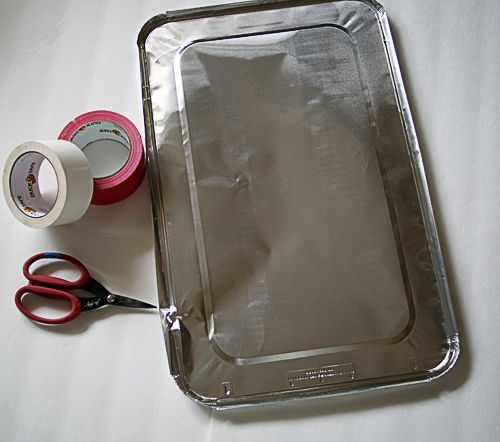
Foil lid (available at Sam’s Club in 15 packs for $13)

Red and/or white Duct tape

Scissors

Green Acrylic paint and primer or green Duct tape

Hole punch

Brad

Gold or yellow beads for center

Clear, tacky glue

Duct Tape Poinsettia Gift Topper #Christmas #Repurpose #Christmas #DIY @savedbyloves

TUTORIAL:

Apply strips of duct tape over the foil lid, making sure to smooth out any air bubbles as you go.  I use the flat inner section of the lid only.

Duct Tape Poinsettia Gift Topper #Christmas #Repurpose #Christmas #DIY @savedbyloves

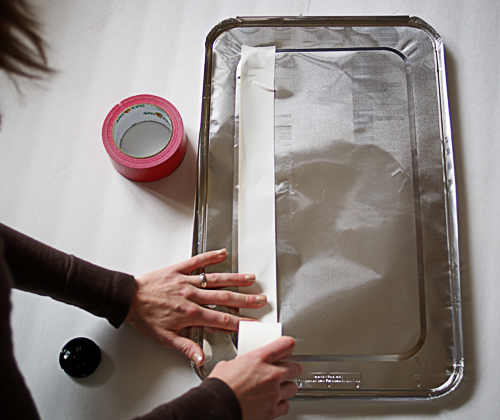
Continue until entire flat part of lid is covered if you want to make several flowers, or just do 2 strips of duct for a single flower.

Cut out the duct tape covered area with scissors and either die cut or trace template with a pen and cut out petals by hand.  You will need 2 green petals for each flower for the leaves.  For this, primer the lid and paint with green acrylic paint (I used Martha Stewart Glitter paint in green) or just use green duct tape.  I wanted the glitter look, and wasn’t too thrilled with the shade of green duct tape in the store.

The purpose of the foil is so that you can shape your leaves by creasing them down the center and curling the tip under for a greater 3D effect.  This foil holds the shape great, but you still get the color and gloss of the duct tape.

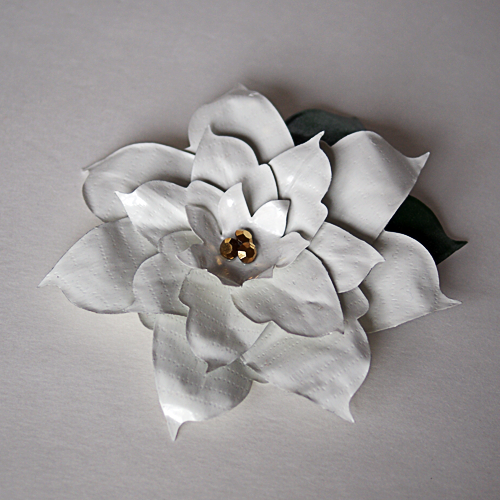
For flower assembly – Refer to the pic below for petal arrangement.  You can use glue like I did in the paper example pictured, but I prefer to punch a hole at the bottom of each petal (stack several petals and punch them at once to save time), and at the center of the central start, then put a brad through all the holes to connect the parts.

That is it.

Duct Tape Poinsettia Gift Topper #Christmas #Repurpose #Christmas #DIY @savedbyloves Duct Tape Poinsettia Gift Topper #Christmas #Repurpose #Christmas #DIY @savedbyloves

Wine Cork Christmas Decor

Wine Bottle Cork #Christmas Decor from Drink Nectar, featured @savedbyloves

Many will be enjoying wine over the holiday celebrations.  Don’t get rid of those corks just yet.  At DrinkNectar.com, you will find this cute Christmas tree wine cork decoration, as well as 11 other Christmas projects to make from these little gems.

Want more wine cork project ideas?  There is a 50+ for that:

Make Headbands from Old T-Shirts

[pinit]

Make braided headbands from #recycled #tshirts at Duitang.com, featured @savedbylovesWe are back at it today with another easy, inexpensive DIY gift idea.  Raid your old t-shirt pile or head to a local thrift store to pick out your favorite colors for these recycled t-shirt braided headbands at Duitang.com.

Be sure to visit our 50+ roundup for more t-shirt ideas:


DIY Dollar Store Custom Stenciled Gift Mugs

@DollarTree Mug Stenciled Mustache; Great #DIY #GiftIdea @savedbyloves

Today I have a great guy gift idea for you.  This project only cost $1 and took just 5 minutes.  Attention procrastinators:  easy, cheap last minute guy gift here.  You can actually make these for anyone on you list.  It doesn’t have to be a mustache that you paint on here.  Remember when I showed you these Martha Stewart stenciled mugs?

@DollarTree Mug Stenciled Mustache; Great #DIY #GiftIdea @savedbyloves

This project is similar, but I found these clear, big glass mugs at Dollar Tree.  I made my own stencil but printing the mustache below on cardstock, cutting it out and tracing it onto contact paper.  I cut that out and used the space left behind as the stencil on the mug.  No die cut machine necessary.

@DollarTree Mug Stenciled Mustache; Great #DIY #GiftIdea @savedbyloves

I made one of these for everyone that is going to be at my family’s traditional egg nog New Year’s Eve get together.  For some I used adhesive stencils, and others I used hand cut stencils I made from contact paper.  I used Martha Stewart glass paint and her daubers to apply it.  The stuff is great because you can bake it and it becomes permanent and dishwasher safe.  Not to mention it applies beautifully.  You can create professional looking gifts with no experience.

@DollarTree Mug Stenciled Mustache; Great #DIY #GiftIdea @savedbyloves

@DollarTree Mug Stenciled Mustache; Great #DIY #GiftIdea @savedbyloves

If you need some more handmade gift ideas, check out our 50+ roundups:

50+ Recycled Lid Crafts to Make

[pinit]

50+ #Recycled Lid #Crafts to make #DIY @savedbyloves

[pinit]

This week I have some seriously creative uses for lids of all kinds.  Mason jar lids, shoebox lids, bottle caps and more can be used to make ornaments, photo keepsakes, wall art, jewelry and much more.  Lets keep those lids out of the landfills while stocking our craft supply box!


DIY Felt Wreath for $1

Make a Felt Poinsettia wreath from @DollarTree stocking and cardboard @savedbyloves

[pinit]

When I saw the huge red and green felt stockings at the Dollar Tree, I just knew I had to make another poinsettia wreath.   This wreath was made with one stocking and a wreath form which I cut from a leftover box.  So yes, it cost $1!  Felt can be expensive, and this is a fantastic way to get a lot of it, in Christmas colors, for next to nothing.  This particular felt makes a gorgeous flower.  I bought three of the stockings and am busy making more of these gorgeous wreaths for Christmas gifts.

SUPPLIES:

Dollar Tree Stocking

Sizzix and Poinsettia Die

-OR-

Poinsettia template to cut felt by hand, like this free one from Eri Doodle

Straight pins

Wire Cutter

Cardboard box

2 circular items to trace onto cardboard to cut out a donut for your wreath form

Scissors

Pen or marker for tracing onto cardboard

Tape

TUTORIAL:

Trace plate or whatever circular items you have onto cardboard and cut out wreath form like I showed you previously:

Wrap your cardboard donut with tape to reinforce and protect.

Cut your poinsettia petals and leaves with your die or template.  Assemble flower and use straight pin to stick onto wreath form.  For detailed flower assembly, see my paper poinsettia wreath post.  The process for felt is the same, but you don’t fold and shape the leaves like you do with paper.

Make a Felt Poinsettia wreath from @DollarTree stocking and cardboard @savedbyloves

You will likely have excess straight pin sticking through the back of your wreath.  Carefully trim flush with wreath form using wire cutters.  Wear eye protection for this part!

Make a Felt Poinsettia wreath from @DollarTree stocking and cardboard @savedbyloves

Make a Felt Poinsettia wreath from @DollarTree stocking and cardboard @savedbyloves


DIY Geometric Paper Ornaments + Template

Make #DIY paper #Ornaments with The Red Thread Blog, featured @savedbyloves #Printable

[pinit]

I am a little nutty over these geometric paper ornaments I spied over at The Red Thread Blog.  It kinda makes me want to start over with my Christmas decor, since I went super traditional this year.  Actually, these are the kind of decor I could make and keep up year round.  They would be lovely as garland or border in a nursery or kids room.  Find the printable template and instructions at the above link.

UPDATE:  I had to remove the link for this project because the site has a virus.  If the problem is resolved, I will put the link back.  

DIY Holly Jolly Christmas Decor

Make a Holly Jolly #ChristmasDecor Sign #repurpose #Upcycle #papercraft @savedbyloves

[pinit]

This fun project only cost a few dollars, and is the perfect piece to top off our Christmas mantel.  I have been wanting to do something with a sign I grabbed from a garage sale for $1 over the summer.  With some spray paint, a stencil I made in Photoshop, and a holly/berry paper die cut, I was able to make this festive Christmas sign.

Supplies:

Krylon Banner Red

Krylon White

Gesso or primer

Paint Brush

Holly Jolly Stencil

Make a Holly Jolly #ChristmasDecor Sign #repurpose #Upcycle #papercraft @savedbyloves

Holly Berry die cut – I used this holly berry file from Eri Doodle Designs to cut the holly berry from card stock using cricut

Photo source: Eri Doodle Designs

 3D Foam mounting adhesive

Medium Grit sandpaper

Towel for cleaning and for drying

Newspaper

Masking tape

Make a Holly Jolly #ChristmasDecor Sign #repurpose #Upcycle #papercraft @savedbyloves

TUTORIAL:

Make a Holly Jolly #ChristmasDecor Sign #repurpose #Upcycle #papercraft @savedbyloves

Lightly sand your sign and wipe away debris with soapy water.  Dry with towel.

Make a Holly Jolly #ChristmasDecor Sign #repurpose #Upcycle #papercraft @savedbyloves

Apply gesso or primer.  I did 2 coats of gesso, drying completely between.  Let dry.

Make a Holly Jolly #ChristmasDecor Sign #repurpose #Upcycle #papercraft @savedbyloves

Spray with red paint and let dry.  While that is drying, cut out your stencil from clear contact paper or vinyl.  Contact paper is way cheaper.  It doesn’t have to be clear, I just prefer that so I can see where I am placing it better.  Any contact paper will do.  I used my cricut to cut out the letters, but you can print the text (file available for free download under supplies, above) and trace the letters onto your contact paper.

Place your stencil on the dry red sign and spray white.  Make sure the area you don’t want white is all blocked off with newspaper or tape.

Adhere your holly berry die cut cardstock and you are all done!

Make a Holly Jolly #ChristmasDecor Sign #repurpose #Upcycle #papercraft @savedbyloves

Make a Holly Jolly #ChristmasDecor Sign #repurpose #Upcycle #papercraft @savedbyloves

Make sure you check out our Christmas gift and decor 50+ roundups for more inspiriation:

50+ Guy Gifts to Make

[pinit]

Over 50 Gifts to make for Men #handmade #Christmas @savedbyloves

[pinit]

Ask and you shall receive.  Several of you have inquired as to a source for handmade Christmas gifts for men.  I have brought you some of the web’s best tutorials for projects that the men in your life will cherish.  Ties, toolbelts, watches and more, this roundup has gifts for guys covered with budget friendliness in mind.  Enjoy!


50+ Christmas Gifts to Make Under $10

[pinit]

50+ #ChristmasGifts to make for Less than $10 #Handmade @savedbyloves

[pinit]

Need some great last minute handmade Christmas gift ideas that won’t break the bank?  This week’s 50+ has you covered.  You will find gifts for everyone on your list, from kids to guys to moms, and everything between.  Best of all, you can create these gifts for under $10.  What are you waiting for?  Grab some friends and make a night of it.


Privacy Policy