
 We made this free printable in the spirit of Valentine’s Day, but isn’t it a great reminder to keep up all year long? The print is 8×10. To download, just click the thumbnail above and the full resolution version will appear. Save to your computer and print or use as wallpaper.
Archives for January 2012
Quatrefoil “Love is” Printable
by
Wire Wrap a Pendant With Video
by
 To continue with our recent jewelry making obsession, today’s post will cover this gorgeous wire wrapping technique. You do not need wire wrapping experience to be able to pull this off. The example shown here is a rectangular glass tile, but you can apply the lesson to virtually any pendant or stone you want to set.

Supplies:
- Pendant for setting
- Beadalon square wire
- Beadalon half round wire
- Beadalon 22 gauge round wire
- Flush cutter
NOTE: The video from BeadsDirectTV uses half round and square for the technique. I only had round wire, which is what I used, and it worked great. Something to keep in mind if you need to work with what you have. Mine was 22 guage round; Beadalon 22 gauge round wire
Make sure you check out their other awesome jewelry making videos.
Make Charms With Resin and Paper
by

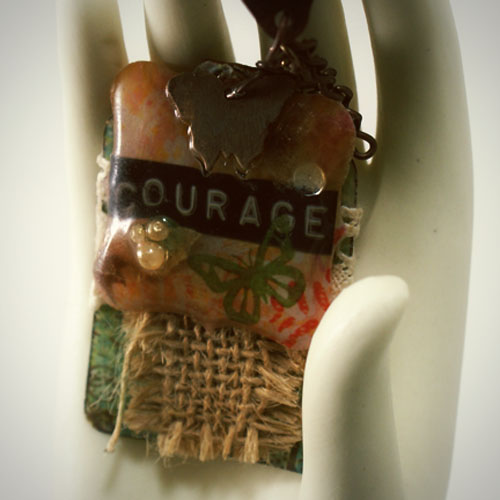
No need for a bezel or pendant blank. You can make charms with a simple paper shape and resin. Here, I used my paper punch to get the shape of this orange courage charm, decorated it with word label and rub-ons, and layered Magic Glos resin.
 To hang, I just puched a hole in the top and added a jump ring. I placed it on top of a paper tag wrapped in lace, with a burlap strip on top. Add a key fob and some dangly pearl charms, and you have a gorgeous mixed media keychain.

50+ Friday: Handmade Valentine’s Day Gift Tutorials
by
 [pinit]
Need some inspiration for that perfect “I Love You” project? We have scoured the creative blog land to bring you over 50 Valentine’s Day handmade gift tutorials. Enjoy!
Thrifty Thursday Week 59
by


Hello, and thanks for stopping by SBLC for our crafty project share party.
Before getting down to business, let’s talk about Pinterest. I love/hate it. Love because it is so dang awesome, hate it because it sucks me in and I am completely powerless. That said, I would love to connect with you on my ever growing current obsession. I have found the most amazing blogs and projects by hooking up with other bloggers. Leave a comment with your pinterest link or visit my boards and say hello so I can follow you.
LINKY STUFF:
How it Works: No giveaways, shop or links to your main blog, please. That way we know when we come to Thrifty Thursday, we will only encounter DIY projects and not end up sifting through a bunch of other links. Entries not related, or to main blog pages/shops/giveaways will be deleted.
Other stuff:
*Please add a text link or my button to your post!
*2 projects from the previous week’s linky will be spotlighted, so let them know they ROCK!
*Please visit the at least the 2 blogs above you and shower them with comment love.
*Leave me a comment and let me know you were here. I love hearing from you.
*Have fun and be inspired!
*My friend Nikki knows how to throw a great party too. Be there…

FEATURES
 Katie at Creatively Living found a crib curbside and snatched it up (a girl after my own heart). She paired the metal frame part with some craigslist finds for this great repuropsed wall decor.
 Artsy VaVa put her own unique spin on scrabble tile pendants with metal jewelry findings, for a fantastic piece of jewelry. You can view her quick and easy pendant making tips and have your own version in a snap.

Andrews Update was inspired by none other than Pinterest to create these decorative book page hanging spheres.
Here we go…
Glue Free, Drill Free Way to Hang Pendants
by

Making a wire wrap bail is a decorative, inexpensive way to attach pendants that eliminates the need for messy glue-on bails and hole drilling. The look is intricate and ornate, and can be achieved quite simply with a few basic jewelry supplies. This is a perfect way to bail glass tile and domino pendants.
TUTORIAL


The wire isn’t shaped to the edges very well in the above demonstration. Make sure to keep it snug against the piece, like it is holding the pendant together.


Use pliers to tuck in the cut ends. Sometimes I file them when they aren’t flush.
It is as simple as that. Now add a jumpring and your pendant is ready to hang, with fancy pants wire work to boot…

Here is what it looks like on the back…

Here, I used the wire wrap method on pre-drilled dominoes with horizontal holes. It is the same process, but you take the wire to the back through the hole so the wire only frames the top and runs horizontally through the middle.


Some 1 inch glass tiles wrapped…


Now you are ready to practice your mad wire wrapping skills. If you try this, share pictures. I love seeing what you have done!
Triple Strand Beaded Domino Pendants
by

There is nothing quite like multiple strands of seed beads to compliment a special pendant. I don’t usually take the time to bead, but these domino pendants inspired me to bust out my stash and get busy. Fast forward 5 hours of stringing these tiny things and I have two finished pieces…’


It is a nice change from pairing pendants with a simple silver snake chain, which is what I normally do with dominoes. I am not much of a jewelry designer, as far as putting together beaded strings with a focal pendant, but you can’t really go wrong with this simple triple strand design to display your focal. Just drill a hole in your domino horizontally and string it like you would any other bead. In my browsing, I found these gorgeous macrame beaded domino necklaces with instructions at Caravan Beads Blog.
 I actually started the beaded macrame string, and about 2 inches into realized it was going to take way more time then I had to invest in a necklace at the present time. It was, however, pretty easy to pick up, and I am not familiar with macrame. It would be a great project for a long road trip.
Now I am going to ask for your input. What kind of necklace do you think would pair well with this piece? I have some ideas, but I want to know yours. If I go with your design, you may just find a domino pendant in your mailbox in the future, so don’t be shy.

Making Jewelry With Rub-on Transfers
by

It was a jewelry making weekend for this crafter, glass tile pendants and altered dominoes stealing the show. Normally, I design images for my pendants and just adhere them as they are. That all changed when I thought to incorporate the rub on transfers I picked up at Hobby Lobby recently. I have used these things before, but in papercrafting, never jewelry. The inspiration hit me because these particular images packs (by Prima) are irresistibly gorgeous , and just the right size for pendants.

Adding them to my pendant images was super easy. Since the sheet they come on is transparent, I was able to move scroll over my printed pendant images to see what the transfer would look like before committing. Once I decided what transfer I wanted where, I just cut it out and burnished it on as instructed. I love the effect it gave my pieces. Super easy, and 1.99 (originally 3.99) a pack at Hobby Lobby right now.

This piece is a domino pendant that I did in layers, with the rub-on green butterfly as the top layer just under the resin. I started by painting the domino with a coat of gesso. Once dried, I mixed acrylic paints to get the soft blue/green background color and painted it on using a soft brush. When that layer dried, I stamped with clear embossing ink using an handwriting script stamp. I embossed the script using white embossing powder, rubbed on the butterfly transfer and coated with resin to finish.

I think the layer effect pops more with these rub-on transfers then when I layer in photoshop, and I get images I wouldn’t have come up with on my own digitally.
 Here is another domino I did with vibrant pink leaves and a bird in a cage rub-on transfers.
 This bezel pendant uses the same background image (fearless) with a flower and butterfly transfer.
 Here is a side by side comparison: a pendant with the image I designed, printed and adhered, and another pendant with the same printed image, embellished with a red butterfly transfer. I love how it refreshes my designs and how fun it is to layer with these. I will be keeping my eyes peeled for jewelry sized rub-ons!
Dry Erase Love Note DIY With Printable
by

I have wanted to do this project since I first saw this framed “p.s. I love you” on Pinterest. It is uploaded by user, so I don’t know who made it. If it was you, let me know so I can send you some link love. Anyway… my guy and I are big note writers, and I thought making a dry erase love not would be a greener way to carry out our lovey dovey correspondence.

Here is the printable I used, which you are free to download…

I printed out the 8×10, stuck it in the frame, used a paper punch to make little hearts, glued them to twine, placed the garland and that was that. If you don’t want to use the printable above, you could just use an actual piece of notebook paper, doodle a cute message, and frame it.
Now we have a cute way to leave notes that doesn’t take up precious paper that I could otherwise roll into a lovely bead. Win win.


Coiled Magazine Page Heart Tutorial
by

[pinit]
You saw this coming, right? Valentine’s Day is approaching, and a coiled newsprint heart tutorial is all but mandatory here at SBLC. This would be a great craft for Valentine’s Day decor or gifts. The technique is pretty much the same I have shown you in other coiled projects, with the addition of the best paste option I have found so far. I will share with you the step by step, including the glue recipe that is key in strengthening the strips and neatly coiling/shaping them.

Supplies:
- Magazines pages in colors you love
- Paper cutter or scissors
- Toothpicks
- Paper mache paste (recipe below)
- Wax paper
- Heart shaped cookie cutter
- Craft glue (I prefer Crafter’s Pick for these projects because it sticks to the wet strips, grabs fast and dries clear)
Instructions:
- Fold strips as shown in this magazine page coiling tutorial. I use a 1/4 magazine page for each strip. Some tutorials show 1/2 page or full page. I like 1/4 because I think the end projects look much nicer (less bends and crinkles in the strips).
- Make your paste as follows:
4 tbsp. flour
1 c. cold water
1 c. boiling water
1 1/2 tbsp. sugarMix flour + cold water then add boiling water and bring to boil. Add sugar, stir constantly until thick. Makes 2 cups. -
Dip each strip in the paste as shown, then lay on wax paper to dry.


-
Let strips dry; I usually prepare a bunch of strips and make the piece the next day. I am sure a couple of hours would suffice.
- When you are ready to being shaping your strips, wet each one, one at a time as you are using it. The paper mache paste makes the strips stronger and wetting them makes them easier to shape, The paste becomes a little sticky again, helping the strip to stay where you place it.

- To get the heart shape outline; wrap strip around cookie cutter. If you are using a larger cutter, you may need more than one strip to go around. No problem. Just overlap the strips about 1/4 end to beginning and continue wrapping. When you come to the beginning of your first strip, overlap the current strip with it about 1/4 inch and trim off any remainder of the end strip. When that dries, slide heart shape off of cookie cutter.
 .
.


- To make the inside coils, I just start coiling (using strips i have re-wet) and use the outline as a guide to help me figure out what size and how many coils I need. Place the coils inside the outline, and using a toothpick, place a dab of glue at each contact point (where the coils touch one another and where the touch the outline). Let your piece dry completely and cover with a couple of coats of mod podge or sealant of choice for durability

 .
.


The possibilities are endless. I would love to see what you come up with, and am happy to answer questions!
