Archives for July 2011

No Bake Peanut Butter Cocoa Cookies

Peanut Butter Oatmeal Cocoa No-bakes
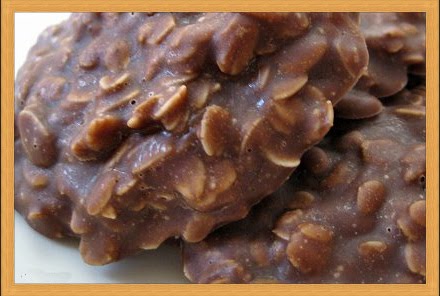
This is a re-post, and is by far my most popular contribution to potlucks.  They take 5 minutes to prepare, and must sit for about 1 hour to harden.  Quick and awesome.  Today, I made them as “I am sorry my psycho Jack Russell TerrOR tried to annihilate your cat” cookies for my dear neighbor.  Couldn’t find a card for the occasion, so why not chocolate. Guess who is in the doghouse.  O.k., not really.  He is impossible for me to stay mad at.  At least it wasn’t a skunk this time.

Ingredients:


  • 1 cup milk


  • 2 sticks butter


  • 4 cups sugar


  • 1 cup peanut butter (i use crunchy)


  • 2 tsp vanilla extract


  • 6 cups Quick Oats


  • 4 tablespoons unsweetened cocoa powder


(the above measurements make a mountain of cookies – depending on how you size them when you drop them on wax paper, about 70. You can halve the recipe if you don’t need that many, but in my experience, they disappear like magic)!


Directions:
  • Put 1st three ingredients in sauce pan and heat to a rolling boil, while stirring. When it comes to a rolling boil, wait onc minute and remove from heat. While waiting for that to boil, combine remaining ingredients in mixing bowl. After removing the saucepan from heat, pour in dry ingredients and stir until mixed. Line counter tops with wax paper and drop mixture into dallops onto the paper. Let stand until cookies harden. Usually about 1 hour.


Note: If cookies don’t set up, you didn’t let them boil at a roll for a full minute. If they are too dry, you let them boil too long.


Let me know if you have questions.


Shrink Film Jewelry

Stamp Jewelry Tutorial

This project is simple and fun!  I love how the jewelry turned out, and it is a quick process.  Gotta love instant gratification.  Follow along and create your own custom shrink film pieces.

Supplies:

  • Clear Shrink Film
  • Solvent inkpads
  • Pigment inkpads
  • Sharpies or other permanent markers
  • Scissors
  • Oven
  • Hole punch
  • Stamps
  • Parchment paper lined cookie sheet

Instructions:

  • Using stamp and inkpad, stamp desired image onto shrink film.  You can use solvent ink or pigment ink (which sets when you heat the piece in the oven later).  In either case, be careful not to touch the inked image, as both smudge prone until the piece is heated and shrunk.

TIP:  Keep in mind when making your image that the piece will be about 3 times smaller after you shrink it.

Shrink Film Jewelry

Before shrinking

Shrink Film Jewelry DIY

Final piece after shrinking

  • Cut piece to desired shape and size, being careful not to smear the ink.  Use fine tip permanent marker to add colors and details.
  • Punch hole for jump ring to attach piece to chain or other jewelry findings.
  • Place piece on parchment paper lined cookie sheet and put in oven preheated to 300°.  The parchment paper is key for the piece flattening out after shrinking.   Piece will curl and bend, and maybe freak you out a little, but fear not.  It will return back to original shape and flatness.  Remove from oven about 20-30 seconds after it flattens.  Total cook time is about 2-3 minutes.  Let cool and string with beads or as desired!

Shrink Film Jewelry DIY

DIY jewelry

Jewelry DIY

Thrifty Thursday Week 32


Hi all! Glad you are here for another thrifty project link up. Thanks so much for stopping by and sharing.
Look around and join the fun. The idea is to link to your frugal post, whether it be a DIY, recipe, tip, coupon… if you like it, link it. If you don’t have a thrifty post to link to, feel welcome to join the hop anyway, and link to your main blog.
Other stuff:
* Please follow Saved By Love Creations, your host!
*Grab my “Thrifty Thursday” button above and throw it on your lovely site. Let’s grow this!
*I will choose 2 participants to feature the following Thursday, Please drop by and follow the features! They are numbers 2 and 3 in the thumbnail list. REMEMBER that to be chosen as a featured site, you must follow SBLC via GFC.
*Follow the blogs that are must reads, and please return the gesture by following those who follow you. Leave a comment when you follow so that the blogger will know you are a new follower
*Leave me a comment and let me know you were here. I love hearing from you.
*Scatter joy, and frugal tips.
*Have fun icon smile Thrifty Thursday Week 31
*Stop by and say hello to Nikki and link up to her thrifty party too…

Weekly featured blogs:

  • Look at these adorable white faux rust tin cans by Carolyn!  I can’t wait to try this project.

homework


Vintage home decor

  • Adriene at Fruitful Home Journal made this simple and lovely rustic coasters.  Great stuff.


DIY rustic decor

Stumble Linky Week 4


The deal:

  • Stumble Upon has huge traffic power; for more SU info, there are resource links below
  • Follow your Saved By Love Creations via GFC
  • Add your blog post that you would like people to stumble to the linky below.
  • Please do not link to your main site, or to a time sensitive post such as a Giveaway or Blog Hop.
  • Stumble all the posts you would like to promote.  You can check to make sure that your stumble went through by clicking on the “Info” icon.  Leave a comment on their post so the blogger knows you have stumbled them.  Leaving a link to the post you want stumbled in the comment is also helpful.
  • If you are not going to stumble other posts, please do not enter a link to be stumbled.  It is all about give and take, not just take.
  • Feel free to add multiple post links.
  • NOTE: You can install the SU toolbar right in your internet browser window.  Then just hit “I like it!” in your toolbar.  If it is the first time that page has been stumbled, you will have to fill in a few tidbits of info: you will need to enter a couple of broad category tags, and a short review.  This only takes a minute, and is a one shot deal, so please do this.  If the post has already been stumbled, you will not have to do this, just click thumbs up.
  • For more info on stumbling, check out these links:  Kelly’s Lucky You Tutorial, The Ultimate Stumble Upon Guide
  • Please spread the word by sharing the button on your site, tweeting and facebooking (but don’t stumble this actual linky, cause it’s a linky – see above)

Tissue Transfer Bird Vase

Image Transfer Vase
I’ve had this blue vase sitting around for awhile now, begging to be decorated.  It ended up in storage until I found inspiration to revamp it from none other than the beloved Graphics Fairy!  Follow along for another image transfer project using tissue paper, an ink jet printer and a plain vase as the substrate for the transfer.

[Read more…]

Pottery Barn Organizer Knock-Off

Pottery Barn Wall Organizer


This is my debut Pottery Barn knock off project.  The inspiration for the project actually came from Starbucks Via instant coffee cartons.  What?? Yeah.  They look like this…

Starbucks Via Iced CoffeeMight I just say that I am 100% addicted to these drinks, but anyway – I was looking at the empty carton and thought surely I could make something cute out of the little shape.  I was initially thinking I would make a faux metal wall pocket and stick some adorable paper flowers in there.  I began searching images for wall pockets when I came across this Pottery Barn piece for $149.

Pottery Barn Wall Organizer

I knew I could make this with supplies I had on hand, and I would still get to use my empty Starbucks Via box.  Check out the step by step and make your own Pottery Barn knock-off wall organizer.  I spent a total of $1.26 on dowel rods, and probably about $10 if you include the garage sale picture frame and bulletin board I used.  The project took undert 2 hours from conception to completion.

Supplies:

  • Old bulletin board
  • Picture frame (mine is 18×24 inch
  • Burlap cut to fit frame and enough to make pouch
  • Super 77 or other mounting adhesive
  • Empty carton (Starbucks Via box works well
  • Dowel rods
  • Drill
  • Chrome or other metallic spray paint
  • Stencils (I  cut mine with Cricut)
  • Black Paint marker or permanent marker like Sharpie
  • Rubber stamp with handwriting (optional)

Instructions:

  • Cut bulletin board to fit frame.  I outlined the glass that was in the frame to use as a guide to cut the bulletin board to fit.  I cut on the inside of the outline, taking into consideration the thickness of the burlap that I would be folding over the edges of the bulletin board later.

Pottery Barn Wall Decor

Pottery Barn Knock-off

  • Cut burlap to fit with 1/2 inch overlap on all sides.

Pottery Barn DIY

  • Spray Super 77 onto cork side of bulletin board, covering it completely,  and immediately place the burlap on top, smoothing it down with your hand.

Pottery Barn Wall Organizer

  •  Now place your stencils on the burlap and stencil away.  I used vinyl stencils I cut with Cricut, which I love because the vinyl stays in place, even on burlap.  I used a paint marker to fill in the stencil openings.   I also used a rubber stamp and black ink pad to add old handwriting for the vintage postcard feel.

Pottery Barn Wall Organizer


  • Drill small holed in frame for dowel rods to sit in as shown.


Pottery Barn TutorialPottery Barn Decor


  • Cut your dowel rods to fit using a utility knife.  Shave the ends to taper them like a pencil if need be to fit into the holes you drilled.  Spray paint them your desired color.  I used a chrome effect spray paint that I had on hand.
  • Pottery Barn Bulletin BoardTo make the pouch, spray your empty carton with Super 77 and adhere burlap you have cut to fit.  For the loop to attach the pouch to the dowel rod, fold over a rectangle scrap of burlap and spray the touching edges, then spray and adhere it to the back of the pouch.  That is it!!

Pottery Barn Wall Organizer

Burlap stenciling

Pottery Barn Burlap Decor

Pottery Barn Wall Organizer

Grab some antique images, flowers, clothespins and dress up your new organizer.  What do you think?

Cucumber Sesame Salad

Cucumber Recipes

I am ridiculously excited about my very first harvest… ever!  In May, I planted cucumbers, tomatoes and peppers, having never planted anything in my life.  It has been a blast.  This is my debut garden recipe.  The tomatoes are giant, but still green.  The cucumbers grow 10 inches a day, it seems.  They are taking over.  Today I share with you a family recipe – refreshing cucumber sesame salad.  Enjoy!

Ingredients

  • 2 medium cucumbers about 12 inches each
  • 1/3 cup rice vinegar
  • 1 1/2  teaspoon sugar
  • 1/2 teaspoon salt
  • 2 tablespoons toasted sesame seeds (see tip)

Instructions

  • Peel cucumbers, leaving alternating green stripes. Then slice in half lengthwise and scrape the seeds out with a spoon. Using sharp knife, cut cucumbers into thin slices.

Cucumber salad

Cucumber salad recipe

Cucumber salad

Quick summer salad recipes

  • Combine vinegar, sugar and salt in a medium bowl, stirring to dissolve. Add the cucumbers and sesame seeds. Toss well and serve immediately.

Tip:  To toast sesame seeds, heat small skillet on low, add seeds.  Stir constantly for about 2 minutes until golden and fragrant.

Toasted sesame seeds

What are your favorite garden vegetable recipes?

Urban Arts and Crafts

Anthropologie Necklace Knock off

My recent trip to Kansas City, MO brought me to quite the inspiring craft spot, Urban Arts and Crafts.  This little shop has yarn, paper, fabric, soldering supplies, ephemera, stamps and everything in between.  Karen and Casey, shop owner and employee respectively, were happy to talk crafts with us and school us on the local hot spots!  Today, I will share with you what I found most inspiring in this gem of a store.

[Read more…]

Thrifty Thursday Week 31


[Read more…]

Stumble Linky Week 3


The deal:

  • Stumble Upon has huge traffic power; for more SU info, there are resource links below
  • Follow your Saved By Love Creations via GFC
  • Add your blog post that you would like people to stumble to the linky below.
  • Please do not link to your main site, or to a time sensitive post such as a Giveaway or Blog Hop.
  • Stumble all the posts you would like to promote.  You can check to make sure that your stumble went through by clicking on the “Info” icon.  Leave a comment on their post so the blogger knows you have stumbled them.  Leaving a link to the post you want stumbled in the comment is also helpful.
  • If you are not going to stumble other posts, please do not enter a link to be stumbledIt is all about give and take, not just take.
  • Feel free to add multiple post links.
  • NOTE: You can install the SU toolbar right in your internet browser window.  Then just hit “I like it!” in your toolbar.  If it is the first time that page has been stumbled, you will have to fill in a few tidbits of info: you will need to enter a couple of broad category tags, and a short review.  This only takes a minute, and is a one shot deal, so please do this.  If the post has already been stumbled, you will not have to do this, just click thumbs up.
  • For more info on stumbling, check out these links:  Kelly’s Lucky You Tutorial, The Ultimate Stumble Upon Guide
  • Please spread the word by sharing the button on your site, tweeting and facebooking (but don’t stumble this actual linky, cause it’s a linky – see above)


Privacy Policy