Archives for May 2011

Garage Sale Score: Bread Machine Fun…

Thursday was an outstanding garage sale day.  Debbie and I were finding deals left and right.  So many that it became difficult to drive.  She just had to get the exercise ball.  (You better have a six pack next time I see you, lady)!

Amongst the numerous bargains of the day, I found me a $5 bread maker:

I had never used one of these beasts.   I brought it right home and got to business, to whip up yummy bread for our weekend camping trip.  I followed a recipe that came in the manual:

 The first loaf I made was more cooked than I like, so I made another with the bake setting on “light” instead of “medium”.  I also added 2 packets of splenda to the recipe to sweeten it up a bit.  It came out perfect.  I read that you have to be careful and follow recipe amounts when it comes to sugar (or honey or molasses) because yeast thrive on sugar, and too much sugar can cause havoc.  I also read that artificial sweeteners cannot be used in lieu of sugar, as they do not react with yeast.  That is what made me think of adding splenda for a subtle sweet boost, and it worked.

So far, I have made for loaves of bread since Thursday.  I have absolutely gotten my $5 worth out of this machine!  Nothing is better than the smell of freshly baked bread filling the home.  This is just in time for us to boost our carbs for marathon training.  Lovely.  If you have any favorite bread machine recipes, send em’ on over!
BWS tips button
Photobucket


Debbie Does Coupons
Busy Mom's Tips Tuesday Blog Hop

What’s Your Story? Featuring Artist Sara of "Spareflair"

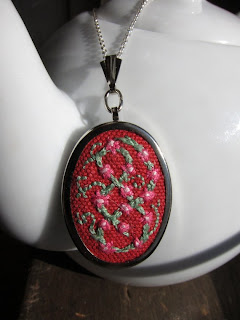
I ran across these adorable, one of a kind embroidered pendants, and I just couldn’t wait to share them with you.  Visit Spareflair on Etsy, here to see more cuteness.  Thanks for the great interview, Sara!

Where are you located?

I was born, raised, and still live in Chicago, Illinois. This area of the United States faces very severe seasons: sweltering summers, beautiful and crisp autumn, freezing winters, and very lush springs. I draw a lot of my inspiration from nature, so I am very happy that it is spring right now!

What do you create?

I create hand-embroidered pendants. I make up each image, embroider it completely by hand, and I then secure it in a metal pendant frame. I like the pendant frame because it is delicate, light, and beautifully frames the embroidered designs. I also provide a chain with each pendant, so each necklace is ready to wear. 

When and why did you set up your online shop?

I set up my online shop in March 2009 and initially sold my photographs. Then I decided that I wanted to do more in terms of “creating.” I always liked to sew, so I taught myself how to embroider, practiced a LOT, and started making my pendants. I opened up my shop because I wanted to share what I created with the rest of the world. I love knowing that other people are enjoying what I made.

How do you promote your creations?


Spareflair on ETSY
Spareflair on Facebook


I am still working on mastering the art of promoting my work. I have posted ads on retail websites. I also try to gain exposure through Etsy.com by creating Treasury Lists, where you make a list of items from Etsy.com that are all in line with a particular theme, such as “purple flowers” or “wedding.” While you cannot list your own things in your Treasury List, if you create a cool list that is visible to lots of Etsy users, your shop may get looked at more often. I also joined a “team” on Etsy, and my team focuses on needle arts. 

What inspires your work?

I make up all my designs, and I like to plan my designs by looking through pictures I have taken of flowers and plants. Sometimes I’ll base a design off a plant in real life, but most of the time I will look at a plant and say, “Now what would make that look even more interesting, and more like a unique piece of art?” A lot of my designs are tweaked so that they are not “just another flower.” I want each design to echo both the unknown and the familiar. 

Recently, I have also been making whimsical designs and fun images, like hearts and a little whale. I have a series of sailboats planned too. I would also like to expand into things bigger than necklaces, like wall art.

What is your must have tool for creating?

Definitely my three-inch embroidery hoop. It’s a must-have for what I’m doing. Also, a good, strong light. I tried embroidering once without a strong light and my eyes were killing me!

Do you have any tips for others wanting to turn their art into a business?

I have a time-demanding day job and it’s tough for me to find as much time as I would like to create my pendants. You have to treat creating like it is a second job if you want your business to be profitable. This means budgeting, schedules, spreadsheets, etc. There are a lot of wonderful business tutorials out there for crafters that I have been using. 

Extras:

What good books have you read or movies have you seen lately?

I love the Song of Fire and Ice series by George R.R. Martin. If you’re not familiar with the books, you may have heard of the Game of Thrones show on HBO, which is based on the Song of Fire and Ice series. It’s amazing, go read it now! I also have started reading “Mistborn” by Brandon Sanderson, and it is great so far. I have been watching Mad Men through Netflix, so not a lot of movies recently!

Where was your last vacation?

I went to California for a friend’s wedding. I went scuba diving by Catalina Island, which was a lot of fun. 

What is your favorite pastime outside of creating?

I love to read and I love to cook.

Who is your favorite designer/artist?

I love Takashi Murakami. His designs are so creative, and he has brilliantly toed the fine line between consumer product and art.

Thrifty Thursday Hop Week 24


Week 24 of Thrifty Thursday.  Beautiful weather and sunshine this week = tons of creativity flowing!
Look around and join the fun.  The idea is to link to your frugal post, whether it be a DIY, recipe, tip, coupon… if you like it, link it.  If you don’t have a thrifty post to link to, feel welcome to join the hop anyway, and link to your main blog.
Other stuff:
* Please follow Saved By Love Creations, your host!
*Grab my “Thrifty Thursday” button above and throw it on your lovely site.  Let’s grow this!
*I am hosting a Saved By Love Creations Pendant GIVEAWAY, here.  Make sure to check it out!  It ends 5/1.
*I will choose 2 participants to feature the following Thursday,  Please drop by and follow the features!  They are numbers 3 and 4 in the thumbnail list.  REMEMBER that to be chosen as a featured site, you must follow SBLC via GFC.
*Follow the blogs that are must reads, and please return the gesture by following those who follow you.  Leave a comment when you follow so that the blogger will know you are a new follower
*Leave me a comment and let me know you were here.  I love hearing from you.
*Scatter joy, and frugal tips.
*Have fun 🙂
*Stop by and say hello to Nikki and link up to Thrifty Thursdays…

Weekly Featured Blogs:
Sooo many cute projects – I wanted to feature a dozen.  Here are some of my favorites:

Look at these cute pincushions at Can’t Stop Making Things

And these adorable spray painted jars at A Pumpkin and a Princess


These are just in time for spray painting weather.  The twine, adorable touch.

Lets see your spring summer creativity!


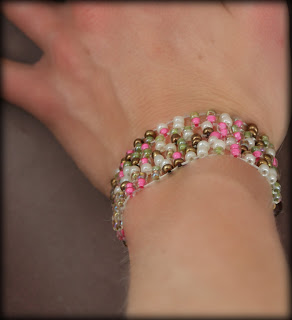
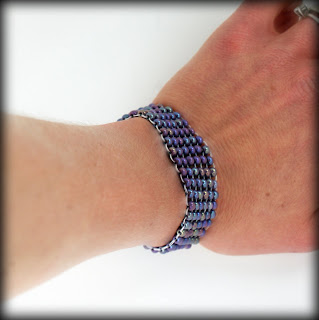
Flat Peyote Stitch Bracelets With Instructions

PinksPeyote2dropBracelet1
PurplePeyote2
The purple bracelet is the first one I ever made.  This is such an easy stitch to learn.  Both projects are done using size 6 e beads.  The purple one is strung on fireline and the multicolored on Nymo beading thread.  It is done with a 2 drop peyote technique, whereas the purple is regular even count peyote stitch.
Instructions for both:

I used bigger beads than those shown in these videos, cause I am a newbie at this, and they are easier to see.  I also must say that I prefer the fireline over the nymo.  It gives more hold and tension, so the beads stayed where they were put.  I like that.  For clasp on both bracelets, I used a button on one side with a seed bead loop on the other to fasten.  There are lots of other options for finishing your bracelet.  I found this cool article with 4 finishing techniques, at Beading Daily (LOOOVE this site).

Marathon Training Again!

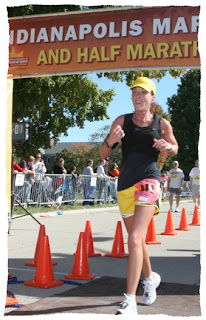
So, I have been ignoring my blog over the past couple of weeks.  Lots going on here.  We are training for another full marathon.  Crazy.  Yep.  I know.  I can’t help it, though.  I love love love distance running.  I have gotten away from it over the past year or so, and I forgot how fulfilling it is.  Fulfilling, and tiring!  That, combined with the fact that I am busy making pendants for an upcoming show in July, makes me less adamant about posting.  I promise to keep Thrifty Thursdays going during all of this, and to keep in touch when I can!

I encourage everyone who will listen to incorporate running into your life.  It doesn’t matter where you are in terms of fitness.  Just start there.  My two favorite resources for training tips and all things running are Cool Running and Runner’s World.  For marathon training schedules, I use Hal Higdon’s site, where there are free plans for everyone from novice to advanced runners.  If you have any running questions, please ask me.  It is one of my favorite topics!

Hop hop hop…

BWS tips button
Photobucket

Polymer Clay and Resin Pendant Tips

I ran out of glass tiles and wanted to make some pendants, so I decided to use polymer clay as the base, and dome some 2 part epoxy resin over the images for a glass like effect.  Some tips:
Condition the clay (I used black for some pendants and gold for others) and roll it through the pasta machine on setting 4.  Take a one inch square hole punch and carefully (avoid indenting the clay surface) slide the clay in, punching out your graphic image base.  I punched out my one inch images with the same hole punch.   Punch out your papers first, as the clay will leave residue on your hole punch, which will get on your paper.
You can spray armor all on the hole punch so the clay releases easier.
With a paint brush, cover the image front and back with translucent liquid sculpey.  This will serve 2 purposes:  1.  It will adhere the image to the clay.  2.  It will seal the image, which is important when you are adding the resin later.  After baking, you can buff and use the pendant as is, or you can dome resin on the top.  I used envirotex lite for this.  I learned a couple of things about resin this time around:  our basement flooded with all of this rain, so I was running a dehumidifier in my studio.  That, combined with turning on a space heater, really got rid of the air bubble problem I so often have with resin.  It really is as temperature sensitive as the instructions claim.  Who knew?!  My resin has never looked so great.
To attach the pendant, I drilled a hole after the resin cured for 3 days, using my dremel.  Then just place a jump ring and attach to necklace of your choice.  I love how these turned out.

Thrifty Thursday Hop Week 23


Week 23 of Thrifty Thursday.  Creative doldrums today, so I am excited for you all to bring on the inspiration!
Look around and join the fun.  The idea is to link to your frugal post, whether it be a DIY, recipe, tip, coupon… if you like it, link it.  If you don’t have a thrifty post to link to, feel welcome to join the hop anyway, and link to your main blog.
Other stuff:
* Please follow Saved By Love Creations, your host!
*Grab my “Thrifty Thursday” button above and throw it on your lovely site.  Let’s grow this!
*I am hosting a Saved By Love Creations Pendant GIVEAWAY, here.  Make sure to check it out!  It ends 5/1.
*I will choose 2 participants to feature the following Thursday and to receive a free week of advertising on SBLC (under “love worthy sponosors’ in sidebar).   To receive the free ad week, you must have a button for your blog!  Please drop by and follow the features!  They are numbers 2 and 3 in the thumbnail list.  REMEMBER that to be chosen as a featured site, you must follow SBLC via GFC.
*Follow the blogs that are must reads, and please return the gesture by following those who follow you.  Leave a comment when you follow so that the blogger will know you are a new follower
*Leave me a comment and let me know you were here.  I love hearing from you.
*Scatter joy, and frugal tips.
*Have fun 🙂
*Stop by and say hello to Nikki and link up to Thrifty Thursdays…

Weekly Featured Blogs:

*Jessa Jill;  A lovely blog with a cute canvas accent tutorial and other inspiration!
*Mongs at My Thrifty Closet

mythriftycloset
Look at this beautiful necklace she made:

Stop by for home decor ideas and more from this new blog!

Now on to the hop…

New Technique: Resin Mold Pendants

Recently, I began making glass tile pendants, and have grown to love it.  I ordered more slides and am still waiting for them to arrive.  Over the weekend, I was playing with some clay, when I ran across this in my craft supplies:
Silicone ice cube molds.  The thought occurred to me that I could use them to make my own “glass” tiles for pendants with my graphic images.  I busted out the resin I use in my scrabble tile and bottle capjewelry.  Mixed it up and poured it into the ice cube tray.   
They turned out great.  A little cloudier than glass, but it gives the images a nice soft feel.  Some of them I poured to much resin, so they were very thick.  It was hard to tell how much I was pouring, and I wasn’t sure how thick to make them anyway.  Next time I will go for thin.  
I think the pendants turned out really cute! 
Privacy Policy