Archives for November 2010

Feature: Bloomington Handmade Market Artisan, Katie Vernon


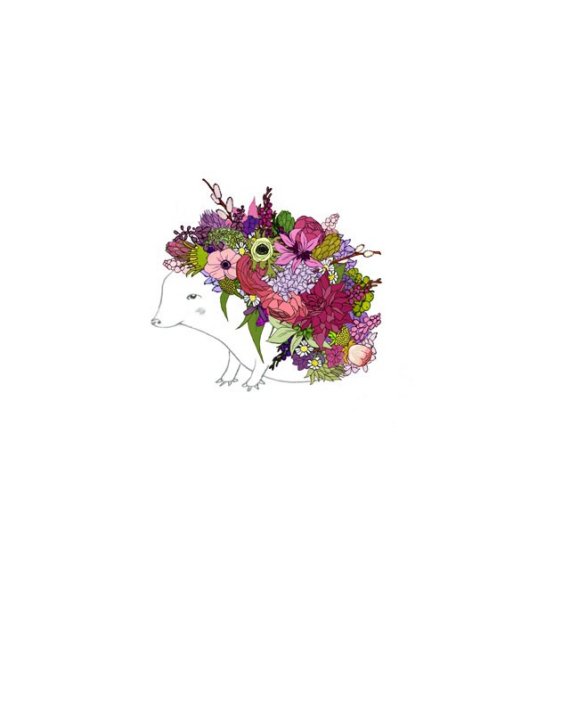
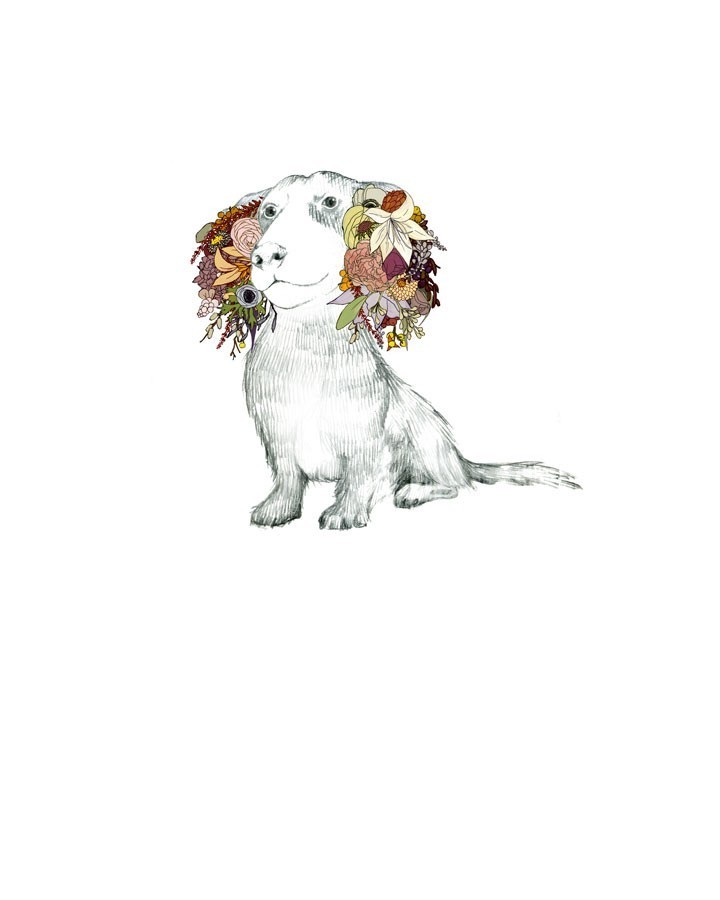
I was blessed to attend Bloomington Handmade Market this weekend, and it was almost more than I could handle. Such a wonderful variety of unique art, a handmade haven, it was. Everyone I met had work I was drooling over, and Katie Vernon was no exception. I fell in love with Katie’s illustrations immediately. As you can see, her work is beautifully, whimsically one of a kind. Her adoration of animals and nature shine with her organic florals unfolding from creature forms. She even does custom work, like the daschund and cat. I will most certainly be commissioning her to work her magic on my beagle and jack russell.
She was as delightful in person as I would expect the creator of this work to be, gladly explaining her techniques and inspiration. The hedgehog is so darn adorable, I may just flip out if I look at it one more time. Go here, to Katie’s base website, where you can read her bio and access her blog, ETSY store and Picasa album displaying more of her wonderful work. If you are buying Christmas gifts for the free spirited animal lover in your life (like me, for example… ahem, husband of mine… hint hint), Katie can take care of you – and she is way underpriced in my opinion!

Vinyl Wall Art Cut With Cricut;And a Freebie Cut File Download!


Still working on the nursery. I showed you the grass in this post, and provided the .svg cut file to use with Sure Cuts A lot and Cricut. That post also tells you where to get the 12×24 inch vinyl sheets. Now the palm trees… I had a problem cutting the trunks in segments to the right scale so that each piece aligned correctly. Since I wanted the trunks taller than 2 ft, and cricut’s max is 12×24 inches, I had to do these in pieces. In photoshop, it is a sinch to cut an object into pieces that will fit together, but I couldn’t figure out how to scale in SCAL. If you know, please, do tell! I didn’t obsess about it too much since the trunks are very simple and I knew I could just draw on the backing of the vinly sheet and cut with scissors.

The leaves were easier because I was able to fit each leaf on the 12×24 vinyl sheet. I designed them in photoshop, saved them as jpg and opened them in SCAL, scaling them to what I thought would look good. I knew I wanted 6 leaves per tree, so I made six leaf shapes and cut out 3 sets of the 6 since I was doing 3 trees.
Here are the 6 free downloadable files in one compressed download, or you can just choose individuals below…
6 Individual Palm Leaves:
Leaf 1 View Download
Leaf 2 View Download
Leaf 3 View Download
Leaf 4 View Download
Leaf 5 View Download
Leaf 6 View Download
There are 6 separate .svg leaf files, numbered 1-6. In the above pics, leaf one is the bottom left and they go in order clockwise. Or you can put them in any order you want. Go for it. Maybe you only want 5 leaves on your tree. Play around. Have fun. If you don’t have a Cricut, don’t miss out on your chance to win a free one by entering my Cricut Electronic Cutter Giveaway, here.
I will be posting much better pics once the nursery is completely finished. The best thing about this wall art is that it is super easily removable, and reposition-able. I am hooked. Enter the giveaway!!!

Cricut Giveaway Button

Speechless Sunday; My Babies

Cabinet Door Art Using Vinyl Cut Outs

cabinetDoorArt3So I found these cabinet doors for a couple of dollars each at my local Habitat for Humanity Restore a couple of months back. I wasn’t sure what I would do with them, but I knew something would happen if I brought them home. I have run across several projects using cupboard doors, and have made a chalkboard from one in the past (here).

After some black spray paint all over, I painted the inner rectangle with a few coats of folk art antique white acrylic paint. Once that was dry, I placed the black vinyl cutouts over the antique white. I smoothed out the air bubbles with a brayer.
This project evolved as I went. I didn’t have anything in mind when I started. I just wanted it to fit into my bedroom decor. After I put the vinyl on, I decided to add ribbon, so I drilled 2 holes in the top. I put one end of the ribbon into each hole from back to front of the door, tied a knot in the front, and pulled the slack back and up. The ribbons aren’t weight bearing. I hung the finshed pieces from nails using the lip on the back of the cabinets.

This is just another of the tons of projects you can create with the help of your Cricut Machine. You can custum design your vinyl cutouts to your liking. Don’t miss out on your chance to win your very own Cricut Create by entering my giveaway.

FREE Download: SVG Cricut Cut Files

Here is my first freebie SVG cricut cut file. I used 12×24 sheets of vinyl in dark green, which can be found here for $1.89 per 12×24 inch sheet. I just measured the room and figured out how many sheets to order to be able to cover the perimeter with the grass silhouette. Here is the downloadable file for you to use in Sure Cuts A lot to cut on your cricut. It will look like this…

You can scale it to your desired size in Sure Cuts A lot (SCAL). The left and right ends aren’t made to perfectly match when alternated around the room, but they lined up fine. It was pretty easy since there are so many blades of grass randomly protruding here and there. One thing to keep in mind… I cut mine at at height of 9 inches in 24 in long sheets. Being as detailed as the silhouette is, it took my Cricut Expression about 25 minutes to cut each 2 foot sheet. At 20 sheets to cover the room, this was timely, but TOTALLY worth it. I love the outcome.
What? Did you say you don’t have a cricut? So glad you mentioned that. It just so happens you can enter my Cricut Create Electronic Cutter giveaway. Just click the link below for details.
Cricut Giveaway Button

Fall Inspired Crockpot Dish: Apple Stuffed Chicken Breast

Wild rice with apples and cranberries make this chicken taste wonderful, and your kitchen smell like fall heaven.

I made this dish in response to my addiction to grilled chicken salad with warm diced apples and dried cranberries. It is all I want to eat these days. My stepdaughter and her dorm roommate come home on Sundays to do laundry and I usually make a slow cooker meal. I thought this sounded yummy, and I was right…

1.5 c wild rice, uncooked

2 cored apples (I used Gala because they were cheap that day), finely chopped

2 onions, finely chopped

3/4 c sweetened dried cranberries

3 c water

salt to taste

4-5 lbs boneless, skinless chicken breast

Combine rice, apples, onion and cranberries in slow cooker and pour water over top. Mix well. Place chicken breasts on top of rice mixture. Cover and cook on low for 8-9 hours. Should serve 10. We couldn’t pull that off. It was all gone in 2 days, and there were only 4 of us. I will definitely be using this recipe again. Sorry no pics of the dish; it vanished before I thought to whip out the camera.

Color Photos to Retro BW With Photoshop; And Free Canvas Print WIth Shipping

Whenever Shannon contacts me to do photo editing, I know it is going to turn into a blog post because her kids are crazy adorable. Today, she asked me to take color photos to black and white, leaving Madelyn’s flower pink. She is opting to take advantage of this offer over at Canvas People where you can get a free photo to canvas print when you pay shipping and handling.

I used photoshop to adjust the contrast, change to black and white, and to give the pics a retro feel. For the flower, I selected it before desaturating the pic, and made it into a new layer, which I blended of the black and white version using color mode. A whole bunch of stuff that only makes sense to you if you are familiar with photoshop. There are loads of tutorials out there. Play with your photos and get your free canvas print while you can.
I leave you with a yesterday’s wreath project, spray painted white, and photo edited…

Awesome Acorn Wreath; Thrifty and SOOOO Cute

AcornWhite2


I ran across this post by Dana at “Made”, and filed it under “To Do” right away. The following day, i scored a the above straw wreath at Goodwill for $0.99. It was meant to be. I went to the local dog park and found the perfect almond shaped acorns. Some of them I had to decapitate (remove their hats), but most of them were hatless.

I returned home with 2 plastic grocery bags a little over half way full. I tell you this because I had to go back for more acorns. Get them all. It takes more than it looks like it would.
I tossed them in the sink and washed them with dish detergent, rinsed, then put on a large cookie sheet and baked at 350 degrees for 15 minutes to rid them of any living beings (apparently maggots can happen if this step is skipped – Yuck). Then I haphazardly hot glued them all over the straw wreath (leaving out the back, so the wreath will lie flat against the wall). For the bow, I ripped a piece of fabric and… that is it. $0.99 plus time spent hunting acorns, plus strip of fabric and some hot glue action. Not bad! (Add a few dollars for some spray paint, which I had on hand).
Check out these beautiful spray painted versions Dana posted…

I love the look of these. I can’t wait to spray paint mine. I think I will stay with the natural color for awhile. Oh, who am I kidding, I will be making more. The wonderful thing about spray painting them is that they can be displayed all year round, not just holiday time. I am struck with a wreath obsession this year.
What are your wreath ideas? Post pics, please. I am inspired by you!!!
Privacy Policy