Archives for January 2010

Revamped Thrift Store Pic…

SONY DSC


Can you tell I found a lot of pics with potential during my thrifting adventures this week? Anyway…
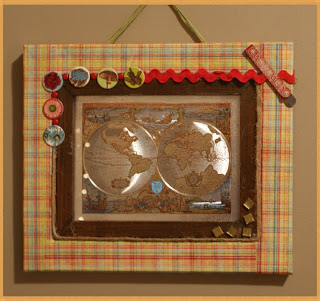
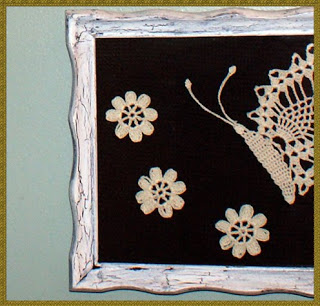
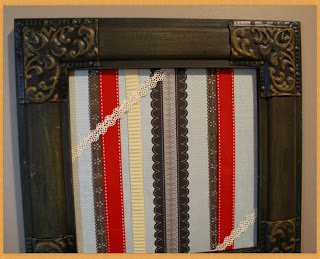
This was easy. I popped the picture out of the frame, adhered a piece of scrapbook paper onto it, using spray adhesive. Then I arranged borders and ribbons, dabbing a bit of hot glue to the ends folded over on the back of the pic.
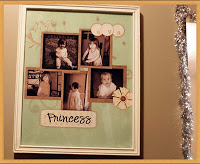
I am obsessed with scrapbook paper and embellishments at the moment. I plan to vintage -ize some family pics in photoshop, and slide a couple of them under the ribbons when I get a chance.
Also upcoming… I found the perfect old wood framed window from a project I have had my eye on for awhile. You can rest assured it, too, will involve scrapbook paper and some mod podge…
Blessings…

Thrift Store Pic Scrapbooking Paper Project

SONY DSC


I scored with my recent thrifting. Here is a pic of a map I picked up for $2. I used a gift card I was given for Hobby Lobby to get some fresh scrapbook pages in the color scheme I am adopting for my kitchen. I used some other embellishments I had laying around. Modge Podge and hot glue gun holds it all together. There you go. I love it. Quick, frugal, easy.
I heart comments.

Framed Crochet Butterflies

SONY DSC

I found these pics at a thrift store for $1.50 each. I was delighted. I didn’t take pics of them as they were when I bought them, but I didn’t have to change much. All I did was remove the green felt the butterflies were on and replace it with the brown fabric shown. I also redid the brown frames with antique white spray paint and crackle medium (covered in my earlier tutorial, here).
I, of course, also had to track down a pattern for these doily-ish butterflies. I found this awesome free pattern. How lovely. And the transformation symbolized by the butterfly always lifts my spirit, reminding me that God turns destruction into beauty.
Blessings,

Tip on Large Format Photo Prints


Before I started selling my art prints online, I had a local gallery wall. I would order prints myself, and frame them using second hand frames I had refinished.
During that time, I explored many different photo printing options. I still occasionally need this service. I have found 2 options to be high quality and frugal friendly…
1. Short Run Posters – This is an online service that prints 18×24 for $2 per print, with their logo branded on the back, or $4 without their logo. I always order with logo, since I framed the prints before selling them. The logo was small and only visible on the back of the print. At either price, these are obscenely cheap. I thought it was a joke, but have used this company several times, no problems. I have 3 of the prints hanging on my walls. They look great. A great option if you are not in a hurry, as it usually took about 8 days from order to arrival. There is also a flat fee for shipping of $10. They are based in Tennessee and use UPS for shipping.
2. Snapfish in Store pick-up – I pick up my prints at Meijer near my house. I upload the desired image, and an hour later I pick up my 16×20 inch prints for $6.97. The quality is great. This is perfect for when someone wants a project quickly. They have been behind before, but only a couple of hours, and they gave me a discount for waiting.
Let me know if you have questions. Or if you know of great large format printing options for the frugal minded. Comments make me happy…

Felted Knit Mushrooms…

My friend Megan is a mushroom farmer, so I always keep an eye out for mushroom crafts to whip up for her.

These are the felt mushrooms I made from a free pattern I found at kathrynivy.com.
They were fun to make, and fulfilled my need for instant gratifications, as they did not take long.
Also, they prompted me to explore needle felting (for the spots), a skill for which I now have many crafty plans.
Thanks Megan!

Beautify Thrift Store Picture Frame Antique Style

FinalCrackleFrame

(Final Product!!)

This is the process I use for most framing projects. I find a cheap framed pic at Goodwill, yard sales… I prefer wooden frames, as my options are open in terms of revamping. I can stain, or paint. My artwork to be framed was 16×20, so I was armed with a tape measurer. I went into this knowing I wanted to create an antique white frame for the collage of Princess Ava I showcased in the previous post.
  • I removed the artwork from the frame
  • Sanded frame lightly with sandpaper, and wiped clean with damp cloth
  • Painted with white acrylic paint using paintbrush (I only did one coat, as the original frame was light wood. If you need to recoat for coverage, let first coat dry completely)
  • While this was drying, I cleaned the glass with Windex
  • After about 1 hour, I applied crackle medium and let dry for 2 hours. (I applied a thin layer of crackle medium, as I didn’t want a very drastic crackle)
  • Once dry, I sprayed a coat of Rustoleum clear coat finish for protection.
  • Placed the glass, my collage, and the picture’s original backing and that is all

Scrapbook Photo Collage Using Photoshop…

This is the first time I have used scrapbook digital downloads for a photoshop project. I down load this awesome vintage set from Shabby Princess. SO cute.

If you are familiar with photoshop layers, you will have no problem creating one of these on your own.
I took the each original pic, adjusted color to sepia and used a grunge frame brush in black in new layer above. Used “transform” to adjust each frame to fit pic, then merged each frame layer to its pic. Below each framed pic layer, I placed and sized the brown paper from the pack. After merging the brown paper with each framed pic, I created a custom shadow for each pic – I selected pixels of each framed pic layer, created a new layer below, and filled selection with brown. Then I added gaussian blur at px 29.
Below all layers I placed the green paper from the free download linked above. I painted the vines in a new layer above the gree using floral brushes, and placed the top left rose from the download as well. I made custom shadows using gaussian filter as described with pic layers. Lastly, I added torn paper edge, using Alien Skin Splat filter.
If you are not familiar with photoshop, you likely have no idea what I am talking about. The good news is that you can learn like I did. By doing countless hours of free online tutorials, getting frustrated at times, but sticking with it because you absolutely love it and have no other choice.
The princess Ava is my niece. My brother and sister in law are building a new house. I see this going will in Ava’s sage and pink bedroom. Off to find a frame. I am happy to answer questions…
Johnnie

Monday’s Mania

Ok. New tradition for my new blog. I know I said I wasn’t posting for a few days, but this is a nice break from trying to figure out HTML.
I am big on assigning tasks to weekdays beginning with the same letter. It started with “Trash Tuesday”, which helped me remember the pickup day in my new neighborhood. It has taken off from there, and was bound to find its way into my blogging. So, Monday’s post will be “Monday Mania” – a place for me to share whatever creative obsession lingers from the weekend. Enjoy!

1. Crochet Washcloths – Pictured above are the bathroom cloths I made over the weekend. I plan to use the color palate in the other pic, showing my project cotton yarn. I was inspired by this free pattern at lionbrand.com. You do have to register to get access to their patterns, which is free as well.
I opted for the much cheaper yarn (peaches and cream) which I got at wal mart for $1.27. I had never made crochet washcloths before, and never really cared to until I ran across this pattern. I have been using one to was my face and for makeup remover at night. It is actually quite soft, and a little more special since I made it myself.
If you have never crocheted, I highly recommend starting. There are tons of online tutorials to get you started, and this will be a quick, easy project to begin your new craft. I taught myself using Crochet Cabana, an amazing website loaded with in depth tutorials for novices. That was 6 years ago and I am rarely without hook in hand. I being able to make anything from afghans to mittens to cutie little amigurumi. Quite gratifying.
Let me know if you have questions!

Breaking from Posts for a few days…


So that I can learn to spruce up my page designs. I hope to return equipped with a fancy pants site. Thanks to those who have gone before me, and then left tips. I promise to give back in that same way, so stay tuned.

I leave you with my nephew, A.J. – who not only knows a really cool trick involving mentos and diet coke, but coordinates well with home decor (see pic).

Privacy Policy